UE ONE Series Installation & Maintenance Instructions Manual
Electronic pressure and temperature switches with "i am working" signal
Hide thumbs
Also See for ONE Series:
Advertisement
Quick Links
Please read all instructional literature carefully and thoroughly before starting. Refer to the final page for the listing of Recommended Practices, Liabilities and Warrantees.
GENERAL
One Series electronic switches utilize a ceramic pressure
Ω
sensor or 100
RTD to measure the process variable and
provide local alarm or shutdown actuation along with local
and remote system status indication. A unique IAW™ circuit
provides the local and remote indication of the output status
and the "health" of the product.
switching device allows for long switch life with no arcing or
contact wear, providing years of reliable operation.
local process and status indication, as well as a proprietary
remote status signal, provide a clear indication that the One
Series product is functioning properly.
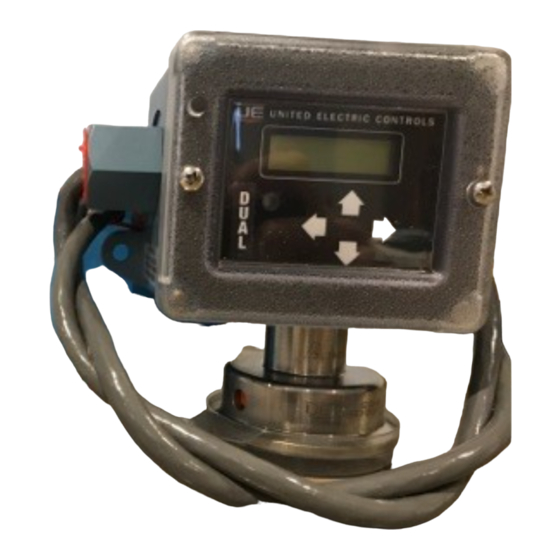
SIMPLE TO USE AS 1, 2, 3...
1. Mount the One Series using the process connection or
two mounting ears.
2. Wire the One Series using the convenient conduit
connection. Color coded lead wires or optional terminal
block allow field connections to be made in seconds.
3. Configure the One Series using the simple four key
keypad and helpful display prompts. Remove cover,
choose an
operating mode, set point and deadband. Replace
cover.
MOUNTING
FOR PRESSURE AND LOCAL TEMPERATURE
MODELS ALWAYS HOLD A WRENCH ON THE
HOUSING HEX WHEN MOUNTING UNIT.
NOT TIGHTEN BY TURNING
THIS WILL DAMAGE THE CONNECTION BETWEEN
THE SENSOR AND HOUSING.
INSTALL UNITS WHERE SHOCK, VIBRATION
AND
TEMPERATURE
MINIMAL.
ORIENT
MOISTURE FROM ENTERING ENCLOSURE. IT
IS IMPERATIVE TO USE PROPERLY RATED SEALING
FITTINGS FOR ELECTRICAL WIRE ENTRY. DO NOT
MOUNT
UNIT
IN
EXCEEDING PUBLISHED LIMITS. THIS IS ESPECIALLY
CRITICAL FOR LOCAL MOUNT TEMPERATURE UNITS.
ONE SERIES
Electronic Pressure and
Temperature Switches
with "I AM WORKING" Signal
An internal solid-state
1 1/16" wrench for hex fitting
Screwdriver for mounting screws
2 mounting screws (1/4" Max.)
ENCLOSURE.
FLUCTUATIONS
UNIT
TO
PREVENT
AMBIENT
TEMPERATURES
The One Series product may be mounted in any position
providing the electrical conduit connection is not facing up.
See Diagrams 1 and 2. Ensure the process connection is
sealed to the process port to prevent leakage.
Process Connections
PRESSURE MODELS
To pipe mount. Thread the pressure connection onto the
The
pressure port. Use a wrench on the hex pressure connection
to tighten.
VIBRATION APPLICATIONS, DO NOT MOUNT VIA THE
PRESSURE CONNECTION ONLY.
LOCAL TEMPERATURE MODELS
For immersion sensing.
recommended
preservation of the system integrity.
housing (0.25 diameter) into the well, insuring that the
housing bottoms out and will be completely immersed in the
media (1.5" min.). Secure the sensor using an appropriately
sized compression fitting. Test for leaks. IN HIGH SHOCK
AND VIBRATION APPLICATIONS, DO NOT MOUNT VIA
THE PROCESS CONNECTION ONLY.
For ambient sensing. Mount using the mounting ears on the
electronics housing. Mount the product to ensure that the
sensor housing will not be damaged and where the
measured temperature is representative of the surrounding
environment.
Tools
REMOTE TEMPERATURE MODELS
For surface sensing. Secure the 2½" sensor housing to the
pipe or vessel using an adhesive or strapping method
suitable for the application.
For immersion sensing.
DO
recommended
preservation of the system integrity.
housing (0.25 diameter) into the well ensuring that the
housing bottoms out and will be completely immersed in the
media (2.5" min.) Secure the sensor using an appropriately
sized union connector. Test for leaks.
ARE
For best temperature measurements, the sensor housing
must be in full contact with the surface or media being
measured.
representative of the system. Minimum insertion depth is
2½".
1
UNITED ELECTRIC
CONTROLS
Installation & Maintenance
Instructions
Test for leaks.
IN HIGH SHOCK AND
Use of a thermowell is highly
to
aid
in
maintenance,
Use of a thermowell is highly
to
aid
in
maintenance,
Locate where the temperature is most
IM1-02
testing
and
Insert the sensor
testing
and
Insert the sensor
Advertisement

Related Manuals for UE ONE Series


Summary of Contents for UE ONE Series
- Page 1 Please read all instructional literature carefully and thoroughly before starting. Refer to the final page for the listing of Recommended Practices, Liabilities and Warrantees. GENERAL The One Series product may be mounted in any position providing the electrical conduit connection is not facing up.
- Page 2 Mount the unit using the two (2) ¼” clearance holes on mounting ears. Plumb sensor to the process port. The One Series 100 mA open drain IAW™ output is a “sinking” output which completes the circuit to the circuit common.
- Page 3 For Models B & C, the terminal is marked 4 - 20 The Negative (-) lead of the output device must return to the One Series circuit common connection. The One Series 4 to 20 mA output may also be connected to a logic solver. See Diagram 13.
-
Page 4: Theory Of Operation
ON or OFF to initiate an alarm or shutdown sequence. point of measurement. The switched output is designed as a See Setting of User Parameters - Set Point. fail-safe-open circuit so that if the One Series loses power the • The DEADBAND setting determines the difference above output will open. - Page 5 ð ð UNIT #/SERIAL # Shifts the cursor Right signal flash when the output energizes or de-energizes. To simplify set-up, the One Series is programmed to configure • A single press of a key displays the appropriate parameter. the switch output status, LED and IAW™ status, and...
- Page 6 NOTE: If the product remains in the EDIT mode, and there is NOTE: If there is no keypad activity for approximately 4 no keypad activity for approximately 30 seconds, the unit returns seconds, to the normal operating mode and new data is NOT saved. the unit returns to normal operation.
-
Page 7: Control Mode
Deadband -/+ Extreme Values The - Extreme and + Extreme are the minimum and maximum The DEADBAND value is the difference, in units, between when the switched output energizes and de-energizes. The process values (lowest and highest) sensed by the product. DEADBAND operation will change based on the selected This provides a snapshot of process variations since the last SWITCH MODE to be either positive (above) or negative... - Page 8 Diagram 1 Single Enclosure Version (no terminal block or solid-state relay) Diagram 2 Dual Enclosure Version (for terminal block and solid-state relay options) Diagram 3...
- Page 9 Sensor Dimensions All dimensions shown in inches (millimeters) Local Mount Low Temperature High Temperature Pressure Sensor Remote Remote High Temperature Version Local Mount Versions Remote Mount Versions Model DIM "L" (FT.) Model DIM "L" (IN.) Model DIM "L" (FT.) Diagram 4 Diagram 5...
- Page 10 Diagram 6 Diagram 7 Diagram 8...
- Page 11 Diagram 9 Diagram 10 Diagram 11 Diagram 12...
- Page 12 Diagram 13...
- Page 13 12 months after installation by buyer but not to exceed 18 months after delivery by the seller. UE shall not be obligated under this warranty for alleged defects which examination discloses are due to tampering, misuse, neglect, improper storage, and in any case where products are disassembled by anyone other than authorized UE representatives.
Need help?
Do you have a question about the ONE Series and is the answer not in the manual?
Questions and answers