Mercado Medic REAL 6100 PLUS User Manual
With linx control system
Hide thumbs
Also See for REAL 6100 PLUS:
- Instructions for use manual (76 pages) ,
- Operating and maintenance instructions manual (24 pages) ,
- Instructions for use and maintenance manual (20 pages)

Subscribe to Our Youtube Channel
Related Manuals for Mercado Medic REAL 6100 PLUS


Summary of Contents for Mercado Medic REAL 6100 PLUS
- Page 1 REAL 6100 PLUS ® with LiNX control system User manual Doc. no: 20-06923-UK Created: 2020-03-09 Instructions for use and care Revision: 01 Updated: 2020-12-04...
- Page 2 REAL® 6100 PLUS with LiNX control system The REAL 6100 PLUS is a Class I medical device. It is CE marked in PDF versions of our instructions for use and care with magnification options accordance with the Swedish Medical Products Agency’s code of statutes can be found on our website: www.mercado.se.
-
Page 3: Table Of Contents
REAL® 6100 PLUS with LiNX control system Table of Contents 1. Important information ....4 10. Reconditioning & Service ... 20 10.1. -
Page 4: Important Information
Warning! Metal surfaces may become very hot if they are exposed to direct sunlight. The chair must not be equipped with any accessories or components other than those approved by Mercado Medic AB. Repairs and other technical measures may only be carried out by personnel authorised by Mercado Medic AB. -
Page 5: Expected Service Life
After the expected service life, assessment above. Mercado Medic AB cannot guarantee the suitability and safety of the product, as Mercado Medic AB has After the expected service life, Mercado Medic AB no control over how the product has been used and cannot guarantee the provision of spare parts. -
Page 6: Before Use
REAL® 6100 PLUS with LiNX control system 4. Before use • All knobs and locking levers must be tightened on • Fold down the footplate, 8.2 & 8.3. the chair before use. If play or other deviations are • Install the backrest support post. See section 8.7. detected, report this to the responsible technical •... -
Page 7: Technical Information And Dimensions
Charging time ............approx. 6–8 hours Chargers tested and approved by Mercado Medic AB ..... ECB-401 Easy Buddy 4A Batteries tested and approved by Mercado Medic AB . -
Page 8: Transfers
REAL® 6100 PLUS with LiNX control system 7. Transfers 7.1. Transferring to and from the chair Please note: Always ask your dealer for advice on the most suitable technique for transferring to and from the chair, from the front or the side. What best suits you and your needs and thus carries the least risk of injury. Transfers to and from the chair must only take place on a flat surface. -
Page 9: Your Real 6100 Plus
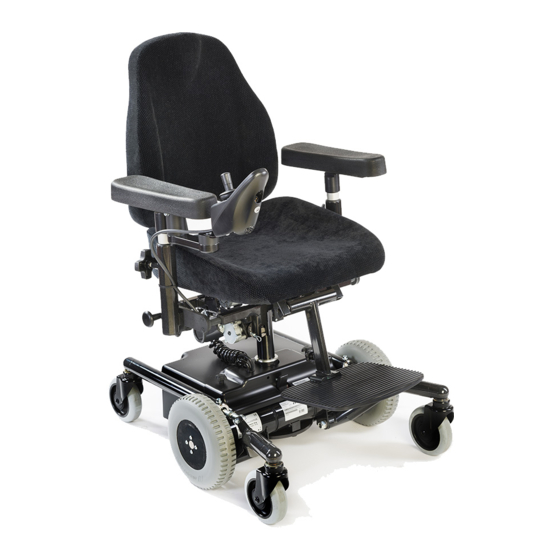
REAL® 6100 PLUS with LiNX control system 8. Your REAL 6100 PLUS ® 1. Backrest adjustable in height, angle and depth. 2. Armrests adjustable in width and height. 3. Control unit (also controls electrical seat functions). 4. Seat adjustable in height. Seat tilt is available as an accessory. -
Page 10: Setup & Use
REAL® 6100 PLUS with LiNX control system 9. Setup & use 9.1. Armrests Controls The user can adjust the height and width of the armrests. If the chair has foldable armrests, these can also be folded backwards. 1. Height. To adjust the height of an armrest, loosen the knob (1). - Page 11 REAL® 6100 PLUS with LiNX control system Backrest mechanisms, cont. Controls, Standard 1. Height. To adjust the height of the backrest, loosen the knob (1). Press or pull the backrest to the desired height. 2. Backrest mechanism angle. To adjust the angle Standard of the backrest mechanism, loosen the lever (2).
-
Page 12: Transport Services
REAL® 6100 PLUS with LiNX control system Backrest mechanisms, cont. Controls, EL 1. Height. To adjust the height of the backrest, loosen the knob (1). Press or pull the backrest to the desired height. 2. Backrest angle. To adjust the angle of the backrest, loosen the lever (3). -
Page 13: Reversed Tilt Or Backward Seat Tilt Only
REAL® 6100 PLUS with LiNX control system 9.6. Reversed tilt or Backward seat tilt only (option) Controls 1. Armrests placed here follow the seat tilt. 2. Armrests placed here do not follow the seat tilt. 3. There are 3 positions. If using position 3, the chair must be equipped with base extenders. -
Page 14: Adjusting The Position Of The Control Unit
REAL® 6100 PLUS with LiNX control system 9.8. Adjusting the position of the control unit The control unit can be adjusted in depth and width. To adjust the depth, remove the screw (1) using a 5 mm Allen key and a 10 mm ring spanner. Move the control arm to the desired position (three possible) and then refit the screw. -
Page 15: Control Unit Linx Rem211
REAL® 6100 PLUS with LiNX control system 9.11. Control unit LiNX REM211 Operation: Driving Operation: Seat unit Turn on the power button (1). Check the battery level For raising/lowering the seat unit or the electric seat indicator (7). The battery level indicator should have tilt/backrest angle or leg support angle. -
Page 16: Linx Keypad
REAL® 6100 PLUS with LiNX control system 9.12. LiNX keypad The LiNX keypad provides direct 1. Backrest tilt access to the electrical functions of the seat unit without exiting the 2. Seat height drive program in the control unit. 3. Electric leg support, Left The keypad is located between the control unit and the armrest as 4. - Page 17 REAL® 6100 PLUS with LiNX control system Control Unit LiNX REM400, cont. To brake, release the joystick (3) so that it comes to rest in the neutral position (centre), or turn the joystick in the opposite direction of the direction of travel for faster braking. Remember that the braking distance is affected by the slope of the surface underneath the chair.
-
Page 18: Charging
REAL® 6100 PLUS with LiNX control system 9.14. Charging The EC-Buddy is equipped with protection against the 3. The green LED (4) flashes during charging. The following: charger becomes warm during charging. This is perfectly normal. There is protection against •... -
Page 19: Sealed Lead/Acid Batteries
REAL® 6100 PLUS with LiNX control system Charging, cont. Care & supervision Connection diagram for charging jack • Turn off the vehicle when it is not in use. • Before each charge, check that Interlock Förregla cables and connectors are not Battery + •... -
Page 20: Reconditioning & Service
REAL® 6100 PLUS with LiNX control system Reconditioning & Service 10.1. Indication of malfunction Each fault of the LiNX will be indicated by flashes on the control unit indicator light at the On/Off switch. These come in groups of 1–7 flashes at an interval of 2 seconds. The number of flashes indicates the fault that has occurred. The electric wheelchair will stop automatically in the event of any serious faults that affect driving safety. -
Page 21: Plus
REAL® 6100 PLUS with LiNX control system 10.3. Troubleshooting & actions, REAL 6100 PLUS Fault Cause Action Control unit Control unit broken Reprogramme/Replace Control unit Cabling broken Replace Control unit Battery Replace Freewheel mechanism Wheels are not moving Check freewheel mechanism... -
Page 22: Reconditioning Instructions: Checkpoints
… 1.1. Electronics/function/cleaning electric lifting mechanism can be damaged. Check the function of the Connect to the LiNX Electronics and sent to Mercado Medic AB for repair/ actuator’s moving parts. Ensure that all check active errors. Save the program reconditioning. - Page 23 Bundle program for the … 8.4. Backrest/replacement/ REAL 6100 PLUS LiNX so that all 7. Seat frame cleaning devices in the system receive the … 7.1. Mechanics/welds Replace the backrest with a new one latest version of the software.
-
Page 24: Instructions For Destruction
Gas spring for seat tilt (0.3 kg) Covers are sorted for disposal Gas piston (3.2 kg) in accordance with markings Other metal parts in products on the plastic. If there is sold by Mercado Medic AB no marking, sort these as combustible.
Need help?
Do you have a question about the REAL 6100 PLUS and is the answer not in the manual?
Questions and answers