Mercado Medic Real 6100 Plus Operating And Maintenance Instructions Manual
Hide thumbs
Also See for Real 6100 Plus:
- Instructions for use manual (76 pages) ,
- User manual (24 pages) ,
- Instructions for use and maintenance manual (20 pages)
Table of Contents
Advertisement
Quick Links
REAL 6100 PLUS is an electrically powered indoor wheelchair for children and adults with various disabilities, as well as for
their personal assistants or close relatives. Sufficient competence in the safe use of this product is achieved after reading
through and understanding these operating and maintenance instructions. Alternatively, the user can receive a review of all
functions and adjustment possibilities of his/her own wheelchair. The REAL chair, according to the model designations speci-
fied below, is CE certified in accordance with the MPA Regulations LVFS 2003:11 for medical devices. REAL 6100 PLUS
meets all requirements of EN 12184:2014, class A. All textiles meet the requirements of EN 1021-1, EN 1021-2.
For those of you with impaired vision, a PDF version of these operating and maintenance instructions with disposal options is
available at
www.mercado.se
that can be installed on your REAL 6100 PLUS. Under "Nyheter" (News) you will find the latest product news from Mercado
as well as information about any safety notices to the market or recalls of products and accessories.
GET ACQUAINTED WITH YOUR REAL 6100 PLUS - PLEASE READ CAREFULLY THESE
OPERATING AND MAINTENANCE INSTRUCTIONS AS WELL AS THE USER MANUAL
BEFORE USING THE WHEELCHAIR.
OPERATING AND MAINTENANCE INSTRUCTIONS
REAL 6100 PLUS
under "Dokument" (Documents). Here, you will also find information on all available accessories
TABLE OF CONTENTS
TROUBLESHOOTING SHARK CONTROLLER PAGE 19
TROUBLESHOOTING DX2 CONTROLLER PAGE 21
Article No
805009
Amended
30/04/2019
Valid from
01/12/2011
PAGE 2
PAGE 3
PAGE 6
PAGE 11
PAGE 12
PAGE 13
PAGE 14
PAGE 15
PAGE 16
PAGE 18
PAGE 22
PAGE 23
PAGE 23
PAGE 23
PAGE 24
Advertisement
Table of Contents
Troubleshooting

Subscribe to Our Youtube Channel
Related Manuals for Mercado Medic Real 6100 Plus


Summary of Contents for Mercado Medic Real 6100 Plus
-
Page 1: Table Of Contents
"Dokument” (Documents). Here, you will also find information on all available accessories that can be installed on your REAL 6100 PLUS. Under "Nyheter” (News) you will find the latest product news from Mercado as well as information about any safety notices to the market or recalls of products and accessories. -
Page 2: Technical Data
The leg support may not touch the floor or the ground at any time. • If REAL 6100 PLUS is equipped with a belt or a harness of any kind, it may not hang loosely on the wheelchair. • Fold up the armrests. -
Page 3: Important Information
• This symbol warns against the risk of crushing and about positions/situations where we point to risks: • If REAL 6100 PLUS is equipped with leg rests, the user's feet must be held on the foot plate when using the electric functions. - Page 4 1. Remove dirt, crumbs and the like. grease. Apply touch-up lacquer using Mercado's black touch-up 2. Apply a thin layer of foam and rub it in paint, Article No 801900. TECHNICAL DATA AND REAL 6100 PLUS DIMENSIONS TECHNICAL DATA STANDARD DIMENSIONS, CONT. Max. user weight...
-
Page 5: Getting In And Out Of The Wheelchair
GETTING IN AND OUT OF THE WHEELCHAIR GETTING IN AND OUT OF THE WHEELCHAIR Things to consider: Always consult your coordinator about the most suitable technique for getting to and out of the wheelchair, from the front or from the side. Consider what best suits you and your needs and thus poses the least risk of injury. -
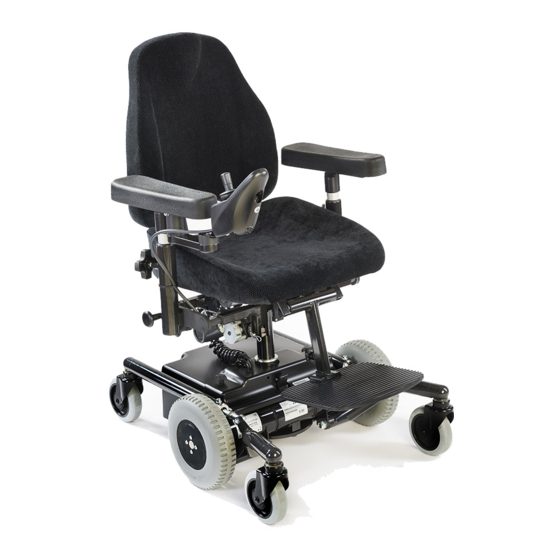
Page 6: User Manual
YOUR REAL 6100 PLUS 1. Backrest with adjustable height, angle and depth. 2. Armrest with adjustable width and height. 3. Controller (also controls the electric seat functions). 4. Seat with adjustable height Seat tilt available as accessory. 5. Driving wheels, puncture-free 6. - Page 7 ARMREST The user can adjust the armrests in height and width. CONTROLS If the wheelchair has folding armrests, they can also be 1. Height To adjust the armrest height, loosen knob (1). Pull/ folded backwards. push the armrest to the desired height. Tighten the knob. 2.
- Page 8 TRANSPORTATION SERVICE When transporting , the user must The chair is not adapted to sit in during REAL 6100 PLUS move over to the dedicated vehicle seat. During transportation, transport service or the like. transportation, the wheelchair must be equipped with transport loops and must be anchored to the vehicle using straps.
- Page 9 SEAT TILT THERE ARE THREE TYPES OF SEAT TILT: CONTROLS Gas spring, crank control and electric tilt. 1. Gas spring under armrest The gas spring controls are located under one of the 2. Gas spring under seat. armrests (1) alternatively, under the right rear edge of 3.
-
Page 10: Controller
FOOTPLATE The height and the angle of the footplate can be CONTROLS adjusted. 1. Height To adjust the height of the footplate, loosen screw (1). Push or pull the footplate to the desired height 2. Leg support angle The leg support angle can be adjusted to four positions. -
Page 11: Shark
CONTROL PANEL, SHARK CONTROLLER DRIVING LOCKING THE SHARK CONTROLLER Press the main switch (1). Check the battery level (4). When the controller is on, hold the power button (1) The battery level should not be down at the red mark for four seconds. -
Page 12: Dx-Remg90A
CONTROL PANEL, DX-REMG90A DRIVING DRIVING push the joystick (5). The time interval for automatic shut-down is adjustable. Horn: press button (8). Press the main switch (1). Check the battery level (4). The battery level should not be down at the red mark LOCK FUNCTION (see “Charging”). -
Page 13: Dx2-Rem421
CONTROL PANEL, DX2-REM421 OPERATION DRIVING LOCKING Press the main switch (1). Check the battery level (4). DX2-REM421 CONTROLLER The battery level indicator should not be down at the When the controller is on, hold the power button (1) red mark (see "Charging"). Make sure the controller for four seconds. -
Page 14: Dx2-Rem550
CONTROL PANEL, DX2-REM550 OPERATION DRIVING it. Adjusting the seat angle: move the joystick (5) forwards to tilt the seat forwards, and backwards to tilt Press the main switch (1). Check the battery level (4). The battery should not be down at the red mark (see it backwards. -
Page 15: Linx Rem211
CONTROL PANEL, LINX REM211 OPERATION DRIVING SEAT UNIT OPERATION Press the main switch (1). Check the battery level To raise/lower the seat unit or to manage the electric indicator (7). The battery level should have at least seat tilt, backrest angle or footplate angle. Navigate 2 bars lit, if only 1 red marking is lit, the wheelchair up/down the option buttons (3) to see the electric must be charged (see "Charging"). -
Page 16: Linx Rem400
CONTROL PANEL, LINX KEYPAD OPERATION With the LiNX keypad you get direct 1. Backrest tilt access to the seat unit's electrical functions 2. Seat height without exiting the driving program in the 3. Electric leg support, left controller. 4. Electric leg support, By default, the keypad is placed between right/centre-mounted 5. - Page 17 CONTROL PANEL, LINX REM400 OPERATION To brake, release the joystick (3) so that it ends up in neutral position (in the middle), or alternatively, pull the joystick in the direction opposite the direction of travel for faster braking. Remember that the braking distance is affected by the inclination of the surface on which the wheelchair is moving.
-
Page 18: Charging And Chargers
CHARGING ECB-401 4A 24V EC-Buddy is equipped with protection against the following: to ensure that they are not damaged or worn out. If • Incorrect polarity they are, the charger must be replaced immediately. • Short circuiting of battery cables •... -
Page 19: Troubleshooting Shark Controller
SEALED LEAD/ACID BATTERIES – CHARGING RECOMMENDATIONS CHARGING/DISCHARGING LONG-TERM STORAGE • Charge for 12 hours before the first use. Disconnect the batteries if the wheelchair is not be • After that, charge after each discharge, even if the battery used for a long period of time. This is done with the is not completely depleted. - Page 20 Check by pulling moistened with hot water or alcohol. Do not use out the M1 connector and measuring the resistance solvents. Only use agents approved by Mercado Medic between the inner pins (2 and 3), to detect breakage Normally, there are no parts in the system that or short-circuiting.
-
Page 21: Troubleshooting Dx2 Controller
SERVICE AND MAINTENANCE OF DX/DX2 CONTROLLER ERROR MESSAGE IN CASE OF In case of less serious errors, the electronics can BREAKDOWN switch to backup driving mode. This means that the Each DX error will be indicated by flashing of the electrical wheelchair can still operate, but all speed controller LED near the on/off power switch The variables will be reduced. -
Page 22: Troubleshooting Real 6100 Plus
DX system. This error caused by many types of problems. The DX system cannot occur on an electric wheelchair in operation. will, if possible, switch to standby mode. SERVICE AND TROUBLESHOOTING, REAL 6100 PLUS SYMPTOM CAUSE ACTION... -
Page 23: Service/Reconditioning List
CHECKLIST SERVICE/RECONDITIONING, REAL 6100 PLUS 1. ELECTRONICS UNIT 6. FREEWHEEL MECHANISM 11. UPHOLSTERY ACCESSORIES 1. controller/function/ cleaning 1. function 1. headrest 2. trunk support 2. Tam/Clam – left side or seat 2. attachments/tightening 3. side support ... -
Page 24: Individual Adjustment
CE marking for Mercado Medic AB. If an article that is not on the list of current combination agreements is to be installed, the customer's authorised personnel must contact Mercado Medic AB for a written approval.
Need help?
Do you have a question about the Real 6100 Plus and is the answer not in the manual?
Questions and answers