Table of Contents
Advertisement
Available languages
Available languages
Quick Links
Kurzanleitung
GPS Drohne GeNii Mini RtF
Best.-Nr. 2280967
Best.-Nr. 2282654 Super Combo
Quick Start Guide
GPS Drone GeNii Mini RtF
Item No. 2280967
Item No. 2282654 Super Combo
WARNUNG
Vor dem Gebrauch unbedingt die Sicherheitshin-
weise lesen!
WARNING
Read the safety instructions before using the
product!
Advertisement
Chapters
Table of Contents

Related Manuals for Reely GeNii Mini RtF


Summary of Contents for Reely GeNii Mini RtF
- Page 1 Kurzanleitung GPS Drohne GeNii Mini RtF Best.-Nr. 2280967 Best.-Nr. 2282654 Super Combo Quick Start Guide GPS Drone GeNii Mini RtF Item No. 2280967 Item No. 2282654 Super Combo WARNUNG Vor dem Gebrauch unbedingt die Sicherheitshin- weise lesen! WARNING Read the safety instructions before using the...
-
Page 2: Table Of Contents
Inhaltsverzeichnis Einführung ................................3 Lieferumfang ................................3 Bestimmungsgemäße Verwendung ........................4 Teilebezeichnungen .............................5 4.1 Fluggerät ................................5 4.2 Fernsteuerung ...............................6 Smartphone-Halter installieren ..........................7 Bedienelemente ..............................8 6.1 Modus 2 .................................8 6.2 Modus 1 .................................8 6.3 Zwischen den Modi umschalten (Modus 1/2) ....................8 Vor dem Flug ...............................9 7.1 Einführung ..............................9 7.2 Flugakku aufladen ............................9 7.3 Aufladen der Fernsteuerung ........................10... -
Page 3: Einführung
1. Einführung Sehr geehrte Kundin, sehr geehrter Kunde, wir bedanken uns für den Kauf dieses Produkts. Dieses Produkt erfüllt die gesetzlichen nationalen und europäischen Anforderungen. Um diesen Zustand zu erhalten und einen sicheren Betrieb zu gewährleisten, müssen Sie als Anwender diese Be- dienungsanleitung beachten! Bei technischen Fragen wenden Sie sich bitte an: Deutschland: www.conrad.de... -
Page 4: Bestimmungsgemäße Verwendung
3. Bestimmungsgemäße Verwendung Bei diesem Produkt handelt es sich um einen flugbereiten, ferngesteuerten Quadrocopter mit Kamera. Das Produkt ist für Personen geeignet, die das 16. Lebensjahr bereits erreicht haben. Die Steuerung dieses Geräts ist mit der Fernbedienung oder mit der mobilen App möglich. Die Echtzeitanzeige von Flugdaten übernimmt die mobile App. -
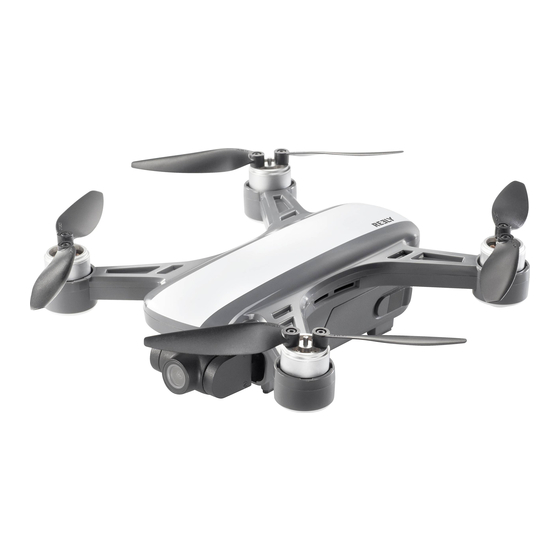
Page 5: Teilebezeichnungen
4. Teilebezeichnungen 4.1 Fluggerät 1 Propeller 6 Ein-/Aus-Tastschalter 2 Gimbal-Kamera 7 Steckplatz für Speicherkarte 3 Flugstatus-Anzeigeleuchte 8 Micro USB-Schnittstelle (nur für Hersteller) 4 Anzeigeleuchte für den optischen Positionierstatus 9 Fluggeräteakku 5 Motor... -
Page 6: Fernsteuerung
4.2 Fernsteuerung a Antenne f Linker Joystick k Smartphone-Halter b Taste Flugmodus g Rechter Joystick USB-Ladeanschluss c Taste Rückkehrfunktion h Ein-/Aus-Taste m Gimbal-Verstellung d Modusanzeige Taste Abheben/Landen e Statusanzeige Bild/Video... -
Page 7: Smartphone-Halter Installieren
5. Smartphone-Halter installieren Schritt 1 Schritt 2 Führen Sie den Halter in den Schacht auf der Rücksei- Ziehen Sie den Halter hoch. te der Fernsteuerung ein. Schritt 3 Schritt 4 Setzen Sie das Mobiltelefon in den Halter ein. Stellen Sie den Halter und das Mobiltelefon auf den richtigen Winkel ein. -
Page 8: Bedienelemente
6. Bedienelemente 6.1 Modus 2 Linker Joystick Aufsteigen Rechter Joystick Vorwärts Sinken Rückwärts Linksdrehung Rechtsdrehung Links Rechts 6.2 Modus 1 Rechter Joystick Aufsteigen Linker Joystick Vorwärts Sinken Rückwärts Links Rechts Linksdrehung Rechtsdrehung 6.3 Zwischen den Modi umschalten (Modus 1/2) 1. Aktivieren des Moduswechsels: - Modus 2: Bewegen Sie den linken Joystick auf die unterste Position und drücken Sie gleichzeitig die Taste <Abheben/Landen>. -
Page 9: Vor Dem Flug
7. Vor dem Flug 7.1 Einführung Bei den folgenden Erläuterungen wird davon ausgegangen, dass Sie das Fluggerät mit der Fernsteuerung bedienen. Das Fluggerät kann auch über die mobile App gesteuert werden (Einzelheiten dazu stehen in der ausführlichen Bedienungsanleitung). In wenigen Schritten machen Sie das Fluggerät flugbereit: 1. -
Page 10: Aufladen Der Fernsteuerung
7.3 Aufladen der Fernsteuerung Anzeigelampe USB-Ladekabel Netzsteckdose USB-Adapter Anzeigen Grün blinkendes Licht (Akku wird geladen) Grün leuchtendes Dauerlicht (Akku ist vollständig geladen) 7.4 Einsetzen (und Entfernen) des Flugakkus Einsetzen Entfernen Schieben Sie den Akku in das Akkufach, bis er einrastet. Entriegeln Sie den Akku und nehmen Sie ihn heraus. -
Page 11: Einschalten Und Initialisieren Des Fluggeräts
7.5 Einschalten und Initialisieren des Fluggeräts WARNUNG Schalten Sie immer zuerst die Fernsteuerung und erst danach das Fluggerät ein, um Unfällen vorzubeugen. 1. Stellen Sie das Fluggerät auf einen flachen Untergrund. 2. Schalten Sie die Fernsteuerung ein. Halten Sie die Taste <Ein/Aus> 2 Sekunden lang gedrückt (Abb. A). 3. -
Page 12: Optional) Verbinden Der Mobilen App Mit Der Fernsteuerung
7.6 (Optional) Verbinden der mobilen App mit der Fernsteuerung 7.6.1 Einführung • Mit der mobilen App können Sie Echtzeit-Bilder und Videoaufzeichnungen und den Flugstatus des Fluggeräts kontrollieren. • Wenn die Fernsteuerung zur Fluggerätesteuerung eingesetzt wird, beschränkt sich der Funktionsumfang der mo- bilen App auf: - Fotos oder Videos aufzeichnen. -
Page 13: Fliegen
8. Fliegen 8.1 Einführung Bei den folgenden Erläuterungen wird davon ausgegangen, dass Sie das Fluggerät mit der Fernsteuerung bedienen. Das Fluggerät kann auch über die mobile App gesteuert werden (Einzelheiten dazu stehen in der ausführlichen Bedienungsanleitung). Die wichtigsten Funktionen: • Sie können manuell abheben und landen oder dazu das Eintastenprogramm benutzen. •... -
Page 14: Landen
8.3 Landen ACHTUNG Verhindern Sie Beschädigung: • Suchen Sie sich als Landepunkt einen offenen und flachen Bereich aus. • Achten Sie auf Hindernisse und stellen Sie vor dem Landen sicher, dass das Fluggerät über dem Lan- depunkt schwebt. VORSICHT Halten Sie sich nach dem Landen solange vom Fluggerät fern, bis sich die Propeller nicht mehr drehen. 8.3.1 Landen mit dem Eintastenprogramm Halten Sie dazu die Taste <Abheben/Landen>... -
Page 15: Flugmodi
9. Flugmodi Bei den folgenden Erläuterungen wird davon ausgegangen, dass Sie das Fluggerät mit der Fernsteuerung bedienen. Das Fluggerät kann auch über die mobile App gesteuert werden (Einzelheiten dazu stehen in der ausführlichen Bedienungsanleitung). 9.1 Positionsflugmodus Dieser Modus eignet sich für Einsteigerpiloten. Für einen exakten Schwebeflug, eine intelligente Verfolgung und für weitere Assistenzfunktionen wird GPS eingesetzt. -
Page 16: Return-To-Home (Startpositionsrückkehr)
9.3 Return-To-Home (Startpositionsrückkehr) 9.3.1 Einführung Die Return-To-Home (Startpositionsrückkehr) ist kein Flugmodus sondern eine Flugassistenzfunktion: Sie steuert das Fluggerät automatisch zur Basis zurück. Wenn sich das Fluggerät im Positionsflugmodus befindet, gibt es folgende Möglichkeit, um Return-To-Home zu aktivieren: • Durch den Pilot: Das Fluggerät kehrt automatisch zur Basis zurück. Diese Funktion ist nützlich, wenn Sie die Kontrolle über das Fluggerät verlieren oder das Fluggerät außer Sicht ist. -
Page 17: Fotos Und Videos
10. Fotos und Videos 10.1 Fotos aufnehmen und Videos aufzeichnen ACHTUNG Verhindern Sie Beschädigung: • Achten Sie darauf, dass sich die Kamera frei drehen kann. • Die Einwirkung hoher Temperaturen kann die Kamera beschädigen und sogar Verletzungen hervorrufen. Video Foto Drücken Sie kurz die Taste zum Aufnehmen von Fotos und halten Sie die Taste... -
Page 18: Technische Daten
11. Technische Daten 11.1 Allgemein Frequenz ............5180 – 5240 MHz, 5745 – 5825 MHz Sendeleistung ...........<14 dBm Reichweite ............Sender: max. 300 m (Sichtfeld) Wi-Fi: max. 100 m 11.2 Quadrocopter Abmessungen ...........148 x 145 x 60 mm (L x B x H) Rotordurchmesser ..........120 mm Funktionen ............ -
Page 19: Sender
11.3 Sender Abmessungen ...........150 x 97 x 64 mm (L x B x H) Gewicht .............202 g Verbauter Akku ..........Li-Ion, 3,7 V, 2600 mAh, 9,62 Wh 11.4 Flugakku Typ ..............Li-Ion 3S, 11,4 V, 1000 mAh Speicherbare Strommenge .......11,4 Wh Ladedauer ............90 min Gewicht .............82 g 11.5 Akku-Ladegerät (für Flugakku) Eingangsspannung/-strom ........5 V/DC, 2 A... - Page 20 Table of contents Introduction ................................21 Delivery content ..............................21 Intended use ..............................22 Know the components ............................23 4.1 Aircraft ................................23 4.2 Remote controller ............................24 Installing the mobile support ..........................25 Controls ................................26 6.1 Mode 2 .................................26 6.2 Mode 1 .................................26 6.3 Switching modes (mode 1 / mode 2) ......................26 7. Before flying ...............................27 7.1 Introduction ..............................27 7.2 Charging the aircraft battery ........................27...
-
Page 21: Introduction
1. Introduction Dear customer, Thank you for purchasing this product. This product complies with the statutory national and European requirements. To maintain this status and to ensure safe operation, you as the user must observe these operating instructions! If there are any technical questions, please contact: www.conrad.com/contact 2. -
Page 22: Intended Use
3. Intended use The product is a ready to fly remote controlled quadcopter with camera. It is suitable for persons aged 16 years or older. The product can be controlled with the remote controller or with the mobile app. Use the mobile app to display real time flight data. It can be used indoors and outdoors under moderate wind conditions. Contact with moisture must be avoided under all circumstances. -
Page 23: Know The Components
4. Know the components 4.1 Aircraft 1 Propeller 6 Power button 2 Gimbal Camera 7 Memory Card Slot 3 Flight Status Indicator Light 8 Micro USB Interface (for manufacturer only) 4 Optical Positioning Status Indicator Light 9 Aircraft Battery 5 Motor... -
Page 24: Remote Controller
4.2 Remote controller a Antenna f Left Joystick k Mobile Phone Bracket b Flight Mode Switch g Right Joystick USB Charge Port c One Key Return h Power m Gimbal Adjustment d Mode Indicator One Key Take Off/Land e Status Indicator Picture/Video... -
Page 25: Installing The Mobile Support
5. Installing the mobile support Step 1 Step 2 Install the mobile phone holder in the slot of the back Pull the holder up. of the remote controller. Step 3 Step 4 Put the mobile device on the mobile holder. Adjust holder and mobile phone to the right angle. -
Page 26: Controls
6. Controls 6.1 Mode 2 Ascend Left Joystick Right Joystick Forward Descend Backward Left Rotation Right Rotation Left Right 6.2 Mode 1 Right Joystick Ascend Left Joystick Forward Descend Backward Left Right Left Rotation Right Rotation 6.3 Switching modes (mode 1 / mode 2) 1. -
Page 27: Before Flying
7. Before flying 7.1 Introduction This section assumes you will control the aircraft with the remote controller. The aircraft can also be controlled through the mobile application (refer to the full operating instructions for details). You can get the aircraft ready for flight in a few steps: 1. Charge the flight battery and the remote controller battery. 2. Install the flight battery. 3. -
Page 28: Charging The Remote Controller
7.3 Charging the remote controller Indicator Light USB charging cable Household power socket USB adapter Indications Blinking green light (Charging) Solid green light (Battery fully charged) 7.4 Installing (and removing) the flight battery Installing Removing Push the battery into the battery compartment until it Unlock the battery and pull it out. -
Page 29: Powering On And Initializing The Aircraft
7.5 Powering on and initializing the aircraft WARNING Always power on the remote controller before you turn on the aircraft to prevent accidents. 1. Put the aircraft on a flat surface. 2. Power on the remote controller. Hold down the <Power> button for 2 seconds (Fig. A). 3. -
Page 30: Optional) Linking Mobile App And Remote Controller
7.6 (Optional) Linking mobile app and remote controller 7.6.1 Introduction • Use the mobile app to monitor the real-time image and video footages and the flight status of the aircraft. • When the remote controller is used to control the aircraft, the mobile app functionality is limited to: - Taking photos or videos. - Features: Follow me, Point of interest, Waypoint 7.6.2 Linking Requirements •... -
Page 31: Flying
8. Flying 8.1 Introduction This section assumes you will control the aircraft with the remote controller. The aircraft can also be controlled through the mobile application (refer to the full operating instructions for details). Important features: • You can take off and land manually or by using the one-key program. •... -
Page 32: Landing
8.3 Landing NOTICE Prevent product damage: • Choose an open and flat space as your landing site. • Be aware of obstacles and ensure the aircraft is hovering over the landing site before landing. CAUTION After landing, stay away from the aircraft until the propellers have stopped rotating to avoid injury. 8.3.1 Landing via the one-key program Hold down the <One Key Takeoff/Land>... -
Page 33: Flight Modes
9. Flight modes This section assumes you will control the aircraft with the remote controller. The aircraft can also be controlled through the mobile application (refer to the full operating instructions for details). 9.1 Position flight mode This mode is suitable for beginner pilots. It uses GPS to achieve accurate hovering, intelligent following and other assistance features. -
Page 34: Return-To-Home
9.3 Return-To-Home 9.3.1 Introduction Return-To-Home is not a flight mode but a flight assistance feature: it returns the aircraft to base automatically. When the aircraft operates in Position Flight Mode, Return-To-Home can be activated in two ways: • By the pilot: the aircrafts returns to base automatically. This is useful in case you lose control or sight of the aircraft. •... -
Page 35: Photo And Video
10. Photo and video 10.1 Taking pictures and recording videos NOTICE Prevent product damage: • Ensure the camera can rotate freely. • Exposure to high temperatures can damage the camera and even cause injury. Video Photo Short press the button to take photos and long press to take videos. -
Page 36: Technical Data
11. Technical data 11.1 General Transmission frequency range ......5180 – 5240 MHz, 5745 – 5825 MHz Transmission power..........<14 dBm Transmission distance ........Remote controller: max. 300 m (line of sight) Wi-Fi: max. 100 m 11.2 Copter Dimension ............148 x 145 x 60 mm (L x W x H) Main rotor diameter ..........120 mm Function ............ -
Page 37: Flight Battery
11.4 Flight battery Type ..............Li-ion 3S, 11.4 V, 1000 mAh Rated energy ............11.4 Wh Charging time ...........90 min Weight ..............82 g 11.5 Balance charger (for drone battery charging) Input voltage/current .........5 V/DC, 2 A Output voltage ..........4.35 V/DC, 0.7 A x 3 11.6 App Name ..............GeNii Mini Operating system .......... - Page 40 Dies ist eine Publikation der Conrad Electronic SE, Klaus-Conrad-Str. 1, D-92240 Hirschau (www.conrad.com). Alle Rechte einschließlich Übersetzung vorbehalten. Reproduktionen jeder Art, z. B. Fotokopie, Mikroverfilmung, oder die Erfassung in elektronischen Datenverarbeitungsanlagen, bedürfen der schriftlichen Genehmigung des Herausgebers. Nachdruck, auch auszugsweise, verboten. Die Publikation entspricht dem technischen Stand bei Drucklegung. Copyright 2020 by Conrad Electronic SE.
Need help?
Do you have a question about the GeNii Mini RtF and is the answer not in the manual?
Questions and answers