Advertisement
Quick Links
THULI TABLES
500 Stationary Owner's Manual
Table of Contents
Introduction . . . . . . . . . . . . . . . . . . . . . . . . . 2
Identification of Parts . . . . . . . . . . . . . . . 3 - 4
Table Assembly . . . . . . . . . . . . . . . . . . . . . . 5
Headpiece Operation . . . . . . . . . . . . . . . . 6 - 8
Table Operation . . . . . . . . . . . . . . . . . . . 9 - 12
office@ thulita b les.co m
youtube.com/thulit ables
facebook.com/thu litab les
Accessories . . . . . . . . . . . . . . . . . . . . . . . . 13
Care & Maintenance . . . . . . . . . . . . . . . 14-15
Warranty . . . . . . . . . . . . . . . . . . . . . . . . . . . 16
Overview of Products . . . . . . . . . . . . . . Back
800-458-4854
www.thulitables.com
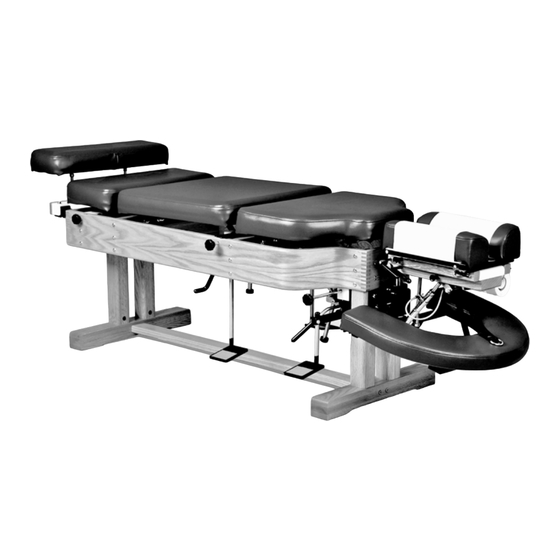
Crescent Arm Rest
(optional)
Advertisement

Related Manuals for Thuli Tables 500 Stationary


Summary of Contents for Thuli Tables 500 Stationary
-
Page 1: Table Of Contents
THULI TABLES youtube.com/thulit ables facebook.com/thu litab les 500 Stationary Owner’s Manual Crescent Arm Rest (optional) Table of Contents Introduction ......2 Accessories . -
Page 2: Introduction
Introduction Thank you for your purchase of a 500 Stationary table. We are pleased to provide you with an aesthically beautiful chiropractic adjusting table that is versatile and precisely engineered. It has been thoroughly inspected and tested right down to the smallest detail before leaving our shop. -
Page 3: Identification Of Parts
Identification of Parts Fixed Section Ankle Rest Pelvic Section Thoracic Section Extension / Elevation Pelvic Tension Thoracic Tension Control Knob Control Knob Headpiece Ankle Rest Extension Locking Knob Pelvic Lowering Lever Crescent Arm Rest (optional) Thoracic Lowering Foot Cocking Pedal Lever... - Page 4 Identification of Headpiece Parts Tension Control Knob (back side) Paper Tear-Off Bar Paper Hold-Down Wire Straight Drop / Forward Pivot Block Motion Knob Cocking Lever Slide Block T-Bar Paper Hanger Remote Control Lever Piston Pin Locking Link Adjustable Buckle for Remote Control Cable Prone Arm Rest Flexion / Extension...
- Page 5 Table Assembly Your table is easy to set up and operate. In order to protect the headpiece and ankle rest extension during shipment, they have been packaged together in a separate box from the table. A wrench is provided for table assembly, and the accompanying set up instructions will assist you.
-
Page 6: Headpiece Operation
Headpiece Operation HEADPIECE PAPER 1. Install a standard 8.5” roll of headpiece 4. To advance the headpiece paper, raise 5. To tear off used headpiece paper, use paper, as shown. the tear-off bar, hold your finger on the an upward motion while holding down 2. - Page 7 Headpiece Operation STRAIGHT DROP FORWARD MOTION DROP Knob pulled out PRIOR to cocking Knob pushed in PRIOR to cocking PRIOR to cocking the headpiece, set for PRIOR to cocking the headpiece, set for straight drop by pulling out the headpiece forward motion drop by pushing in the head- straight drop/forward motion knob until piece straight drop/forward motion knob.
- Page 8 Headpiece & Ankle Rest Operation IMPORTANT VERTICAL LOWERING Advise your patient before changing the position of the headpiece. This is especially important when lowering the back end of the headpiece (step 2). Failure to gently lower the back end of the headpiece may result in its sudden drop, causing possible alarm to the patient.
- Page 9 Table Operation HEADPIECE CUSHIONS: ADJUSTABLE WIDTH The headpiece cushions are easily adjustable in width for individualized patient comfort. Firmly pull up on the front end of each headpiece cushion and move in (one or two notches) or out (one or two notches) to desired position. Secure cushions by engaging locating pins into notches provided.
- Page 10 Table Operation THORACIC DROP SETTING THE DROP TENSION When using the thoracic drop, position the patient sufficiently The thoracic and pelvic drops cock by stepping down on the forward with their arms outstretched and wrists resting on foot cocking pedals. Advise your patient of your intentions the prone arm rest.
- Page 11 Table Operation THORACIC SECTION: RAISING THORACIC SECTION: LOWERING The cephalad end of the thoracic section can be raised to a height IMPORTANT: Before lowering the thoracic from a raised of 0”- 9.5” from horizontal, which translates to an angle of 0 - 30 position, advise your patient of your intention.
- Page 12 Table Operation PELVIC SECTION: RAISING PELVIC SECTION: LOWERING The cephalad end of the pelvic section can be raised to a Before lowering the pelvic section from a raised position, advise height of 0”-6 1/2” from horizontal, which translates to an your patient of your intention.
-
Page 13: Accessories
Accessories COMFORT PILLOW The Velcro on the underside of the pillow secures it to the base, Comfort Pillow allowing for width Pillow adjustability. Base The Comfort Pillow offers Rotate the Comfort Pillow 180 The base of the Comfort Pillow inserts into place degrees to provide cervical massage quality comfort in the between the headpiece cushions. -
Page 14: Care & Maintenance
Care & Maintenance DROP MECHANISMS: CLEANING & LUBRICATION Periodic lubrication of the drop mechanisms will ensure smooth, crisp drops. Apply 3-IN-ONE oil every month or 500 adjustments. If the drops have not been lubricated on a regular basis, first apply WD-40 to clean the plungers from dust & debris. See below. 3-IN-ONE OIL Use 3-IN-ONE oil for routine lubrication of the drops. - Page 15 3. Water Rinse: It is important to follow cleaning with a thorough, clear water rinse to minimize premature deterioration of the vinyl extended exposure to chemicals. REPLACEMENT VINYL: In the event of wear or damage, pre-sewn replacement vinyl is available from Thuli Tables.
-
Page 16: Warranty
Warranty Our tables are designed and built to high standards and we are proud to offer a limited lifetime warranty against manufacturing defects. This warranty is valid to the original owner and only if the table has not been altered in any way. It does not cover issues caused by normal wear and tear, which naturally and inevitably occur as a result of normal use over time, or damage caused by accidents, improper use and negligence. - Page 18 Junior Portable Tour Portable Sport Portable 300 Stationary 500 Stationary Elevation Tables Lumbo-Pelvic Drop 800.458.4854 608.935.9300 Portable www.thulitables.com Extremity Drop Headpiece office@thulitables.com Speeder Board youtube.com/thulitables facebook.com/thulitables Portable Drops...
Need help?
Do you have a question about the 500 Stationary and is the answer not in the manual?
Questions and answers