
Subscribe to Our Youtube Channel
Related Manuals for Joy-it RB-LCD16x2


Summary of Contents for Joy-it RB-LCD16x2
- Page 1 LCD Display 20x4 with Buttons LCD Display 16x2 with Buttons Published: 22.08.2019 Copyright by Joy-IT...
- Page 2 LCD Display 20x4 with Buttons Index Connecting the Display Installing the System Usage & Example-Code 3.1. RB-LCD16x2 - Version 1 3.2. RB-LCD16x2-V2 Support Published: 22.08.2019 Copyright by Joy-IT...
-
Page 3: Connecting The Display
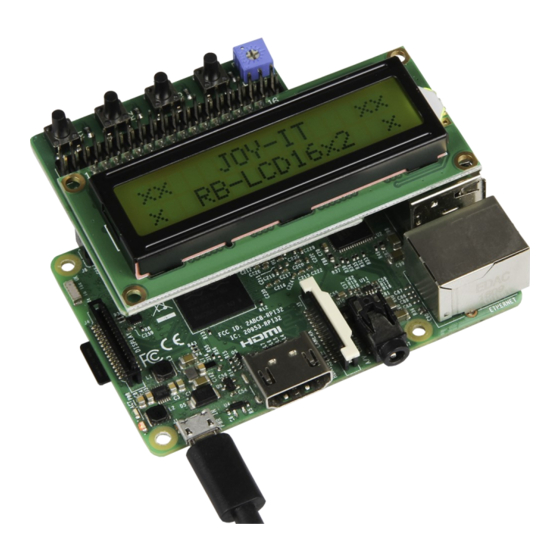
Plug the display onto the pin header of your Raspberry Pi so that the display is placed over your Raspberry Pi. As soon as you power your Raspberry Pi, the displays backlight should start to light. Published: 22.08.2019 Copyright by Joy-IT... -
Page 4: Installing The System
Install the latest Raspbian-System-Image to your SD-Card. You can download the image here. Transfer the image with a suitable program (e.g. Etcher). You can insert the SD-Card to your Raspberry Pi and start the system when the transfer progress is complete. Published: 22.08.2019 Copyright by Joy-IT... - Page 5 LCD Display 20x4 with Buttons Verwendung & Code-Beispiel Before using our RB-LCD16x2 you need to determine which version you own. The following two pictures show you how to recognize this. RB LCD16x2 Continued from page 6 16x2 RB-LCD16x2 Version 2 Continued from page 10 Published: 22.08.2019...
- Page 6 LCD Display 20x4 with Buttons 3.1. RB-LCD16x2 - Version 1 The display is ready for use after connection and requires no further installation. You may need to adjust the contrast manually before you can see an output on the display.
- Page 7 GPIO.setwarnings(False) lcdLine OUTPUTS: GPIO.setup(lcdLine, GPIO.OUT) switch INPUTS: GPIO.setup(switch, GPIO.IN, pull_up_down=GPIO.PUD_UP) CheckSwitches(): #Check status of all four switches on the LCD board val1 = GPIO.input(SW1) val2 = GPIO.input(SW2) val3 = GPIO.input(SW3) val4 = GPIO.input(SW4) return (val4,val1,val2,val3) Published: 22.08.2019 Copyright by Joy-IT...
- Page 8 SendByte(0x0C) #turn cursor off (0x0E to enable) SendByte(0x06) #shift cursor right SendByte(CLEARDISPLAY) #remove any stray characters on display ######################################################################## SendChar(ch): SendByte(ord(ch),True) ShowMessage(string): #Send string of characters to display at current cursor position character string: SendChar(character) Published: 22.08.2019 Copyright by Joy-IT...
- Page 9 # time.sleep(0.2) You can save the file with the keyboard shortcut CTRL + O and exit the editor with CTRL + X. You can then execute the file with the following command: sudo python lcd16x2-V1.py Published: 22.08.2019 Copyright by Joy-IT...
- Page 10 LCD Display 20x4 with Buttons 3.2. RB-LCD16x2-V2 To get the display up and running, you must first install a library for the display. You can do this in the console with the following command: sudo pip install adafruit-charlcd It may be necessary to manually adjust the contrast before you can see an output on the display.
- Page 11 Then you have to select the option "I2C": You have to confirm the next message with Yes and then you can leave the settings on "Finish". I2C is now successfully activated, now the display can be used. Published: 22.08.2019 Copyright by Joy-IT...
- Page 12 RB-LCDV2 Test xx\n 1234567890') You can save the file with the keyboard shortcut CTRL + O and exit the editor with CTRL + X. You can then execute the file with the following command: sudo python lcd16x2-V2.py Published: 22.08.2019 Copyright by Joy-IT...
- Page 13 If there are any questions left or if you encounter any problems, please feel free to contact us by mail, phone or by our ticket-supportsystem on our website. E-Mail: service@joy-it.net Ticket-System: http://support.joy-it.net Phone: +49 (0)2845 98469 – 66 (11- 18 Uhr) Please visit our website for more informations: www.joy-it.net Published: 22.08.2019 Copyright by Joy-IT...
Need help?
Do you have a question about the RB-LCD16x2 and is the answer not in the manual?
Questions and answers