Advertisement
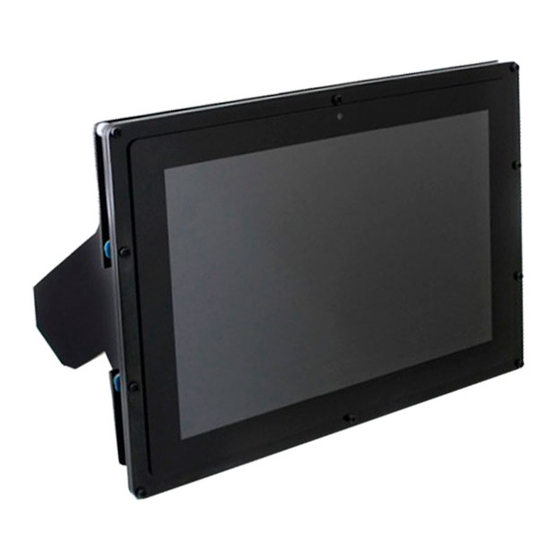
10,1 " LCD DISPLAY VERSION B
RB-LCD-10B
1. GENERAL INFORMATION
Dear customer,
Thank you for purchasing our product. In the following, we will show you
which things should be noted during the use.
Should you encounter any unexpected problems, do not hesitate to
contact us.
www.joy-it.net
Pascalstr. 8 47506 Neukirchen-Vluyn
Advertisement
Table of Contents

Related Manuals for Joy-it RB-LCD-10B


Summary of Contents for Joy-it RB-LCD-10B
- Page 1 10,1 " LCD DISPLAY VERSION B RB-LCD-10B 1. GENERAL INFORMATION Dear customer, Thank you for purchasing our product. In the following, we will show you which things should be noted during the use. Should you encounter any unexpected problems, do not hesitate to contact us.
-
Page 2: Mounting Bracket
Afterwards, you can put the feet on the board by lifting the board. Make sure that the leg with the larger cut-out is placed on the side with the connectors. www.joy-it.net Pascalstr. 8 47506 Neukirchen-Vluyn... - Page 3 Note that the numbers on the cover represent the different single board computers compatible with the display. After you put the spacers you removed earlier, back on the board, put the cover plate back on the board and fasten the screws. www.joy-it.net Pascalstr. 8 47506 Neukirchen-Vluyn...
-
Page 4: Device Connection
Touching it executes the left-key action of the mouse and holding your finger down executes the right-key action. (You can use also the backlight backlight adjustment button of the screen with the , please note the marked position in the following image). www.joy-it.net Pascalstr. 8 47506 Neukirchen-Vluyn... -
Page 5: Installation
1280 800 60 6 0 0 0 Note The memory size of your microSD card should be more than 4 GB. In this operation, you will also need a microSD card reader, which must be purchased separately. www.joy-it.net Pascalstr. 8 47506 Neukirchen-Vluyn... - Page 6 As soon as the file has been copied, you have to edit the touch function: sudo nano /etc/X11/xorg.conf.d/40-libinput.conf You will now have a preconfigured file open. You must enter a new command under the entry Identifier "libinput tocuhscreeen catchall" , which is marked in the following picture. www.joy-it.net Pascalstr. 8 47506 Neukirchen-Vluyn...
- Page 7 If you want to have the initial state, you simply remove the command. As soon as you are finished, the Raspberry Pi must be restarted. It should then restart with the setting you have set. sudo reboot www.joy-it.net Pascalstr. 8 47506 Neukirchen-Vluyn...
- Page 8 Raspberry Pi to the power supply and then switch on the Pi. backlight (Now you can adjust the backlight of the LCD with the adjustment button . See the marking in the following picture.) www.joy-it.net Pascalstr. 8 47506 Neukirchen-Vluyn...
- Page 9 Compared to the Banana Pi, the BananaPi Pro has an additional WiFi mo- dule. If you have a BananaPi Pro, you can use SSH to connect it. The following command can be used to load the WiFi drivers: sudo modprobe ap6210 www.joy-it.net Pascalstr. 8 47506 Neukirchen-Vluyn...
-
Page 10: Other Information
We will send you a parcel stamp with which you can send us your old appliance free of charge. For this possibility, please contact us via e-mail at service@joy-it.net or via telephone. Information about Package: Please package your old appliance safe for transport. Should you not...
Need help?
Do you have a question about the RB-LCD-10B and is the answer not in the manual?
Questions and answers