Table of Contents
Advertisement
OPERATING INSTRUCTIONS
INSTRUCCIONES DE MANEJO
MODE D'EMPLOI
WARNING
TO REDUCE THE RISK OF FIRE OR
ELECTRIC SHOCK, DO NOT EXPOSE
THIS APPLIANCE TO RAIN OR
MOISTURE.
Español
FR-A560
RADIO RECEIVER
RECEPTOR DE RADIO
OWNER'S RECORD
For your convenience, record the model number and the serial
number (you will find it in the battery compartment of your set) in
the space provided below. Please refer to them when you
contact your Aiwa dealer in case of difficulty.
Model No.
Serial No.
FR-A560
U
Advertisement
Table of Contents

Related Manuals for Aiwa FR-A560


Summary of Contents for Aiwa FR-A560
-
Page 1: Operating Instructions
For your convenience, record the model number and the serial number (you will find it in the battery compartment of your set) in the space provided below. Please refer to them when you contact your Aiwa dealer in case of difficulty. Model No. FR-A560... -
Page 2: Installation
CAUTION RISK OF ELECTRIC SHOCK DO NOT OPEN “CAUTION:TO REDUCE THE RISK OF ELECTRIC SHOCK, DO NOT REMOVE COVER (OR BACK). NO USER-SERVICEABLE PARTS INSIDE. REFER SERVICING TO QUALIFIED SERVICE PERSONNEL.” The symbols are located on the bottom of cabinet. Explanation of Graphical Symbols: The lightning flash with arrowhead symbol, within an equilateral triangle, is... -
Page 3: Instrucciones Importantes De Seguridad
INSTRUCCIONES IMPORTANTES DE SEGURIDAD Lea cuidadosa y completamente el manual de instrucciones antes de utilizar la unidad. Asegúrese de guardar el manual de instrucciones para utilizarlo como referencia en el futuro. Todas las advertencias y precauciones del manual de instrucciones y de la unidad deberán cumplirse estrictamente, así... -
Page 4: Electric Power
English IMPORTANT SAFETY INSTRUCTION Portable cart — An appliance and cart combination should be moved with care. Quick stops, excessive force, and uneven surfaces may cause the appliance and cart combination to overturn. Ventilation — The unit should be situated with adequate space around it so that proper heat ventilation is assured. - Page 5 INSTRUCCIONES IMPORTANTES DE SEGURIDAD Carrito portátil — La combinación de un aparato y un carrito deberá moverse con cuidado. Las paradas repentinas, la fuerza excesiva, y las superficies desniveladas podrían hacer que la unidad y la combinación se cayese. Ventilación — La unidad deberá colocarse solamente donde tenga espacio adecuado a su alrededor para asegurar su ventilación adecuada.
-
Page 6: Maintenance
English IMPORTANT SAFETY INSTRUCTION Grounding or Polarization — This unit is provided with a polarized alternating-current line plug (a plug having one blade wider than the other). This plug will fit into the power outlet only one way. This is a safety feature. If you are unable to insert the plug fully into the outlet, try reversing the plug. - Page 7 INSTRUCCIONES IMPORTANTES DE SEGURIDAD Puesta a tierra o polarización — Esta unidad se suministra con un enchufe para tomacorriente de corriente alterna polarizado (una de las cuchillas es más ancha que la otra). Este enchufe solamente entrará en el tomacorriente de una forma.
-
Page 8: Damage Requiring Service
IMPORTANT SATETY INSTRUCTION Damage Requiring Service Unplug this unit from the wall outlet and refer servicing to qualified service personnel under the following conditions: 1) When the power cord or plug is damaged. 2) If liquid has been spilled, or objects have fallen into the unit. 3) If the unit has been exposed to rain or water. - Page 9 INSTRUCCIONES IMPORTANTES DE SEGURIDAD Daños que requieren el servicio de reparación Desconecte la unidad del tomacorriente de la red, y solicite los servicios de personal cualificado en las condiciones siguientes: 1) Cuando el cable de alimentación o el enchufe esté dañado. 2) Si dentro de la unidad ha entrado líquido u otros objetos.
-
Page 10: Backup Function
6F22 BACKUP FUNCTION If the AC power supply is interrupted, the clock display goes off and the alarm setting is canceled. To back up the clock and alarm, insert a 6F22 battery in the battery compartment on the rear of the unit. •... - Page 11 FUNCION DE RESPALDO Si se corta la fuente de corriente alterna, se apaga la indicación del reloj y se cancela la alarma. Para mantener el respaldo del reloj la alarma, instale una pila 6F22 en el portapilas en la parte trasera del aparato. •...
- Page 12 CLOCK SNOOZE SETTING THE CLOCK 1 Connect the AC power cord to a wall outlet a. The clock display begins flashing. 2 While holding down CLOCK, press UP or DOWN to set the clock. Using the UP button changes the time faster. 7:00 7:00 a.m.
-
Page 13: Ajuste Del Reloj
AJUSTE DEL RELOJ 1 Conecte el cable eléctrico en el tomacorriente de la pared a a. La pantalla del reloj empieza a destellar. 2 Mantenga el botón CLOCK oprimido y oprima UP o DOWN para ajustar la hora. Utilice el botón UP para cambiar la hora más rápidamente. 7:00 7:00 A.M. -
Page 14: Radio Reception
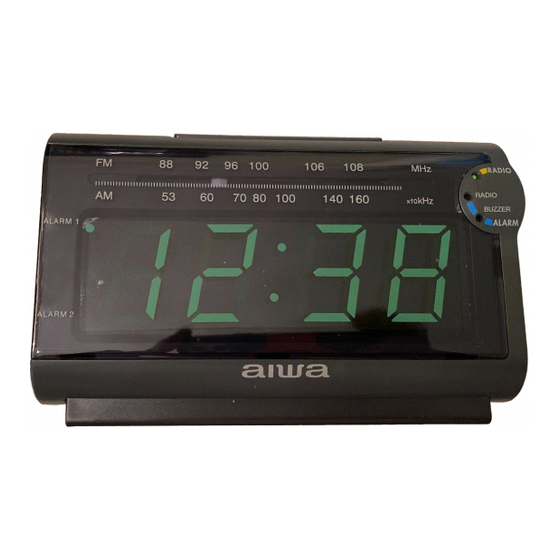
RADIO RECEPTION 1 Set POWER to RADIO ON. 2 Set BAND to select FM or AM. 3 Turn the TUNING control to tune in to a station. 4 Adjust the volume. To turn off the radio Set POWER to 6 STANDBY. For better reception FM: Extend the FM wire antenna fully. -
Page 15: Reception Radio
RECEPCION DE LA RADIO 1 Mueva el POWER a RADIO ON. 2 Mueva el BAND para seleccionar FM o AM. 3 Gire el control TUNING para sintonizar una emisora. 4 Ajuste el volumen. Para desconectar la radio Mueva el POWER a 6 STANDBY. Para una mejor recepción FM: Extienda completamente la antena de cable FM. -
Page 16: Alarm Setting
ALARM ALARM SETTING SLEEP OFF/ The radio or buzzer automatically sounds at the designated ALARM OFF time every day. You can set two different alarm times, one in ALARM 1 and one in ALARM 2, so that the alarm timer operates twice a day. 1 Set ALARM MODE to 1 or 2. -
Page 17: Ajuste De La Alarma
AJUSTE DE LA ALARMA La radio o la alarma suenan automáticamente a la hora especificada todos los días. Se pueden ajustar dos horas de alarma diferentes, una en la ALARM 1 y la otra en la ALARM 2 para que la alarma suene dos veces al día. - Page 18 ALARM SETTING To set the alarm timer to sound twice a day 1 Set two alarm times ALARM 1 and 2 respectively referring to steps 1 and 2 on page 16. 2 Set POWER to ALARM RADIO or ALARM BUZZER. 3 Set ALARM MODE to 1 + 2.
- Page 19 AJUSTE DE LA ALARMA Para ajustar la alarma para que suene dos veces al día 1 Ajuste dos horas de alarma en ALARM 1 y en 2 respectivamente refiriéndose a los pasos 1 y 2 de la página 17. 2 Mueva el POWER a ALARM RADIO o ALARM BUZZER. 3 Ajuste el ALARM MODE a 1 + 2.
-
Page 20: Sleep Timer Setting
SLEEP SLEEP TIMER SETTING You can use the sleep timer to turn the radio off automatically SLEEP OFF/ after up to 59 minutes. ALARM OFF • Before setting, tune in to a station (See page 14). 1 Set POWER to 6 STANDBY. 2 While holding down SLEEP, press UP or DOWN to set the time to turn off the radio. -
Page 21: Ajuste Del Temporizador Para Dormir
AJUSTE DEL TEMPORIZADOR PARA DORMIR Se puede utilizar el temporizador para dormir para desconectar automáticamente la radio después de 59 minutos. • Antes de este ajuste, sintonice una emisora (consulte la página 15). 1 Mueva el POWER a 6 STANDBY. 2 Mantenga oprimido SLEEP y oprima UP o DOWN para ajustar la hora de desconexión de la radio. -
Page 22: Specifications
SPECIFICATIONS Power source AC 120 V, 60 Hz Output 280 mW (EIAJ) Power consumption Speaker 57 mm, 8 ohms Frequency range FM: 87.5 – 108 MHz AM: 530 – 1,710 kHz Antennas FM wire antenna Ferrite bar antenna for AM Maximum outside dimensions 172.5 (W) 106 (H) 126 (D) mm Weight... -
Page 23: Especificaciones
ESPECIFICACIONES Fuente de alimentación CA de 120 V, 60 Hz Salida 280 mW (EIAJ) Consumo eléctrico Altavoz 57 mm, 8 ohmios Gama de frecuencias FM: 87,5 – 108 MHz AM: 530 – 1.710 kHz Antenas Antena de cable para FM Antena de barra de ferrita para Máximas dimensiones exteriores 172,5 (An.) - Page 24 CAUTION TO PREVENT ELECTRIC SHOCK DO NOT USE THIS (POLARIZED) PLUG WITH AN EXTENSION CORD, RECEPTACLE OR OTHER OUTLET UNLESS THE BLADES CAN BE FULLY INSERTED TO PREVENT BLADE EXPOSURE. CAUTION Modifications or adjustments to this product, which are not expressly approved by the manufacturer, may void the user’s right or authority to operate this product.
Need help?
Do you have a question about the FR-A560 and is the answer not in the manual?
Questions and answers