Table of Contents
Advertisement
Quick Links
Advertisement
Table of Contents

Subscribe to Our Youtube Channel
Related Manuals for Binary B-260-SWTCH-4X1


Summary of Contents for Binary B-260-SWTCH-4X1
- Page 1 4K HDR Switch with IR - 4x1 B-260-SWTCH-4X1 INSTALLATION GUIDE Source | M (HDMI O...
-
Page 3: Table Of Contents
CONTENTS Product Overview Features Package Contents Device Layout Front Back Installation Connections IR Receiver Connections IR Controller Connections RS-232 Control Connections Selecting a Switch Input Front Panel IR Control RS-232 Control Specifications Limited Warranty Support... -
Page 4: Product Overview
The B-260-SWTCH-4x1 Switch features HDMI 2 0 and HDCP 2 2 compatibility and supports resolutions up to 4K @ 60Hz 4:4:4 8 bit, enabling four Ultra HD sources to be switched to one... -
Page 5: Device Layout
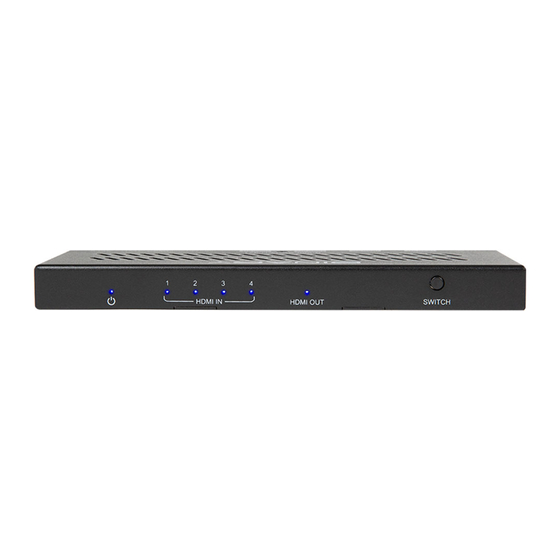
DEVICE LAYOUT Front A. Power LED On: Power on Off: Power off B. HDMI IN 1-4 LED On: The HDMI IN source is selected and active Off: The HDMI source is not selected or active C. HDMI OUT LED On: An HDMI display is connected to the switch Off: No HDMI display is not connected to the switch D. -
Page 6: Back
Back A. +12V DC Connect the provided 12V DC power supply’s cord and tighten it in place B. HDMI IN (1-4) Connect to the output of HDMI source(s) to the input(s) you require C. HDMI OUT Connect to the input of an HDMI display or other similar device D. -
Page 7: Installation
INSTALLATION The B-260-SWTCH-4x1 can be placed on a solid and stable surface, installed in an equipment rack, or mounted to a wall or distribution box When installed on a rack shelf, wall, or distribution box, we strongly recommend that the... -
Page 8: Ir Receiver Connections
IR Receiver Connections To control the switch with an IR receiver, set IR Receiver PWR to ON and connect an IR receiver (sold separately) to the IR EXT port IR receiver (sold separately) Set switch for IR Receiver PWR to ON IR remote IR Controller Connections To control the switch with an IR controller, set IR Receiver PWR to OFF and connect the IR... -
Page 9: Rs-232 Control Connections
RS-232 Control Connections To control the switch using RS-232, follow the below wiring diagram RS-232 device pins SELECTING A SWITCH INPUT Front Panel 1 Press the SWITCH button, on the front panel, to cycle through inputs... -
Page 10: Ir Control
IR Control The switch can be controlled via IR using the provided IR remote or using IR via a control system In order to use the included IR remote, an IR receiver must be purchased separately Buttons IR Codes Description ►... -
Page 11: Specifications
SPECIFICATIONS Technical x4 HDMI In x1 HDMI Out Connector Type x1 IR EXT x1 RS-232 (Phoenix-type connector) x1 DVC 12V In Input/Output Signal Type HDMI with 4K @ 60 Hz YUV 4:4:4, HDCP 2 2 Up to 4096x2160 @ 60Hz, including Input/Output Supported Resolution 4K @ 60 Hz / 4K @ 30 Hz/1080P/1080i/720p PCM 2 0/5 1/7 1, Dolby TrueHD, Dolby Atmos,... - Page 12 Wirepath Home Systems, LLC, dba “Control4” and/or dba “SnapAV” in the United States and/or other countries Snap AV and Binary are also registered trademarks or trademarks of Wirepath Home Systems, LLC Other names and brands may be claimed as the property of their respective owners.
Need help?
Do you have a question about the B-260-SWTCH-4X1 and is the answer not in the manual?
Questions and answers