Table of Contents
Advertisement
Quick Links
Advertisement
Table of Contents

Related Manuals for GANN HYDROMETTE BL LG 17


Summary of Contents for GANN HYDROMETTE BL LG 17
- Page 1 Version 1.0 Operating Manual HYDROMETTE® BL LG 17 Hydromette® BL LG 17...
-
Page 2: Table Of Contents
Table of Contents Publication Statement ............4 General Notes ..............5 WEEE Directive 2012/19/EU Law on Waste Electrical and Electronic Equipment ............6 Introduction ................7 Description................. 7 Device Layout and Button Assignment ......8 Display Symbols .............. 10 Basic Functions ..............11 Switching on the Device / Standby Mode ...... - Page 3 2.3.11 Minimum / Maximum Value Display....19 2.3.12 Memory Menu ............ 19 2.3.13 Measurement Mode Display ....... 20 2.3.14 Graph Measurement Mode ......... 20 2.3.15 Bar Measurement Mode ........21 2.3.16 Continuous Measurement Mode ......21 Other Functions ............... 22 2.4.1 Automatic Switch-off ...........
-
Page 4: Publication Statement
Regeltechnik GmbH. Subject technical documentary changes. All rights reserved. This document has been prepared with due care. Gann Mess- u. Regeltechnik GmbH shall not accept any liability for errors or omissions. GANN Mess- u. Regeltechnik GmbH, Gerlingen, Germany, 01/06/2018 Hydromette BL LG 17 ®... -
Page 5: General Notes
Operational reliability and functionality are no longer ensured if the device is modified or adapted. Gann Mess- u. Regeltechnik GmbH shall not be liable for any damage arising from such modifications or adaptations. -
Page 6: Weee Directive 2012/19/Eu Law On Waste Electrical And Electronic Equipment
Introduction WEEE Directive 2012/19/EU Law on Waste Electrical and Electronic Equipment According to the European WEEE Directive, electronic equipment may not be disposed of in domestic waste. Their components must be recycled or disposed of separately, because toxic and hazardous components can cause lasting damage to the environment if not disposed of properly. -
Page 7: Introduction
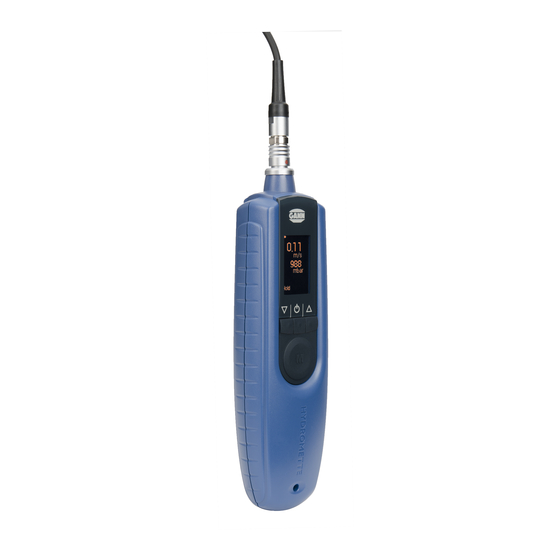
Introduction 1 Introduction Description The Hydromette® BL LG 17 is a high-precision air velocity measuring device (anemometer) for measuring even the smallest air flows for many areas of application, e.g. living space monitoring, air conditioning technology, blower-door test, laminar-flow control etc. -
Page 8: Device Layout And Button Assignment
Introduction Device Layout and Button Assignment Sensor connection OLED display Up button On/Off button Measurement button Down button Hydromette BL LG 17 ®... - Page 9 Introduction Fixing screw Air velocity electrode LG-25 BL Telescopic handle 1/4“ thread - can be screwed onto classic camera tripods Hydromette® BL LG 17...
-
Page 10: Display Symbols
Introduction Display Symbols Pressure setting Manual / Automatic Measurement menu symbols Battery symbol Air velocity in m / s Absolute air pressure in mbar Compensation temperature in °C Measured value is retained; ready for measurement Hydromette BL LG 17 ®... -
Page 11: Basic Functions
Basic Functions 2 Basic Functions Switching on the Device / Standby Mode The device is switched on by pressing the "On" button. The following is shown on the display if no air velocity sensor is connected: “No sensor”. The device does not function without connected air velocity sensor. -
Page 12: Display In Measuring Mode
Basic Functions Display in Measuring Mode Measured value in m/s or ft/min Measured / manual pressure in mbar Compensation temperature in °C "Hold" symbol signals readiness to make a measurement A measurement process is started by pressing the "M" button. The "Hold"... -
Page 13: Menu Guidance
Basic Functions Menu Guidance Pressing the "Up" or "Down" button in standby mode takes you to the main menu. Use the "Up" button and the "Down" button to navigate through the menu. The selection of a menu item is performed by pressing the measurement button. -
Page 14: Measurement Menu
Basic Functions 2.3.1 Measurement Menu The last measurement with the note "Hold" is shown here. A new measurement can be started in this menu by pressing the "M" button. During the measuring process, the "Hold" symbol disappears from the display. After releasing the "M" button, the measured value is saved. -
Page 15: Flow Rate
Basic Functions 2.3.3 Flow Rate Main menu Settings ( ) Surface ( ) maximum value display A diameter or two edge lengths of an air duct can be entered for the calculation of the flow rate. flow rate measurement deactivated in this menu (selection option "none"), the air velocity is displayed again. -
Page 16: Units Setting
Basic Functions 2.3.5 Units Setting Main menu Settings ( ) Units ( The units system can be changed from metric ("m/s") to Imperial ("ft/min") in this menu. 2.3.6 Languages Setting Main menu Settings ( ) Language ( Language selection options: ... -
Page 17: Brightness Setting
Basic Functions 2.3.7 Brightness Setting Main menu Settings ( ) Brightness ( The brightness of the display can be adjusted in steps. It must be noted that the current consumption increases with higher brightness and thus the operating time reduces. 2.3.8 Alarms Limit Value Main menu ... -
Page 18: Compensation Temperature
Basic Functions 2.3.9 Compensation Temperature Main menu Settings ( ) C.Temp. ( factory setting compensation temperature for the air velocity is 20 °C. Under this menu item, the temperature setting for the compensation of the air velocity can be manually adapted to the actual local conditions. -
Page 19: Minimum / Maximum Value Display
Basic Functions 2.3.11 Minimum / Maximum Value Display Main menu Data ( ) Min / Max ( The minimum and maximum measured air velocity values of a measurement series are displayed in this menu. The display of the minimum value and maximum value is only possible for the air velocity value. -
Page 20: Measurement Mode Display
Basic Functions 2.3.13 Measurement Mode Display Main menu Data ( ) Graph ( The air velocity is displayed either as graphs or as bars. This allows the measured variable to be recognised more quickly. 2.3.14 Graph Measurement Mode Main menu ... -
Page 21: Bar Measurement Mode
Basic Functions 2.3.15 Bar Measurement Mode Main menu Bar ( ) Start ( The bar display of the air velocity measured value enables fast visual feedback for the measured value. The bar measurement is started and stopped by pressing the measurement button. -
Page 22: Other Functions
Basic Functions Other Functions 2.4.1 Automatic Switch-off If no button is pressed within approx. 5 minutes, the device switches off automatically. The current values are retained and are displayed again after the device is switched on again. 2.4.2 Battery Monitoring The battery must be replaced If the battery symbol is shown empty ) on the display. -
Page 23: Specifications
Specifications 3 Specifications Technical Data of the Hydromette® Display: OLED display Display resolution: 0.01 m/s Response time: < 2 s Storage conditions: + 5 to + 40 °C - 10 to + 60 °C (short-term) Operating conditions: 0 to + 50 °C - 10 to + 60 °C (short-term) Power supply: 9 V block battery... -
Page 24: Prohibited Environmental Conditions
Specifications Prohibited Environmental Conditions Condensation, air humidity continuously too high (> 85%) and wetness Permanent presence of dust and combustible gases, fumes or solutions Ambient temperatures continuously too high (> +50 °C) Ambient temperatures continuously too low (< 0 °C) Measuring Ranges Air velocity: -2.50 to +2.50 m/s... -
Page 25: Transport & Storage Conditions
Application Notes Transport & Storage Conditions The Hydromette® BL LG 17 may only be stored in the packaging that is provided by us or available from us as accessory. We shall not accept any liability or warranty for damage that may occur to the device or the sensor system as a result of non-compliance. -
Page 26: Cleaning Of The Sensor Head
Application Notes Cleaning of the Sensor Head A dusty or dirty sensor head can be blown off with compressed air (do not impress hard pressure shocks!). If this procedure does not help, the sensor head can be treated by immersion and rinsing in alcohol (e.g. -
Page 27: Maintenance
Warranty Conditions Gann Mess- u. Regeltechnik GmbH shall rectify material or manufacturing defects at no cost by repair or replacement of the defective part at its discretion that occur within six months of purchase or one year of despatch from the factory, whichever period ends first. - Page 28 Appendix When making any warranty claim, the device must be sent postage-free to Gann Mess- u. Regeltechnik GmbH or the supplier with details of the claim and enclosing proof of purchase. The warranty is void if attempted repairs or other manipulations have been performed by the owner or third parties.
Need help?
Do you have a question about the HYDROMETTE BL LG 17 and is the answer not in the manual?
Questions and answers