
Related Manuals for Gaggia Milano CONCETTO EVO SELF


Summary of Contents for Gaggia Milano CONCETTO EVO SELF
- Page 1 Automatic Machine for Espresso Coffee WARNING: This instruction manual is intended exclusively for personnel with adequate expertise.
-
Page 2: Main Parts
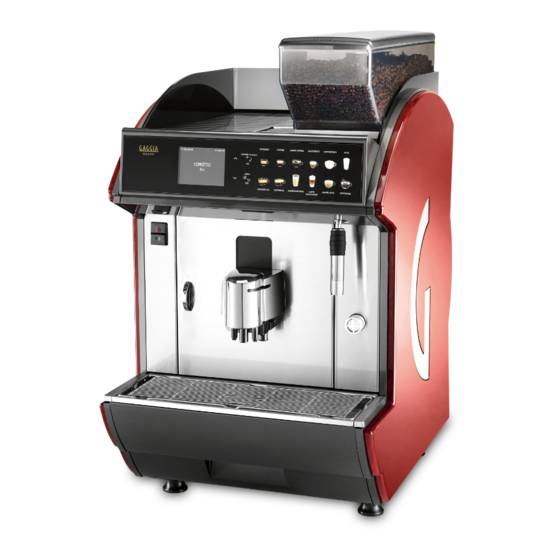
English MAIN PARTS Mod. SELF / Mod. CAPPUCCINO Left panel Door Cup shield Coffee grounds drawer Rear panel Steam wand (except for SELF set-up) Cup warming surface 18 Power button Pre-ground coffee door “I” Electrical functions enabled - Machine on - Indicator light on. “O”... - Page 3 English Mod. DUO Left coffee bean hopper Left grinder adjustment knob Left coffee grinder group...
- Page 4 English SAFETY INSTRUCTIONS For professional use only. Only install the appliance in places where it can be The professional appliance supervised qualified cannot installed personnel. outdoors. Do not place it areas where temperature is lower than The use by children older 2°C or higher than 32°C than 8 years or by persons and in particularly humid or...
- Page 5 English Before connecting In case of filling tube appliance to the water replacement, use the new network, please read and set of tubes supplied with follow applicable the appliance, not the old regulations in force in your one. country. If the power cord is Access to the internal area damaged, must...
-
Page 6: Table Of Contents
English CONTENTS MAIN PARTS 12.2 INACTIVITY AND STORAGE 1 INTRODUCTION TO THE MANUAL 13 INSTRUCTIONS FOR END OF OPERATIONAL LIFE DISPOSAL 1.1 PREAMBLE 1.2 ICONS USED 2 INFORMATION ABOUT THE MACHINE 2.1 INFORMATION FOR THE USER 2.2 INTENDED USE OF THE APPLIANCE 2.3 APPLIANCE IDENTIFICATION 2.4 TECHNICAL SPECIFICATIONS 3 SAFETY... -
Page 7: Introduction To The Manual
English INTRODUCTION TO THE MANUAL Preamble Authorised Service Centres are also available This manual is an integral technical part of this machine and it explanation, information must be kept in a known on its operation, technical and easily accessible place, assistance and spare parts good conditions,... - Page 8 English Carefully read this manual All the rights of this manual and make sure to have reserved Saga clearly understood Coffee S.p.A. Any copy or content before performing even partial disclosure, not any operation. expressively authorised in writing, absolutely forbidden. Each single user of the machine must...
-
Page 9: Icons Used
English Icons Used Various kinds of warnings are contained in this manual to highlight the different hazard or competence levels. Each icon is followed by a message describing the procedure and providing useful information. Warning Information about user safety and machine integrity. Prohibition It is used to highlight actions/operations not to be performed. -
Page 10: Information About The Machine
English INFORMATION ABOUT THE MACHINE The Maintenance Technician must carefully read and Information for the User observe the safety warnings contained in this manual to ensure that installation, start-up, use and maintenance operations are performed in complete safety. The appliance must be installed well-lit, sheltered and dry place... -
Page 11: Appliance Identification
English The following are also It is strictly forbidden to considered misuse: tamper with or modify the data plate. • any use other than the intended use and/or employing methods other than those described in this manual; When contacting technical service, always •... -
Page 12: Technical Specifications
English Brew group Technical Specifications Size (w x h x d) 410 x 695 x 550 mm Supply Voltage 230 V/400 V 2 N Power cord length 1,500 mm Power Mod. SELF See the data plate consumption Mod. See the data plate CAPPUCCINO Mod. -
Page 13: Safety
English SAFETY It is mandatory to: Preamble • check conformity of the power supply; accordance with applicable standards • use original spare parts; regulations, SaGa Coffee has prepared a technical file • carefully read the instructions contained in this manual and relating to the Concetto EVO appliance at its premises, in the attached documents;... -
Page 14: Operator Requirements
English Do not install the appliance Operator Requirements in a location where water Two operators with different skills are required in order jets may be used. to guarantee the appliance’s safety: User Person in charge of using and attending the appliance. The user is allowed to: start the appliance, adjust the operating parameters, stop the appliance, refill the appliance, empty Only install the appliance in... -
Page 15: Safety Devices
English Safety devices Residual Risks The machines described in Only use containers made this manual have been materials that manufactured in compliance suitable “for food”. with the relevant European structural Regulations in force and all characteristics potentially dangerous machines described in this parts thus brochure, do not protect... -
Page 16: Handling And Storage
English HANDLING AND STORAGE Unloading and Handling Unloading from the transport vehicle and handling operations of the appliance must be carried out by qualified personnel only and using suitable equipment. The appliance must always be kept in upright position. Do not: •... -
Page 17: Installation
English INSTALLATION Cautions Check that the size and strength of the surface The appliance cannot be where machine installed in external areas. installed are appropriate to Avoid installing it in areas safely bear it. where the temperature is lower than +2°C or higher than 32°C correct... -
Page 18: Unpacking And Positioning
English If the appliance needs to be positioned close to a wall, it is necessary to leave a space of at least 8 cm between the appliance’s back and the wall, in order to make sure that the air outlet grill at the back of the appliance is unobstructed. -
Page 19: Connection To The Water Network
English Before connecting Connection to the Water water filter to the machine, Network Before connecting perform a wash cycle until appliance to the water the water is clear. Then network, please read and connect the water filter to follow applicable the machine. -
Page 20: Connection To The Electric Network
English • Connect the filter to the water network. Connection to the Electric Network Maintenance Technician, charge of the appliance's installation, shall make sure that: • the power supply system complies with the safety instructions in force; • the voltage corresponds to that indicated on the appliance data plate. - Page 21 English - Power cord type H07RNF section 4x2.5 mm2 Make sure that the power cord plug easily reachable after installation. Neutral – Blue The electric socket or the Phase – Brown Phase – Black all-pole switch which the Ground – Yellow/green appliance is connected to - Connection of the two phase power supply plug 400 V 2 must be easily accessible...
- Page 22 English The all-pole switch must be suitable for machine input and be able to detect all voltage polarities. Check that the electrical cables of the system are proportioned to machine input.
-
Page 23: Description Of Controls
English DESCRIPTION OF CONTROLS Controls When performing any kind of cleaning or maintenance The appliance is equipped with the following controls: • Power button operations inside • Control panel machine, disconnect 6.1.1 Power button from the mains and set the all-pole switch to “0”. - Page 24 English 6.1.3 Button Description during Normal 6.1.3.2 Container Selection Operation (for DUO model only) The Duo version is equipped with 2 coffee bean hoppers and 2 coffee grinders. This allows you to double the products that can be dispensed or insert a different product quality. Press the button to select a container.
-
Page 25: Supply And Start Up
English SUPPLY AND START UP Coffee Bean Supply Crema Adjustment • Remove the container cover. Crema quantity in beverages depends on the adjustment of • Pour the coffee beans into the hopper. the adjusting lever. • Put the cover back on the container. •... -
Page 26: Temperature Adjustment
English Temperature Adjustment Coffee Grind Adjustment The milk to be used for Regardless of the coffee the Cappuccinatore must blend, a very fine grind be stored in a fridge at a (notch on low values) temperature higher increases the density, the than 4°... -
Page 27: First Appliance Start-Up
English The grinding is pre-set by the manufacturer on standard Although all buttons are values, but it can be changed with the following procedure: • Open the door, rotate the knob counter-clockwise to set previously programmed on a finer grind (the notch moves on a lower value), or clockwise to set a coarser grind (the notch moves to a standard values, check if higher value). -
Page 28: Programming And Maintenance Menu
English PROGRAMMING AND MAINTENANCE MENU This chapter contains instructions on how to set change programming parameters of the appliance. Therefore it is necessary to carefully read it and to understand exact sequence operations before performing them. Some functions also enable to program one or more data (already programmed on standard values). -
Page 29: Programming Menu
English Programming Menu 8.2.2 Structure of the Programming Menu The structure of the programming menu is indicated in section "Structure of the Programming Menu". GENERAL SETTING OPTION NO. MENU ITEM The section "Description of Messages in the Programming Language Menu" describes all the items in the programming menu. ITALIANO DEUTSCH ENGLISH... - Page 30 English 27...2702 10.3. MILK QUANTITY Standard 3…180 High milk 3.2. WATER QUANTITY 11.1. MILK QUANTITY 27...2702 3…180 Coffee x2 FLAT WHITE 4.1. GRINDER SETTING 12.1. GRINDER SETTING Standard Standard High High 4.2. WATER QUANTITY 12.2. WATER QUANTITY 27...2702 27...2702 LARGE COFFEE 12.3.
- Page 31 English WASHING MENU OPTION NO. MENU ITEM Cappuccinatore Rinsing CLEAN BREWING UNIT GROUP RINSING MILK PROGRAMMING Test menu...
- Page 32 English 8.2.3 Description of Messages in the Programming Menu GENERAL SETTING OPTION DISPLAY Description Language Press “OK” from the “LANGUAGE” menu to select the language. ITALIANO DEUTSCH ENGLISH FRANÇAIS ESPAGNOL PORTUGUES NEDERLANDS 한국어 Polski CUP WARMING SURFACE % (except for DUO model) This function allows you to activate the cup warming surface by adjusting it from 0 to 100% 0..100% at intervals of 10.
- Page 33 English OPTION DISPLAY Description Espresso The quantity of water and ground coffee used during the dispensing process and programmed upon installation can be changed for each beverage. 1.1. GRINDER SETTING By selecting “LOW” or “HIGH”, the dose is decreased or increased by 1 g. By confirming “STANDARD”, the dose used during the dispensing process is the one programmed by the Maintenance Technician.
- Page 34 English Standard High 8.2. WATER QUANTITY 27...2702 8.3. MILK QUANTITY 3…180 Cappuccino 9.1. GRINDER SETTING Standard High 9.2. WATER QUANTITY 27...2702 9.3. MILK QUANTITY 3…180 Caffè Latte 10.1. GRINDER SETTING Standard High 10.2. WATER QUANTITY 27...2702 10.3. MILK QUANTITY 3…180 milk 11.1.
- Page 35 English “OFF”, pre-brewing is not performed. SHORT “SHORT”, the “pre-brewing” programmed by the Maintenance Technician is performed. LONG “LONG”, the “pre-brewing” is extended by 1 sec. Hot Water programm. This function allows changing the functioning of the hot water button. “OFF”;...
- Page 36 English follow instructions (contact an authorised service centre for detailed information on the tablets). Procedure: The process starts from “GROUP RINSING” Press the "Enter" button; the display shows “PUT THE TABLET INTO THE GROUP” Remove the brew group; the display shows “INS. BREW GROUP” Insert the tablet into the brew group and put the brew group back in its place;...
- Page 37 English Technical WASHING MENU OPTION DISPLAY Description This function allows dispensing a quantity of steam to avoid the building up of deposits in the Cappuccinatore Rinsing Cappuccinatore. CLEAN BREWING UNIT This function allows dispensing a minimum quantity of hot water (about 5 cc) to avoid the building up of deposits in the coffee dispensing spout.
- Page 38 English 8.2.4 MILK PROGRAMMING “MILK PROGRAMMING” is a direct control allowing to program and store the milk quantity for the beverage chosen. Select “MILK The display shows the programming icon (1) PROGRAMMING” Press and hold the button The machine starts dispensing milk only corresponding to the beverage to be...
-
Page 39: Operation And Use
English OPERATION AND USE Before using the machine, Children must not play read this manual carefully with appliance. and make sure users are Children must not carry familiar with the machine. cleaning maintenance operations without being monitored. Machine Statuses After the machine has not With regard to the power supply, the machine can have been used for a certain the following statuses:... -
Page 40: Programmed Automatic Start-Up
English Programmed Automatic Start-up This start-up is possible when the machine is in “STANDBY” mode and the function “AUTOMATIC START-UP” is active. The machine will switch-on at the programmed time. Stand-by Temporary Start-up Manual switching-on when the machine in “STANDBY” mode. This is possible by pressing the button shown in the figure for 3 seconds. - Page 41 English Press the button corresponding to the beverage required. Press brew buttons for approx. 1 second. BREWING TABLE Button sequence Brewing Q.ty Level Description The machines are delivered with factory standard Coffee Brewing obtained from settings. instantly-ground coffee high high This kinds of brewing are programmed for a Pre-ground Coffee C + E...
- Page 42 English BREWING TABLE This beverage consists in instantly ground coffee Coffee with a dash of milk (*), H Brewing obtained from and a small dose of hot milk. ground coffee and a small milk dose This beverage consists of hot milk and instantly Latte Macchiato (*), P Brewing obtained from hot...
-
Page 43: Steam
English Steam Although all buttons are previously programmed on (Except for SELF set-up) standard values, check if • Immerse the steam wand into the beverage to be heated. the dispensed beverage • Turn the steam dispensing knob counter-clockwise. Once the required temperature is reached, close the knob has the desired features. -
Page 44: Brew Buttons Programming
English Brew Buttons Programming Display Messages The beverage quantities associated to the corresponding A list of alarms (in addition buttons, can be directly programmed through the keypad. To program and re-program the buttons, follow the to those explained before) instructions below: Coffee quantity: that can be displayed and •... -
Page 45: Switching Off The Machine
English PUMP ERROR 1-2 or 3-4 One of the pumps is faulty. The machine is still working but it is necessary to contact the AUTHORISED SERVICE CENTRE. SENSOR ERROR 1 2 It is displayed when there is a faulty temperature sensor. Switch off the machine and contact the AUTHORISED SERVICE CENTRE. -
Page 46: Cleaning And Maintenance
English CLEANING AND MAINTENANCE Before performing case faults, maintenance and/or immediately turn off the cleaning operations, turn appliance, disconnect off the appliance by setting from the power supply by the switches to the “OFF” removing the plug from position. Disconnect the the socket and contact the appliance from the power nearest Service Centre. -
Page 47: Cleaning And Scheduled Maintenance
English Periodic maintenance and cleaning will keep the appliance in good working conditions for a longer time and ensure 10.2 Cleaning and Scheduled compliance with basic hygienic standards. Maintenance All parts must be washed Follow the instructions and timing indicated in the "MAINTENANCE SCHEDULE"... - Page 48 English 10.2.1 Maintenance Schedule COMPONENT TO BE CLEANED Maintenance Coffee dispensing spout See section “Cleaning the Coffee Dispensing Spout”. Brew group See section “Cleaning the Brew Group”. Drip tray and relative grill See section “Cleaning the Drip Tray and Relative Grill”. Coffee grounds drawer See section “Cleaning the Coffee Grounds Drawer”.
- Page 49 English 10.2.2 Cleaning the Coffee Dispensing 10.2.3 Brew group cleaning Spout 10.2.2.1 Manual Coffee Dispensing 10.2.3.1 Manual Cleaning of the Brew Spout Cleaning Group The following parts can be removed: • the upper protection cover of the dispensing spout, by pulling it outwards; Cleaning must be carried with •...
- Page 50 English 10.2.4 Cleaning the Drip Tray and 10.2.9 Cleaning of the Cappuccinatore Relative Grill Remove the drip tray from the machine and wash it under Never clean running water, paying particular attention to the grill. Cappuccinatore when the 10.2.5 Cleaning the Coffee Grounds machine is in “STANDBY”...
-
Page 51: Unscheduled Maintenance
English 10.3 Unscheduled Maintenance Unscheduled maintenance includes every repair or part replacement. The Maintenance Technician is the only person authorised to perform these operations. 10.3.1 Coffee Grinder Block • A foreign body among the coffee beans can cause the grinders block and, subsequently, the machine block; the message “GRINDER ERROR”... - Page 52 English Mod. DUO • Remove the screws. • Remove the gearwheel. screws gearwheel • Unscrew and remove the adjustment ring nut and clean both grinders with a vacuum cleaner and a brush. Check the grinders wear. In case of clear damages, replace them.
- Page 53 English Mod. DUO This 1/2 turn loosening of the ring nut is necessary to avoid grinders block and damage. • Open the partition. Before re-starting machine, it is necessary to adjust the grinding again. • Put the gearwheel back in its position and fix it by tightening the screws.
-
Page 54: Troubleshooting
English TROUBLESHOOTING A list of the possible machine faults is given below. The icon of the Maintenance Technician in the “Notes / Recommended Intervention” box means that the operation must be carried out by the Maintenance Technician only. Fault Cause Notes / Recommended Intervention The machine does not turn on No voltage Check:... -
Page 55: Storage - Disposal
English STORAGE - DISPOSAL 12.1 Location Change Should the machine be placed in a different location, it is necessary to: • disconnect the appliance from the supply network; • carry out the general cleaning of the appliance as indicated in chapter "Cleaning and Maintenance"; •... - Page 56 English INSTRUCTIONS FOR END OF OPERATIONAL LIFE DISPOSAL INFORMATION FOR THE USER in compliance with art. 13 of the Italian Legislative Decree dated 25 July 2005, no. 151 "Implementation of the directives 2002/95/EC, 2002/96/EC and 2003/108/EC on the restriction of the use of certain hazardous substances in electrical and electronic equipment, as well as waste disposal".
Need help?
Do you have a question about the CONCETTO EVO SELF and is the answer not in the manual?
Questions and answers