Table of Contents
Advertisement
Please note your phone is battery-embedded design with removable battery
and battery cover. Unauthorized personnel are strictly prohibited from
disassembling the phone. Make sure to use only the power adapter (5V 2A
Output AC/DC) that came with PM85.
In case your phone does not work as expected, you are strongly recommended
to restart it by pressing and holding the power button for at least 12 seconds
until the startup screen appears. If your phone has encountered a serious error
and cannot be recovered, you should reset your phone to factory settings by
using the menu, either "Backup & Reset", or "Factory Reset". For more details,
please refer to "Factory data reset" section on page 32.
Note: Please be cautious while performing the factory data reset.
Because this will erase personalized settings and data saved in your
phone, such as SMS, Contacts, Music, etc.
www.sar-tick.com
PROTECT YOUR HEARING
To prevent possible hearing damage, do not listen at high volume
levels for long periods. Exercise caution when holding your device
near your ear while the loudspeaker is in use.
Body-worn Operation
This device was tested for typical bodyworn
operations with the Front & back of the device kept
0.39 inches (1cm) between the user's body and the
Front & back of the device. To comply with FCC RF
exposure requirements, a minimum separation
distance of 0.39 inches (1cm) must be maintained
between the user's body and the Front & back of the
device.
Any
accessories containing metallic components may not
be
used.
Body-worn
maintain 0.39 inches (1cm) separation distance
between the user's body and the Front & back of the
device, and have not been tested for typical body-
worn operations may not comply with FCC RF
exposure limits and should be avoided..
beltclips,
holsters,
accessories
1
and
similar
that
cannot
Advertisement
Table of Contents

Related Manuals for Point Mobile PM85


Summary of Contents for Point Mobile PM85
- Page 1 Unauthorized personnel are strictly prohibited from disassembling the phone. Make sure to use only the power adapter (5V 2A Output AC/DC) that came with PM85. In case your phone does not work as expected, you are strongly recommended to restart it by pressing and holding the power button for at least 12 seconds until the startup screen appears.
-
Page 2: Table Of Contents
Table of Contents Getting Started ............3 Major Parts ............3 Accessary ............5 Setup PM85 ............6 Charge PM85 ............10 Turn On/Off PM85..........11 Learning the basics ..........12 Use a keypad ............12 Using a keypad ............13 Use a touch screen .......... -
Page 3: Getting Started
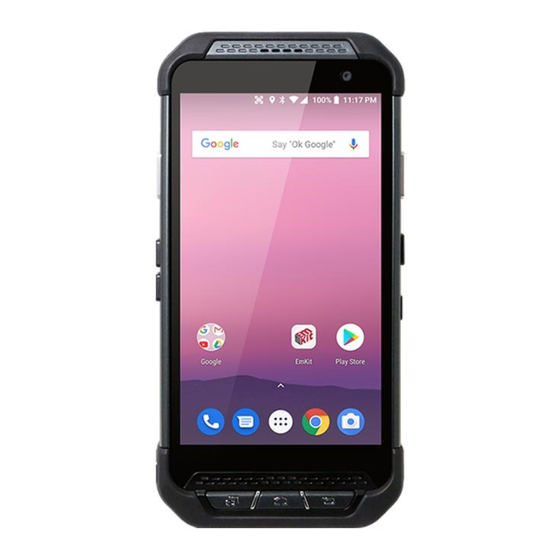
Getting Started 1.1 Major Parts Ear jack Side deco Pogo pin... - Page 4 Texture MT11010 (PC) Texture MT11010 (PC) Front cover Battery locker Front deco receiver Power button Front camera Volume button Front deco speaker Scan button Touch screen Sos button Keypad Scan window Keypad pad Camera window Function deco Flash window Rear housing Cap screw Battery cover Hand strap...
-
Page 5: Accessary
1.2 Accessary 5V 2.0A AC/DC Adapter Micro USB C Type Cable AC plug (US/EU/UK) Battery (2900mAh) Battery (5800mAh) Hand Strap... -
Page 6: Setup Pm85
1.3 Setup PM85 1.3.1 Remove the Battery Cover 1. Push down the Battery locker. 2. Lift up the Battery Cover. 3. Remove the Battery Cover. - Page 7 1.3.2 Insert the Battery Insert “Battery” from top area first and then put in top area. 1.3.3 Close the Battery Cover Insert “Battery Cover” from the bottom area first and then put in top area. Press battery cover with both hand firmly.
- Page 8 1.3.4 Insert and Remove the SIM-SAM card You must insert your SIM card to make phone calls. Please power off your phone before inserting or removing the SIM card. 1. Remove the Battery Cover and the Battery. 2. Lift up the SIM rubber. 3.
- Page 9 1.3.5 Install and Remove the microSD card 1. Remove the Battery Cover and the Battery. 2. Lift up the SIM rubber. 3. Insert the microSD card into the slot (Gold plate should face down). 4. To remove the microSD card, repeat step1 and step2, then remove the card out of the slot.
-
Page 10: Charge Pm85
2,900mAh 3.85V Backup Battery 5,800mAh 3.85V Charging time About 5 hours Note: Always use an original charger and cable from the Point Mobile. Other chargers and cables may damage PM85. In addition, make sure connector, charger, cables are not wet. -
Page 11: Turn On/Off Pm85
Turn On 1. Press and hold down the “Power Key” for a few seconds. 2. When PM85 enter to the boot mode, it will display “SMART BEYOND RUGGED” logo with short vibration. 3. Release the “Power Key” and wait until PM85 finish booting. -
Page 12: Learning The Basics
Learning the basics 2.1 Use a keypad Power key Press - Lock the screen / Light up the screen. Press and hold - Display the power menu “Power off / Restart”. Press and hold for over 12seconds - Forced to reboot. Press and hold the “Power”... -
Page 13: Using A Keypad
2.2 Using a keypad Front panel Recent Apps key - Press to see recently used apps. Home key - From any apps or screens, press to return to the Home screen. Back key - Press to go back to the previous screen, or to close a dialog box, options menu, notification panel, etc. - Page 14 One-finger press, wait, move, lift for “Pick up and move” or “select multiple items” Scroll Vertical or horizontal swipe in a single direction Pinch Open & Close Two-finger press, move outwards and inwords, lift for “Zoom in and out” Rotate When PM85 is turning sideways, screen orientation is changing...
-
Page 15: Home Screen, Apps And Widget
2.4 Home Screen, Apps and Widget Status Bar - Status / Notification - Drag down to open the “Quick Setting Panel” Search Bar - Touch 1 to search by text - Touch 2 to search by voice Touch an icon to run an app, open folder, etc. - Page 16 Create “App Folder” - Long press the app icon to other app icon. This will create the “App Folder” - To set the folder name, touch the “Unnamed Folder” and rename it Notification panel When there are notifications from the Android (system) or the App, you can check details by drag down the “Status Bar”.
- Page 17 Quick setting panel You can access “Quick setting panel” by drag down the “Notification panel”. You can enable / disable functions or change modes easily. By touching the “App drawer” icon, all installed apps are listed in the tab, alphabetically. - Tap app icon to run.
-
Page 18: Status & Notifications Icons
All available widgets are listed in the “Widgets” tab, alphabetically. - On the home screen, touch and hold an empty area of the screen. - Touch "WIDGETS". - Long press, specific widget to place to the “Home Screen”. 2.5 Status & Notifications Icons Status icons GPRS connected GPRS in use... - Page 19 Connected to a Bluetooth Bluetooth is on device Battery is full Battery is partially drained Battery is low Battery is very low Battery is charging GPS is on Alarm is set Speaker phone is on Headset connected Vibrate mode/ Mute Phone mic is mute Notification icons Missed call...
-
Page 20: Make A Call
2.6 Make a call Touch icon in the Favorite tray apps. Slide to access the “Favorites”, “Recents” and “Contacts”. - Touch to use a dialer - To make a call from recent call list or missed call, select “Recents” tab - To make a call from your contact list, select “Contracts”... -
Page 21: Add To A Contact
Answer or dismiss a call 1. If your device is unlocked, in the call notification window, tap ANSWER or DECLINE. 2. If your device is locked . • Swipe up to answer a call. • Swipe down to reject a call. •... -
Page 22: Send A Message
Touch to save the contact Touch to add a new contact SIGN IN TO AN ACCOUNT You can sync with your contacts in the Google account. IMPORT CONTACTS You can import contact in the storage (.vcf file) or SIM card. 2.8 Send a message Touch icon in the Favorite tray apps. - Page 23 Touch to use a dialer Touch to type a name, phone number or email Suggest contact display here. Touch “Contacts” to compose a message Your message display here Touch to send the composed message You can attach photo, saved picture, voice or location Note: You may allow granting “Message App”...
-
Page 24: Os Update
OS Update 3.1 OS Image update from a Storage To update OS image, copy or place OS image file into the root folder of “Internal Storage” or “External Storage”. Touch “App Drawer” - “Settings” - "System" and then “About phone” Touch “System Updates”... - Page 25 Your PM85 will check storage and display available OS image. Touch “Update” button By touching the “CONTINUE” button, your PM85 start to update the OS image. During this time, you cannot use your PM85. Please save the data before start, the OS update process.
-
Page 26: Os Image Update From The Fota
3.2 OS Image update from the FOTA icon for the advanced option Touch “FOTA Client” PM85 will compare the OS image between FOTA server and current OS image. If there is newer OS image in the FOTA server, FOTA server will suggest downloading. - Page 27 Touch “OK” to start download the image in the FOTA server You can cancel OS image download process Note: Default OS image download setting of FOTA Client is “Download over Wi-Fi only” Please connect to the nearby Wi-Fi network for FOTA service.
-
Page 28: Factory Data Reset
Factory data reset 4.1 Factory data reset from Settings When your PM85 system is unstable and abnormal behavior occur but could not recover by rebooting, you may need to “Factory data reset” your PM85. Touch “App Drawer” - “Settings” and then “Reset options”... - Page 29 Please note, all apps and data in the internal storage will be deleted and restored to “Factory default” and this process cannot “Undo”. Touch to start “RESET PHONE” process Touch to confirm erase of “ERASE EVERYTHING”...
-
Page 30: Factory Data Reset
4.2 Factory data Reset Force Factory data reset your PM85 You can perform “force” factory data reset your PM85. When your PM85 turned off, press “Power” + “Volume up” + “Home” button all together. After short vibration from your PM85, you may release the buttons. - Page 31 Select “Wipe data/factory reset” DO NOT select Select “Yes” to perform the “Factory data reset”. After that, your PM85 start wiping the data. After data wiping, please select “Reboot system now” to finish the “Force Factory data reset” process.
- Page 32 FCC warning This device complies with part 15 of the FCC Rules. Operation is subject to the following two conditions: (1)This device may not cause harmful interference, and (2) this device must accept any interference received, including interference that may cause undesired operation. This equipment has been tested and found to comply with the limits for a Class B digital device, pursuant to part 15 of the FCC Rules.
- Page 33 This device is restricted to indoor use only within the 5.15 ~ 5.35GHz Band. Cet appareil est restreint a l'utilisation a l'interieur seulement dans la bande 5.15 ~ 5.35GHz. This equipment complies with FCC/IC radiation exposure limits set forth for an uncontrolled environment.
Need help?
Do you have a question about the PM85 and is the answer not in the manual?
Questions and answers