Advertisement
Quick Links
Advertisement

Subscribe to Our Youtube Channel
Related Manuals for Oh!FX SIROCCO Sky dancer


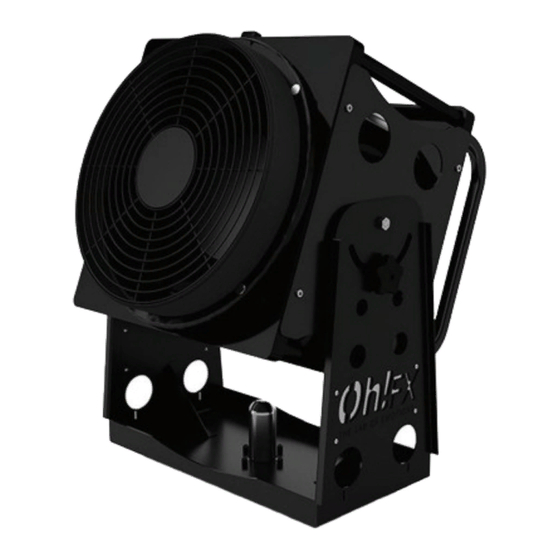
Summary of Contents for Oh!FX SIROCCO Sky dancer
- Page 1 SIROCCO MULTI EFFECTS INSTRUCTION MANUAL...
- Page 3 INSTRUCTION MANUAL INTRODUCTION SIROCCO MACHINE SIROCCO is the new concept of multi FX machine developed and manufactured by OhFX (CONFETTISHOTS, SL) The particular advantage of this machine is that thanks to its interchangeable head system, you can easily replace the head of the machine and use it for many other FX in a professional way.
-
Page 4: Technical Specifications
INSTRUCTION MANUAL SIROCCO SKY DANCER AND WIND FX SIROCCO machine equipped with the head for Sky dancer, is able to easily raise Sky dancers or sleeves of 8 meters, and also create a wind eff ect widely used in theatre, cinema or live concerts. -
Page 5: Assembly And Operation
INSTRUCTION MANUAL ASSEMBLY AND OPERATION Placement: place the machine on a stable and fl at surface with enough height and space around so that the fabric of the Sky dancer can raise without touching anything around. Loosen the locking knobs and point the turbine vertically as shown in image. Now tighten the locking knobs. - Page 6 INSTRUCTION MANUAL SIROCCO FOAM CANNON The Sirocco Foam cannon creates a perfect jet of dry foam reaching 11-12 meters away, and can also regulate the fl ow of foam. It is a machine for professional use, ideal for outdoor and large spaces.
- Page 7 INSTRUCTION MANUAL Detail of connections ASSEMBLY AND OPERATION Assembling: To assemble the acquired FX head, you must previously remove the Sky dancer head supplied from the turbine by loosening and removing the screws Fix then the Foam cannon head on the turbine using the supplied screws, and lining up the 4 holes.
- Page 8 INSTRUCTION MANUAL Power connection: connect the plug of the machine to a socket. (The engine of the machine has an IP-65 protection, which means the machine can get wet (but not submerge) without any risk. Set up: The machine is now ready for operation. Turn ON the machine by the ON/OFF switch and the machine will begin to blow.
- Page 9 INSTRUCTION MANUAL PUMPING WATER Fill your tank with water. Submerge the pump into the tank. It should be in horizontal position so that the pump is always well refrigerated. The pump cannot run out of water. (Risk of burning). In a similar way, the pump does not stop alone;...
- Page 10 INSTRUCTION MANUAL CONSUMPTIONS OF WATER AND FOAM FLUID The water and foam fl uid consumption depends on some variables such as: the water pressure, outfl ow and amount of foam generated by the machine. The values displayed below are the average consumption and the most common ones when using our high concentrate foam fl...
- Page 11 INSTRUCTION MANUAL • The machine does not absorb the foam fl uid Although the foam cannon is supplied with an absorption tube of 3 meters, this does not mean you can place the bottle of foam fl uid 3 meters below the level of the machine, as you could fi...
- Page 12 INSTRUCTION MANUAL PARTS 7. Screws (x4) 8. Water connection: (WATER) 9. Foam fl uid connection (FOAM) 10. Fluid tap 11. Absorption tube for foam fl uid. 12. Inlet Water tap Detail of connections ASSEMBLY AND OPERATION Assembling: To assemble the acquired FX head, you must previously remove the Sky dancer head supplied from the turbine by loosening and removing the screws Fix then the Foam generator head on the turbine using the supplied screws, and lining up the 4 holes.
- Page 13 INSTRUCTION MANUAL • The foam produced by the generator is not compact as it appears in your video. After verifying that your water source is correct, the problem most probably will be with the concentration of foam fl uid that you are using. When using our High concentrate foam fl uid, you should dilute the fl...
- Page 14 INSTRUCTION MANUAL PARTS 1. Snow diff users 2. Handles 3. Switch ON/OFF 4. Snow fl uid connection 5. Locking knobs 6. Pump 7. Accommodation for tripod 8. Plug 9. Filter ASSEMBLY AND OPERATION Remember that to assemble the acquired FX head, you must previously remove the Sky dancer head supplied from the turbine by loosening and removing the screws Attach then snow FX head to the turbine using the screws supplied, and lining up the 4 holes.
- Page 15 INSTRUCTION MANUAL The snow FX head comes equipped with 2 diff users with a slightly diff erent output allowing to choose the size of the fl akes of snow to produce. If you want to change the size of the fl akes, remove the black fabric of the head, and you will fi nd 2 diff users. The central diff user is the one producing snow.
- Page 16 INSTRUCTION MANUAL ASSEMBLY AND OPERATION Remember that to assemble the acquired FX head, you must previously remove the Sky dancer head supplied from the turbine by loosening and removing the screws It is important to make sure that there is enough height so that the confetti does not touch the ceiling or even prevents that the confetti is raised well.
- Page 17 INSTRUCTION MANUAL SIROCCO CONFETTI TECHNICAL SPECIFICATIONS REF: SIR-VULC/M DIMENSIONS: 102,5 x 55 x 68,5 cm WEIGHT: 45,85 kg VOLTAGE IN: 220AC 50 HZ - 110AC 60HZ POWER: 1.1 KW SPEED: 3000 RPM PARTS 1. Switch ON/OFF 2. Output of Air and confetti 3.
- Page 18 INSTRUCTION MANUAL Attach then confetti blower head to the turbine using the screws supplied, and lining up the 4 holes. Place the machine in the intended place, either on a fl at and stable surface or on a tripod or even better on the fl ightcase we propose, by inserting the tube piece included with the fl...
- Page 20 INSTRUCTION MANUAL www.ohfx.eu...
Need help?
Do you have a question about the SIROCCO Sky dancer and is the answer not in the manual?
Questions and answers