Table of Contents
Advertisement
Quick Links
Advertisement
Table of Contents

Related Manuals for Vacron VVH-MDE43E83


Summary of Contents for Vacron VVH-MDE43E83
- Page 1 4 & 8CH Mobile DVR Systems 2019 JULY V1.0 (optional WIFI / 4G / G-MOUSE optional) * The company reserves the right to modify this product manual without prior notice. The product screen display and operation content should be based on the actual machine.
-
Page 2: Safety Precautions
Safety Precautions Take and review some testing video initially to make sure the images were recorded correctly. Please note that manufacturer, its subsidiaries and affiliates, and its distributors are not liable for consequential damages arising from any malfunction of main device accessory, including memory device that results in the failure of an image to be recorded or to be recorded in a way that is machine readable. - Page 3 terminals or plug. • Avoid using, placing or storing the product in the humid or dusty areas. Before using 3G/4G products, please ensure that you read the safety notifications described below. • Company and user shall not modify certified low power radio frequency device the frequency, increase the power and change the characteristics and functions without permit.
- Page 4 Index Product Features Specifications System Support Accessories Physical Appearance Power On / Power Off Remote Control System Interface and Operation Computer Player : Format the hard disk. For detailed operation instructions, please refer to the "Format/Restore Hard Disk" instructions................. 25 Format/Restore Hard Disk 4G Network Settings...
-
Page 5: Product Features
A. Product Features Wide voltage input DC +8V ~ +60V, suitable for all kinds of vehicles, such as sedans, buses, construction trucks, and electric cars. Built-in lithium battery 2200mA/Hr and low power consumption mode about 5mA/Hr to achieve a long-term monitoring in power saving mode, such as GPIOs, internal and external battery low voltage detection, six axis sensor (G+Gyro) detection, RTC timing wake up detects peripheral status. -
Page 6: Specifications
Specifications Item Description Operating System Embedded Linux Video Compression H.264 Resolution 1080P/720P/960H Input: 4 / 8CH 1080P@30FPS Video Input / Output Output: CVBS x 1 , VGA x 1 Network GPS+GNSS or G-Mouse 1. Analog Input x 2: A. Voltage Range: 0-60V 2. - Page 7 USB Wi-Fi (optional) USB Interface Support Wi-Fi (AP Mode) 802.11b / g / n Application: Wi-Fi Connection Battery Type Lithium Battery 3.7V / 2200mA Display 1 / 4 / 9CH Simplex Mode Record / Playback Control Interface Language English, Traditional Chinese, Simplified Chinese Display Mode 1 / 4 / 9CH Disconnect Detection...
-
Page 8: System Support
System Support... - Page 9 Accessories The following accessories include in the standard package. 5A fuse power cable x 1 I/O cable x 2 Remote Control x 1 GPS/GNSS active antenna x1 Optional accessories 7”LCD Monitor G-MOUSE Temperature RFID Reader IR Extension Cable...
-
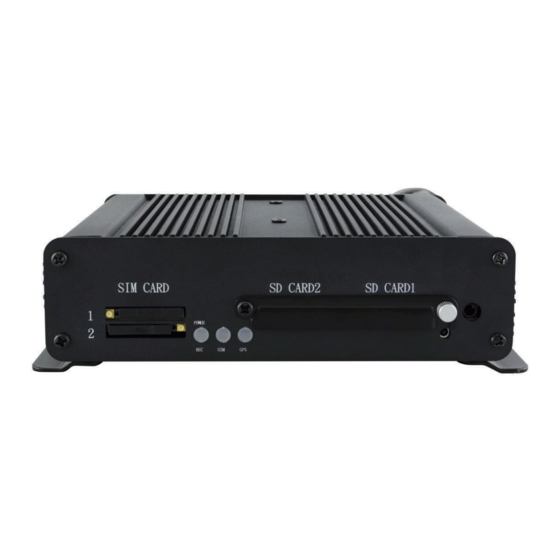
Page 10: Physical Appearance
Physical Appearance... - Page 11 G-Mouse / 4G / Wi-Fi (Optional)
- Page 12 Signal I/O Ports Contact Item Description Note2 Analog 2 FUEL Fuel analog1 R.P.M. IN10 IN10 5V Output(always) Note 1: (IN1-10 Alarm Function Definition) Note 2: (Signal source definition: A is an analog signal; D is a digital signal; P is power signal.)
- Page 13 Function I/O Ports Contact Item Description Note ONEWIRE One Wire Device MIC+ Microphone IN MIC- RS232 TX1 RS232 TX1 RS232 TX2 RS232 TX2 CAN-L CAN Bus_L OUT1 OUTPUT1 sink 1A/50v OUT2 OUTPUT2 sink 0.5A/50v SPK+ Audio out SPK- Audio out RS232 RX1 RS232 RX1 RS232 RX2...
- Page 14 Note: (Signal source definition: A is an analog signal; D is a digital signal; P is power signal; i & o are in and out respectively.) Output example: load & signal...
-
Page 15: Power On / Power Off
Power On / Power Off (1) Power On Put the SD card into the SD card slot and close the SD card slot lock, then turn on the power and it will take approximately 30 seconds. When lights start flashing as the recording is in progress. (2) Power Off Turn off the power;... -
Page 16: Remote Control
G. Remote Control Remote control playback and computer playback are available. Remote control operation Remote control button Introduction Item Descripton Item Description Split screen display Enter Force recording Reverse Quad full-screen display Fast forward Speaker mute button Playback mode, play button Menu Pause Navigation... -
Page 17: System Interface And Operation
H. System Interface and Operation Live View Display Live View Display – 8-split View (1) Screen operation guide line To make channel 1~4 single-channel display, switch between display by menu selection or remote control To display quad screen, press the button quad To open the menu press the menu button To play mode press the play button (2) Illustration... - Page 18 OSD menu operation and setting instructions: Two channels a group free to choose the camera signal source Camera type of 1080P 720P D1 ( Selecting error will have no image ) FPS: 15-30 FPS Image settings Picture quality: Normal, better, best Image brightness, contrast, color adjustment adjustment...
- Page 19 Language Switching Traditional Chinese, Simplified Chinese, and switching English. After restoring the factory settings, the machine will reboot Restore default and clear the original settings Format hard After formatting the hard disk, the footage will be deleted. disk The firmware update program is stored in the SD card and the firmware is updated by the device.
- Page 20 Playback mode Local playback and computer playback Local playback Press the Play button in live view mode to enter the playback page Select search and press enter to enter the file list Select the file to played back, press the enter key to enter playback Computer playback: Read the hard disk for playback The hard disk that contains the video file is read by the computer and then the playback software CarBox2.exe is executed.
- Page 21 (Note: In use of WIN7 OS, if it is not possible to read the video list. Solution: Right click on the CARBOX icon and execute the player as the system administrator)
-
Page 22: Computer Player
Computer Player Run the player software CarBox2.exe interface as the figure below Note: DirectX 9.0 or above is required. Operation Interface Playback Date Selection Coordinates Speed Play Bar Play Speed (1). Tools snapshot: Capture and save the picture as a picture file Configuration: Set machine related settings Start backup: Select the path to be... - Page 23 Previous : Play the previous video Previous frame: Move the movie to the previous frame while paused Sd file format storage. The video is played backward Pause: pause the video in play Stop: Stop the playing video Play: Play paused videos Next frame: In the paused state, move the video to the next frame Next video: Play the next video...
- Page 24 After the setting is complete, save it, insert the hard disk into the host, and record according to the format set by the user. Note: To use a computer to read the hard disk, use the SATA to USB cable device to read directly from the USB. Video Quality Recording resolution of high, normal, and low selection Video Frame Rate...
- Page 25 Time Zone Adjust time zone to display according to Greenwich Measure Set the speed unit to display Km/h Unit of Speed Mile/h Knot G-sensor Sensitivity G-sensor mode and Sensitivity Settings Daylight saving time Applicable to countries implementing daylight saving time zones Backup : Start Backup...
- Page 26 Step 1. Select the hard disk that contains the video file Step 2. Select the hard disk video file to backup. Step 3. Select backup data access format Backup format ● SD Format ● AVI Format Note: Backing up in SD file format, the file format will include the speedometer, position table, latitude and longitude, and G-SENSOR record data.
- Page 27 Step 4. Backup the video file according to the requirements and set the required time range Step 5. Select he path to the backup folder Step 6. Start the backup...
- Page 28 Playback Playback video: Select a video file stored on a hard disk or computer to play it 1. SD Card...
- Page 29 Format : Format the hard disk. For detailed operation instructions, please refer to the "Format/Restore Hard Disk" instructions. (2) GPS Coordinates/latitude and longitude Coordinates Latitude & Longitude Coordinate, latitude and longitude: Display driving direction and latitude and longitude, need to display with G-Mouse function...
- Page 30 (3) G-SENSOR G-SENSOR Gravity Sensing Analysis, When Triggering G-Sensor Forced Video Recording, Data of X, Y, and Z Axis Changes of the Vehicle will display. X Changes in the left and right levels of the sensor body. Y Changes in front and rear levels of the sensing body. Inducing changes in the body.
- Page 31 (7) Playback Date Selection Date Search Playback Date Selection: Divide by date and time to show the video file time on the hard disk.
- Page 32 Format/Restore Hard Disk Format the hard disk Why format the hard disk?? When the storage format of the hard disk is different from the storage format required by the computer, the hard disk must be formatted first. After the hard disk sold or used in the market, the formatting operation must be performed first.
- Page 33 Step 1. After removing the hard disk from the computer, use the computer to read the hard disk, and then execute the computer-side playback software CarBox2.exe. Step 2. Click Enter format tool menu Select the corresponding storage device Step 3. Click “Format” Step 4.
- Page 34 (After formatting, please insert the hard disk into your computer and you can make related settings for the hard disk. After the setting is completed, insert the hard disk into this unit to start recording.) Restore Hard Drive Why restore hard drive? When the hard disk after the host computer is used is moved to other storage applications, the hard disk must be restored before it can be used for general storage purposes.
- Page 35 Step 4. System pops up the format window, check “Quick Format” and press start. “Restore this disk” will display. Press “OK” to format it. Step 5.
- Page 36 Step 6. After format completed, “Format completed” will display. Press “OK” and close format disk window. Step 7. After the completion, “Disk Restore Successful” will display. Press “OK”.
-
Page 37: Network Settings
4G Network Settings SIM card Setting PIN protection must be turned off. The steps are as follows: The following uses HUAWEI's CHT-E180 model 3.5G USB wireless network adapter as an example. Step 1. After installing the 4G network card on the SIM card, connect the 4G network card to the computer and the system will automatically execute the Mobile Partner. - Page 38 Step 3. Enter the correct PIN, Chunghwa Telecom default is 0000. Step 4. Confirm PIN, cancellation PIN code completed. Step 5. After completing the above actions, insert the SIM card into the SIM card slot on this unit and turn on the power before connecting. 3G Network Settings Set the relevant parameters of this machine 3G-Network Step 1.
-
Page 39: Setting Parameters
Step 2. Then insert the SD card into the computer, select the SD card disk, and enter the relevant parameter settings. Setting parameters Removable SD Source of device Storage UserName User name (generally no setting) Password User name (generally no setting) Server Address Server IP address Server Port... - Page 40 Step 3. Input complete, click OK to save. Then click on the location of the drive to see if the file already exists. (The file name is net3g.ncf). Step 4. Then install the SD card into the DVR's SD1 port and restart the unit.
- Page 41 Made in Taiwan...
Need help?
Do you have a question about the VVH-MDE43E83 and is the answer not in the manual?
Questions and answers