Table of Contents
Advertisement
Quick Links
Flytec 3040 / TT34
Operation Manual
11.30.2011
© Flytec USA 2007-2012
All rights reserved.
No part of this manual may be reproduced, stored in a retrieval system, or transmitted in any
form or by any means, electronic, mechanical, photocopying, recording, or otherwise without
permission in writing from Flytec USA. This manual is protected under U.S. and International
Copyright Laws.
Advertisement
Table of Contents

Related Manuals for Flytec 3040


Summary of Contents for Flytec 3040
- Page 1 No part of this manual may be reproduced, stored in a retrieval system, or transmitted in any form or by any means, electronic, mechanical, photocopying, recording, or otherwise without permission in writing from Flytec USA. This manual is protected under U.S. and International Copyright Laws.
-
Page 2: Table Of Contents
Pilots should abide by applicable aviation authority regulations and use best judgment for safe flying at all times, irrespective of instrument readings. Flytec is not responsible for loss or injury caused by the use of this instrument. You assume all risks associated with flying and the use of this instrument. -
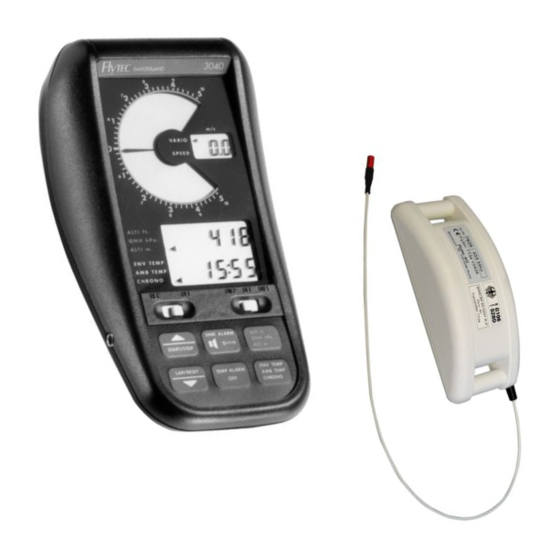
Page 3: Instrument Overview
Altimeter feet / Altimeter meters / QNH display Graphic variometer display Battery compartment (2 x 9 Volt battery) Digital variometer / Wind speed display (with optional sensor) © Flytec USA 2007-2012 All rights reserved Printed on 100% post-consumer recycled paper... -
Page 4: Basic Operation
Basic operation Turning on the Instrument The 3040 is equipped with two independent 9V batteries. The device is switched on by moving the main power switch to the position ON1 or ON2 (battery 1 or battery 2) After moving the power switch to either ON1 or ON2,... -
Page 5: Multifunction Keypad
The device has three operating modes: Run-mode, Set-mode and Configuration-mode. Run-mode: After switching on the 3040, it goes through its startup sequence and then enters the Run-mode. In this mode, the altitude, temperature or time and the vertical speed are continuously displayed. -
Page 6: The Altimeter
(such as with the passage of a cold front), corresponding to a change in elevation of more than 130 ft. Altimeter The 3040 is equipped with three altitude dispays: ALTI ft Absolute altimeter in feet... -
Page 7: Variometer
The digital vario display is the small window just to the right of the dial display. It shows the ascent/descent rate with a range of 0.0 to 20.0 (x100 ft/min) and with a resolution of 20 ft/min (0.2 x 100 ft/min). © Flytec USA 2007-2012 All rights reserved Printed on 100% post-consumer recycled paper... -
Page 8: Descent Tone
Time functions The 3040 has two time functions: a 24-hour real-time clock and a stopwatch. The real-time clock is maintained as long as there is at least one 9V battery installed. When replacing batteries, if they are done one-at-a-time, the time setting will not be lost in the process. The stopwatch functions only while the instrument is on;... -
Page 9: Set Time
Start/Stop key. If CRONO is not currently displayed, a running stopwatch will be indicated with a flashing indicator arrow (pointing at CHRONO). If the stopwatch is paused using the STOP or LAP key, the indicator arrow will be steady. © Flytec USA 2007-2012 All rights reserved Printed on 100% post-consumer recycled paper... -
Page 10: Temperature
3040. Each TT34 is coded with a unique ID number (s/n) which can be entered into a 3040. When this is done the 3040 will receive temperature only from the paired TT34. This feature allows many balloons equipped with Flytec systems to fly near one another without reading each other’s envelope temperatures. -
Page 11: Envelope Temperature Display (Env Temp)
7.2.2 Pairing to a 3040 In order for the 3040 to receive data from a TT34 it must first be paired. This is accomplished by setting the TT34 ID code (serial number) into the 3040. With the receiver set to ON, select ENV TEMP with short... -
Page 12: Personal Temperature Alarm
If - Id - appears in the ENV TEMP field, it means that either the 3040 is receiving data from a TT34 other than one with which it is paired, or it is receiving strong RF interference (radio/TV/microwave tower, 2-way radio, cell phone, etc.). If this happens, enter Set-mode as described above to check the code and correct it if necessary. -
Page 13: Never-Exceed Temperature Alarm
That way the time and date will be preserved and will not need to be reset. If the 3040 does not show the correct time/date after replacing the batteries, please follow the procedure for setting the time and date (Section 6.2). -
Page 14: Warranty
Technical data may be altered anytime without notice. 10. Warranty The 3040 is warranted against material and manufacturing defects for two years. Physical damage such as a broken housing or display window, as well as damage resulting from abuse, water entering the housing, battery leakage, improper care, exposure to excessive heat or opening the housing is excluded from this warranty. - Page 15 Cleaning of the housing should be limited to non-abrasive and non-solvent based cleaners using a soft cloth. When not in use, the 3040 should be stored in the supplied carry bag; of course the bag must be kept clean and dry. If the instrument is to be stored for an extended period it is recommended that the batteries be removed to eliminate the possibility of a battery leak.
-
Page 16: Mounting Instructions For Tt34 Temperature Transmitter
12. Mounting instructions for TT34 Temperature Transmitter © Flytec USA 2007-2012 All rights reserved Printed on 100% post-consumer recycled paper... -
Page 17: Qnh Correction
13. QNH Correction The pressure sensor in the 3040 is extremely accurate and very stable and should give many years of service without need for calibration. Over time, it may become necessary to calibrate the altimeter relative to the displayed QNH. If you notice that after setting the QNH from a reliable weather source (e.g., nearby flight service or weather station) there is a discrepancy... -
Page 18: Temperature Boundary Layer On A Balloon Envelope
14. Temperature Boundary Layer on a Balloon Envelope 1% (2.54 cm) © Flytec USA 2007-2012 All rights reserved Printed on 100% post-consumer recycled paper...
Need help?
Do you have a question about the 3040 and is the answer not in the manual?
Questions and answers