Table of Contents
Advertisement
Advertisement
Table of Contents

Subscribe to Our Youtube Channel
Related Manuals for marsden M-950


Summary of Contents for marsden M-950
-
Page 2: Table Of Contents
TABLE OF CONTENTS Specification ......................2 Preperation for equipment……………………………………………………………….3 DP-3810 Indicator……………………………………………………………………………..6 Power Supply…………………………………………………………………………………….6 Panel…………………………………………………………………………………………………7 Key Functions……………………………………………………………………………………7 LCD Symbol Description……………………………………………………………………8 Date & time setting procedure…………………………………………………………9 Normal weighing procedure (patient on bed) ........100 How to use BMI feature .................. 111 How to use tare function ................122 How to use pre-set tare function .............. -
Page 3: Specification
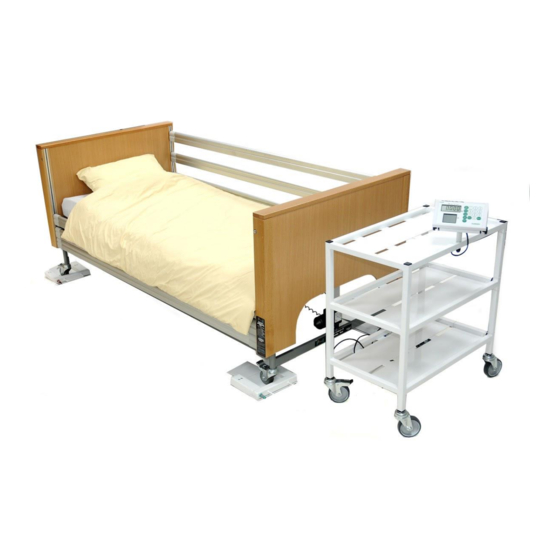
SPECIFICATION Model M-950 Capacity 600kg x 200g / 1000kg x 500g Accuracy 300g ± Weight Unit 0.2kg / 0.5kg LCD Display 1.0 inch LCD display with 5 and 1/2 digits Dimension Weighing Area- 92 X 3.5 X12.5 cm ON/OFF, ZERO, TARE, BMI, UNIT, HOLD, PRINT, Key Functions ... - Page 4 Using the handle of weigh beam Place weigh beams under bed next to the bed casters. Set the unit on a stable, level surface. When the bubble indicator is in the centre of the circle, M-950 is leveled correctly. Bubble indicator: Good Wrong All four feet must touch the surface to make sure that M-950 does not rock.
- Page 5 Connect the 4 weighing pads to the indicator via the colour coded cables. Switch scale on, check at zero and push bed forward and onto the weigh beams. We strongly recommend two people to operate the procedure.
- Page 6 Before moving bed on the weigh beam, please turn on the scale!! You must make sure that the connecting cable is not caught under the measuring foot, otherwise faulty measurements may result. 6. Four bed casters are now placed well on weighing pads.
-
Page 7: Dp3810 Indicator
DP3810 Indicator 1. Make sure the battery pack is installed in the battery box of indicator, or, plug the connector of AC ADAPTER (12V 2A) in the indicator. 2. Plug the cable to the printer, and then connect its 9D connector to the indicator. -
Page 8: Panel
PANEL KEY FUNCTIONS Description ON/OFF Switching on/off the scale PRINT Data transmission via interface Determination of Body Mass Index HOLD Hold function / determination of stable weighing value The scale is reset to 0.0kg display. It is possible to set max. up to 2% of maximal load for ZERO verified scales, and 2% or 100% of maximal load for common scales (possibility of selection in the menu) -
Page 9: Lcd Symbol Description
LCD SYMBOL DESCRIPTION Definitions Stable symbol: To indicate that the weight is stable. Minor weight: Weight under zero. Zero symbols: Weight is at zero point. Power Index: When the indicator show “LO” is means Battery need to charge. -
Page 10: Date & Time Setting Procedure
DATE & TIME SETTING PROCEDURE Press HOLD key 3 sec into the TIME SETTING mode, beginning with the top row, in the flashing space. Press HOLD to change flashing space. EX: To input Dec 25, 2008, 8:00am Enter year. Press HOLD to change flashing space. -
Page 11: Normal Weighing Procedure (Patient On Bed)
NORMAL WEIGHING PROCEDURE (patient on the bed) Turn On the scale using ON/OFF key. **(before moving bed on the weigh bridge) Setting the PRE-TARE value (bed weight), scale will automatically perform Tare function and the minus (-) sign will appear in front of Pre-Tare value. Setting Pre-Tare Function please refer “HOW TO USE PRE-TARE FUNCTION”... -
Page 12: How To Use Bmi Feature
HOW TO USE BMI FEATURE Use the instrument to calculate your BMI and understand your body condition. Please follow below procedure: In normal mode, press BMI key to enter into BMI mode. The display will show last height and the extreme left of figure will flicker. Enter the height by number key. -
Page 13: How To Use Tare Function
HOW TO USE TARE FUNCTION In normal mode, place a target which you want to tare its weight (like clothes) on the scale platform. Press TARE to tare the weight of target. LCD will return to zero. Then client stand on the scale and weigh. -
Page 14: How To Use Pre-Set Tare Function
HOW TO USE PRE-TARE FUNCTION Press ON/OFF to switch on device. Press TARE key 3sec to enable this function. The LCD shows 0.0kg and the Pre-tare arrow is flashing for input target’s weight. Input the weight that you wish to deduct. -
Page 15: Set Up Your Device
SET UP YOUR DEVICE When the scale is switched on, hold the [ZERO] key pressed for about 3 seconds until the display shows successively the „SETUP” and „A.OFF” symbols. AUTO-OFF TIME SETUP This enables operator to setup period to shut off device with no operation automatically. -
Page 16: Printing Function
PRINTING FUNCTION Weight, BMI and Height results can be printed for records using RS232 interface cable (included in accessory kit). After weighing and calculating BMI simply press PRINT key to print out the results. The format presented below is the standard format of results print- out and cannot be changed. - Page 17 RS232 Pin out Connecting with PC 1. Start Hyper Terminal Start Hyper Terminal program from clicking Start Menu → Programs → Accessories → Communication → Hyper Terminal. 2. New Connection Description Give new connection a name then click OK. 3. Select Your COM Port Click Connect to select your COM port.
-
Page 18: Error Message
ERROR MESSAGE... -
Page 19: Instruction Of Replacing Battery Pack
INSTRUCTION OF REPLACING BATTERY PACK 1. Open the battery door. 2. Disconnect the rechargeable battery pack then replace it. 3. Push the female and male connectors together. - Page 20 4. Push the battery pack into the battery holder then locate the cable connector above the battery pack. 5. Replace and close the battery door.
- Page 21 ROHS COMPLIANCE EU Directive 2002/95/EC restrict the use of the 6 substances below in the manufacture of specified types of electrical equipment. The product does not contain any of the restricted substances in concentrations and applications banned by the directive; and for components, the product is capable of being worked on ...
Need help?
Do you have a question about the M-950 and is the answer not in the manual?
Questions and answers