
Subscribe to Our Youtube Channel
Related Manuals for Grundfos COMFORT 10-16 Temperature control


Summary of Contents for Grundfos COMFORT 10-16 Temperature control
- Page 1 GRUNDFOS INSTRUCTIONS COMFORT 10-16 Temp, Auto and Digital Timer Installation and operating instructions...
-
Page 2: Table Of Contents
English (US) Installation and operating instructions Original installation and operating instructions Table of contents Limited warranty......3 General information . -
Page 3: Limited Warranty
Unless otherwise provided, the distributor or dealer will contact Grundfos or an authorized service station for instructions. Any defective product to be returned to Grundfos or a service station must be sent freight prepaid; documentation supporting the warranty claim and/or a Return Material Authorization must be included if so instructed. -
Page 4: General Information
2.1 Hazard statements The symbols and hazard statements below may appear in Grundfos installation and operating instructions, safety instructions and service instructions. DANGER Indicates a hazardous situation which, if not avoided, will result in death or serious personal injury. -
Page 5: Notes
2.2 Notes The symbols and notes below may appear in Grundfos installation and operating instructions, safety instructions and service instructions. Observe these instructions for explosion-proof products. A blue or gray circle with a white graphical symbol indicates that an action must be taken. -
Page 6: Pumped Liquids
2.3 Pumped liquids The product is suitable for pumping clean, thin, non-aggressive and non- explosive liquids without solid particles or fibers. It can be used for domestic hot water. The kinematic viscosity of water is 1 mm2/s (1 cSt) at 68 °F (20 °C). If the pump is used for a liquid with a higher viscosity, the hydraulic performance of the pump will be reduced. -
Page 7: Mechanical Installation
4. Mechanical installation WARNING Electric shock Death or serious personal injury ‐ Switch off the power supply before you start any work on the product. Make sure that the power supply cannot be switched on accidentally. WARNING Electric shock Death or serious personal injury ‐... -
Page 8: Preparing The Product For Installation
4.3 Preparing the product for installation Before installing the product, please observe the following: • Flush the system of debris before installation. • Refer to the arrows on the pump housing indicating the direction of the liquid flow through the pump. •... -
Page 9: Mounting The Product
4.4 Mounting the product WARNING Pressurised system Death or serious personal injury ‐ Tighten the union nuts before opening the isolating valves. The pumped liquid may be scalding hot and under high pressure. The arrows on the pump housing indicate the flow direction through the pump. Close the isolating valves and make sure that the system is not pressurized during the installation of the pump. - Page 10 Tighten the fittings. Switch on the pump. Do not switch on the pump until the system has been filled with liquid and vented.
-
Page 11: Installing The Temperature Sensor
4.5 Installing the temperature sensor The following only applies to the AUTO pump variants: The attached temperature sensor must be installed in the system in order to use the AUTO function. ADAPT Do as follows: Turn the faceplate counterclockwise on the pump, to release the sensor cable. -
Page 12: Changing The Pump Head Position
4.6 Changing the pump head position WARNING Electric shock Death or serious personal injury ‐ Switch off the power supply before you start any work on the product.Make sure that the power supply cannot be switched on accidentally. WARNING Hot surface Death or serious personal injury ‐... -
Page 13: Startup
Carefully turn the pump head to the desired position and tighten the union. Open the isolating valves. 5. Startup WARNING Hot surface Death or serious personal injury ‐ At high liquid temperatures, the product may become so hot that only the operating panel must be touched to avoid burns. WARNING Electric shock Death or serious personal injury... -
Page 14: Comfort Auto Variants
5.1 COMFORT Auto variants Pos. Description AUTO . It lights up when the pump is running in AUTO ADAPT ADAPT 100 % LED. When lit, the pump runs according to continuous 100 % mode. Sensor defect alarm. Lights up in red color if the internal or external temperature sensor is defect. -
Page 15: Comfort Temperature Control Variants
• Temperature control The operating range of the pump is kept within a predetermined temperature range. When a control mode is chosen, the corresponding LED is lit. If the LED blinks, the pump is in standby. The sensor must be installed regardless of what control mode the pump will run in. -
Page 16: Comfort Digital Timer Variants
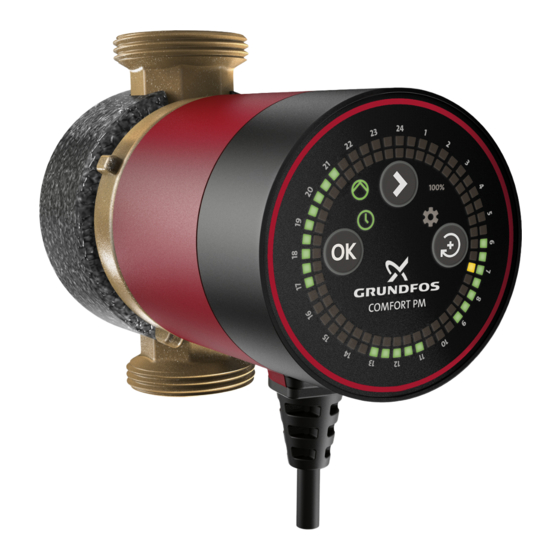
When a control mode is chosen, the corresponding LED is lit. If the LED blinks in temperature control mode, the pump is in standby. 5.3 COMFORT Digital Timer variants 5.3.1 Operating panel COMFORT PM Pos. Description Arrow button for changing mode. 100 % LED. - Page 17 To watch the COMFORT Digital Timer instruction video, scan the QR code below. http://v2.t2g.me/?q=fc0652a6 5.3.2 Setting the pump to continuous 100 % mode The pump is factory set to run at continuous 100 % mode. When the pump is powered on the 100 % LED is lit. 5.3.3 Setting the actual time Press the Arrow button to start the process.
- Page 18 Select or deselect a time period by pressing OK. One LED equals a time interval of 30 minutes. Press the Arrow button to confirm the settings. 5.3.5 Resetting to factory setting When resetting the timer, all saved time periods will be lost. Press and hold the Arrow button for 5 seconds.
-
Page 19: Service And Dismantle The Product
6. Service and dismantle the product WARNING Electric shock Death or serious personal injury ‐ A damaged product must be repaired or replaced by Grundfos or a service workshop authorized by Grundfos. WARNING Electric shock Death or serious personal injury ‐... - Page 20 WARNING Hot surface Death or serious personal injury ‐ At high liquid temperatures, the product may become so hot that only the operating panel must be touched to avoid burns. Close the isolating valves on all sides of the product and wait for the product to cool down before working on it.
-
Page 21: Fault Finding The Product
7. Fault finding the product 7.1 Defective external temperature sensor (only COMFORT Auto) The red error LED indicator is turned on during AUTO and turns off when ADAPT the pump is switched manually to temperature control mode. Cause The external temperature sensor is defective. Per default, the pump turns internally to temperature control mode, due to the external temperature sensor is needed for the AUTO control mode. -
Page 22: No Instant Hot Water
Cause The pump is not running. Remedy • Check the power supply. • Check the operating periods are according to the needs. • Check if the impeller is blocked. 7.5 No instant hot water No instant hot water. Cause The pump is running. Remedy •... -
Page 23: Technical Data
104 °F (40 °C). 9. Disposing of the product Use the public or private waste collection service. If this is not possible, contact the nearest Grundfos company or service workshop. See also end-of-life information at www.grundfos.com/product- recycling. - Page 24 U.S.A. GRUNDFOS Pumps Corporation 9300 Loiret Boulevard Lenexa, Kansas 66219 USA Tel.: +1 913 227 3400 Fax: +1 913 227 3500 GRUNDFOS Water Utility Inc. 3905 Enterprise Court P.O. Box 6620 Aurora, IL 60598-0620 Phone: +1-630-236-5500 Fax: +1-630-236-5511 GRUNDFOS CBS Inc.
- Page 25 99836602 09.2020 ECM: 1278422...
Need help?
Do you have a question about the COMFORT 10-16 Temperature control and is the answer not in the manual?
Questions and answers