
Subscribe to Our Youtube Channel
Related Manuals for Cameo DROP B4


Summary of Contents for Cameo DROP B4
- Page 1 USER´S MANUAL BEDIENUNGSANLEITUNG MANUEL D´UTILISATION MANUAL DE USUARIO INSTRUKCJA OBSŁUGI MANUALE D´USO DROP ® BATTERY POWERED OUTDOOR UPLIGHT CLDROPB4 / CLDROPB4WH...
-
Page 2: Table Of Contents
CONTENTS / INHALTSVERZEICHNIS / CONTENU / CONTENIDO / TREŚĆ / CONTENUTO ENGLISH ESPAÑOL SAFETY INFORMATION INSTRUCCIONES DE SEGURIDAD INTRODUCTION INTRODUCCIÓN CONNECTIONS, OPERATING AND DISPLAY ELEMENTS CONEXIONES, ELEMENTOS DE MANEJO Y ELEMENTOS OPERATION DE VISUALIZACIÓN IR REMOTE CONTROL (OPTIONAL) FUNCIONAMIENTO DIFFUSERS MANDO A DISTANCIA POR INFRARROJOS (OPCIONAL) INSTALLATION AND MOUNTNG DIFUSORES... -
Page 3: English
This device was developed and produced under the highest standards of quality in order to ensure smooth operation for many years. Please read these operating instructions carefully so that you can use your new Cameo Light product quickly and optimally. You can find more information on Cameo Light on our website WWW.CAMEOLIGHT.COM. - Page 4 36. The appliance is not to be used by persons (including children) with reduced physical, sensory or mental capabilities, or lack of experience and knowledge. 37. Children must be instructed not to play with the device. 38. If the power cord of the device is damaged, do not use the device. The power cord must be replaced by an adequate cable or assembly from an authorized service center.
-
Page 5: Introduction
CHARGING THE BATTERY, OPERATING AND STORING THE SPOTLIGHT • The spotlight’s internal battery may only be charged using the optionally available charging device. • The charge time from 0% to 100% charge status is approximately 3 hours. • After about 300 charging cycles (0–100%), the battery will retain approx. 70% of its nominal capacity. •... -
Page 6: Connections, Operating And Display Elements
CONNECTIONS, OPERATING AND DISPLAY ELEMENTS ON/OFF SWITCH Push switch for switching the spotlight on and off. OLED DISPLAY The OLED display shows the currently activated mode (main display 1), spotlight status (main display 2 = W-DMX and battery status), the menu items in the editing menu and the numerical value or operating mode in certain menu items. -
Page 7: Operation
• When the spotlight is switched on, the following is displayed in succession during the start-up process: “Software Update Please Wait...” (for service purposes only), “Welcome to Cameo”, the model name and the software version. After this process, the spotlight is ready for operation and the previously activated operating mode is launched. - Page 8 DMX command in the receiver or the Unlink command in the transmitter, regardless of whether a device has been disconnected from the power supply in the meantime. W-DMX STATUS ™ W-DMX deactivated W-DMX activated, not W-DMX activated and W-DMX activated and W-DMX activated and paired paired;...
- Page 9 Stand Alone Stand Alone 7 CH Settings Settings 13CH01 System Info System Info 13CH02 20 CH -------- Menu -------- ------ DMX Delay ------ DMX Address Group DMX Mode by DMX? No/Yes DMX Delay Delay 0.0s Stand Alone Settings ------ DMX Delay ------ ------ DMX Delay ------ --------...
- Page 10 Stand Alone Stand Alone Warning! Delay 7 CH System Info Group Group Group 20 CH Static -------- Menu -------- Stand Alone Settings Settings is controllable 13CH01 by DMX? by DMX? by DMX? DMX Address Static Dimmer -------- Menu -------- ------ DMX Delay ------ by DMX now! System Info...
- Page 11 This will take you to the submenu for setting the submenu items (see table, select with UP and DOWN, confirm with ENTER, change value or status with UP and DOWN, confirm with ENTER). Settings Wireless = W-DMX settings W-DMX On/Off On = W-DMX enabled Settings Off = W-DMX disabled...
-
Page 12: Ir Remote Control (Optional)
nu -------- Stand Alone Auto Program x dress Static Program 1 Dimmer Mode Color Macro Speed elay User Color Program 6 Alone Auto SYSTEM INFORMATION (System Info) Starting from main display 1, press MENU to enter the main menu. Now use the UP and DOWN controls to select the menu item System Info Info and confirm with ENTER. - Page 13 SP / SPEED Speed setting for the colour change program in Auto Program (PG) operating mode. Select a colour change program, press the SP button then use the + and - buttons to set the desired speed from 000 to 100. / BRIGHTNESS Pressing the button for setting brightness immediately activates the Static operating mode.
-
Page 14: Installation And Mountng
INSTALLATION AND MOUNTNG Thanks to the wide stand and mounting bracket, the spotlight can be positioned in a suitable location on a level surface. Installation on a traverse is possible with a traverse clamp, which is attached to the mounting bracket (A). Suitable traverse clamps are optionally available. Ensure firm connections and secure the spotlight by attaching a suitable safety cable to the securing lug on the mounting bracket. -
Page 15: Dmx Technology
DMX TECHNOLOGY DMX-512 DMX (Digital Multiplex) is the designation for a universal transmission protocol for communications between corresponding devices and controllers. A DMX controller sends DMX data to the connected DMX device(s). The DMX data is always transmitted as a serial data stream that is forwarded from one connected device to the next via the "DMX IN"... -
Page 16: Technical Data
TECHNICAL DATA Product number: CLDROPB4(WH) Product type: LED wash light Type: Outdoor spotlight Colour spectrum LED: RGBWA+UV Number of LEDs: LED type: 15 W Prolight LED PWM frequency: 800 Hz Beam angle: Beam Angle 22° / Field Angle 38° 1. Filter Medium BA 32° 2. -
Page 17: Manufacturer's Declarations
MANUFACTURER´S DECLARATIONS MANUFACTURER‘S WARRANTY & LIMITATIONS OF LIABILITY You can find our current warranty conditions and limitations of liability at: https://cdn-shop.adamhall.com/media/pdf/MANUFACTURERS- DECLARATIONS_CAMEO.pdf. To request warranty service for a product, please contact Adam Hall GmbH, Adam-Hall-Str. 1, 61267 Neu Anspach / Email: Info@adamhall.com / +49 (0)6081 / 9419-0. CORRECT DISPOSAL OF THIS PRODUCT (valid in the European Union and other European countries with a differentiated waste collection system) This symbol on the product, or on its documents indicates that the device may not be treated as household waste. -
Page 18: Deutsch
Dieses Gerät wurde unter hohen Qualitätsanforderungen entwickelt und gefertigt, um viele Jahre einen reibungslosen Betrieb zu gewähr- leisten. Bitte lesen Sie diese Bedienungsanleitung sorgfältig, damit Sie Ihr neues Produkt von Cameo Light schnell und optimal einsetzen können. Weitere Informationen über Cameo Light erhalten Sie auf unserer Website WWW.CAMEOLIGHT.COM. - Page 19 34. Der Abstand zu brennbaren Materialien muss mindestens 0,5 m betragen. 35. Netzleitungen zur Spannungsversorgung mehrerer Geräte müssen mindestens 1,5 mm² Aderquerschnitt aufweisen. In der EU müssen die Leitungen H05VV-F, oder gleichartig, entsprechen. Geeignete Leitungen werden von Adam Hall angeboten. Mit diesen Leitungen können Sie mehrere Geräte über den Power out Anschluss mit dem Power IN Anschluss eines weiteren Gerätes verbinden.
- Page 20 AKKUSICHERHEIT • Halten Sie den Scheinwerfer mit Akku fern von übermäßiger Hitze und direkter Sonneneinstrahlung. Legen Sie ihn nicht auf oder in Heizgeräte, wie Mikrowellen, Öfen oder Heizkörper. Akkus können bei Überhitzung explodieren. • Versuchen Sie nicht, den Scheinwerfer zu öffnen und den Akku zu ändern oder zu überarbeiten, Fremdkörper in den Akku einzuführen oder ihn in Wasser oder andere Flüssigkeiten einzutauchen bzw.
-
Page 21: Einführung
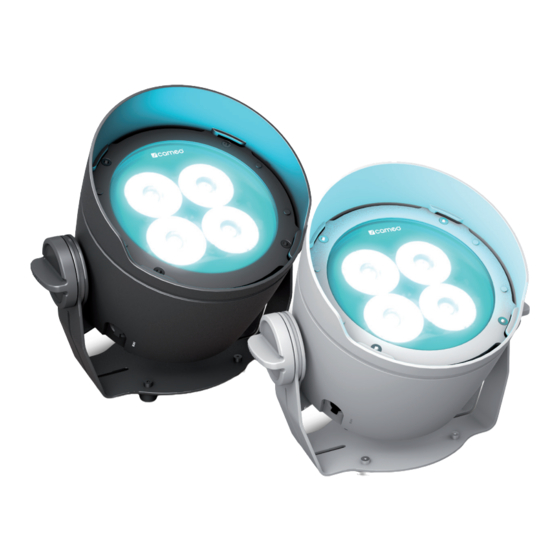
EINFÜHRUNG Akkubetriebener Outdoor Scheinwerfer mit 4 x 15W RGBWA+UV LEDs und W-DMX™ CLDROPB4 / CLDROPB4WH STEUERUNGSFUNKTIONEN 3-Kanal, 4-Kanal, 6-Kanal, 7-Kanal, 13-Kanal 1, 13-Kanal 2 und 20-Kanal DMX-Steuerung via W-DMX™ Standalone Funktionen Steuerbar via IR-Fernbedienung (Fernbedienung optional erhältlich) EIGENSCHAFTEN 4 x 15W RGBWA+UV LEDs. Outdoor-Gehäuse mit IP65 Schutzart. Netzunabhängiger Betrieb dank internem Li-Ion Akku. DMX-Ansteuerung via W-DMX™. -
Page 22: Anschlüsse, Bedien- Und Anzeigeelemente
ANSCHLÜSSE, BEDIEN- UND ANZEIGEELEMENTE EIN- BZW. AUSSCHALTER Druckschalter zum Ein- und Ausschalten des Scheinwerfers. OLED-DISPLAY Das OLED-Display zeigt die aktuell aktivierte Betriebsart (Hauptanzeige 1), den Scheinwerfer-Status (Hauptanzeige 2 = W-DMX- und Akku-Status) die Menüpunkte im Bearbeitungsmenü und den Zahlenwert bzw. Betriebszustand in bestimmten Menüpunkten an. Zum Wechseln zwischen den beiden Hauptanzeigen drücken Sie gleichzeitig kurz auf ENTER und DOWN, in das Bearbeitungsmenü... -
Page 23: Bedienung
• Nach dem Einschalten des Scheinwerfers wird während des Startvorgangs nacheinander „Software Update Please Wait“ (nur für Ser- vicezwecke), „Welcome to Cameo“, die Modellbezeichnung und die Softwareversion im Display angezeigt. Nach diesem Vorgang ist der Scheinwerfer betriebsbereit und die Betriebsart, die zuvor aktiviert war, wird gestartet. - Page 24 W-DMX™ Zum Koppeln des W-DMX Receivers (Empfänger) mit einem W-DMX kompatiblen Transmitter (Sender) muss im Menü des Receivers unter Wireless Settings W-DMX eingeschaltet werden (W-DMX On) und im gleichen Menüpunkt der Befehl Reset ausgeführt werden (Reset auswählen und mit ENTER bestätigen). Der Receiver befindet sich nun in Koppelbereitschaft und wartet auf die Kopplungsanfrage eines Transmitters.
- Page 25 Mode Mode Mode Mode DMX DELAY Static Color Macro User Color Auto Mit Hilfe der Funktion DMX Delay kann auf einfache Weise mit einer beliebig großen Anzahl Scheinwerfern des gleichen Modells und Softwarestands ein Lauflichteffekt realisiert werden, der sonst nur mit einem geeigneten DMX-Controller und aufwändiger Programmierung erreicht werden könnte.
- Page 26 -------- Menu -------- DMX Address ------ DMX Delay ------ DMX Address 3 CH 001 - 510 DMX Address DMX Mode Group DMX Mode 4 CH DMX Address Fixture Status DMX Delay DMX Delay DMX Mode by DMX? No/Yes 6 CH Stand Alone DMX Delay Delay...
- Page 27 Turquoise White Stand Alone Auto Yellow W Magenta Cyan Cold White Settings Yellow Pink System Info Green Warm White -------- Menu -------- Stand Alone User Color Color x Turquoise White DMX Address Static Color 1 Dimmer Cyan Cold White STAND-ALONE-BETRIEBSART AUTO DMX Mode Color Macro Strobe...
- Page 28 elay User Color Green Alone Auto Blue Info White Amber DimResp. = Dimmverhalten Der Strahler reagiert abrupt auf Änderungen des DMX-Werts Halogen Der Strahler verhält sich ähnlich einem Halogenstrahler nu -------- Stand Alone Color Macro mit sanften Helligkeitsänderungen dress Static Color O Blue Mode...
-
Page 29: Ir Fernbedienung
IR-FERNBEDIENUNG (optional) Aktivieren Sie in den Systemeinstellungen Settings unter „IR Remote“ die Steuerung durch die Infrarot-Fernbedienung (IR Remote On). Richten Sie nun die Infrarot-Fernbedienung in Sichtverbindung direkt auf den auf der Vorderseite des Strahlers verbauten Infrarot-Sensor. Die maximale Reichweite beträgt circa 8 Meter. Deaktivieren Sie die Steuerung durch die Infrarot-Fernbedienung (IR Remote Off), sobald Sie den Scheinwerfer per W-DMX steuern möchten. -
Page 30: Streuscheiben
STREUSCHEIBEN Im Lieferumfang des Scheinwerfers befinden sich zwei Streuscheiben, die über ein unterschiedliches Abstrahlverhalten verfügen (32°, 45°). Der Abstrahlwinkel des Scheinwerfers kann somit individuell auf 22° (ohne Streuscheibe), 32°, oder 45° eingestellt werden. Setzen Sie die gewünschte Streuscheibe vor die Lichtaustrittslinsen und drehen sie nach dem Prinzip eines Bajonettverschlusses gegen den Uhrzeigersinn, bis die vier Außennasen am Rand der Streuscheibe in ihre Halterungen in der Streulichtblende greifen. - Page 31 Um die Tilt-Funktion mittels Tilt-Schraube bei der Verwendung als Uplight wirksam nutzen zu können und um eine dezentere Optik zu erzie- len, muss der Montagebügel demontiert werden, indem Sie die vier Torxschrauben T20 (B), die den Montagebügel am Scheinwerfergehäuse halten, mit einem geeigneten Werkzeug lösen.
-
Page 32: Dmx Technik
DMX TECHNIK DMX-512 DMX (Digital Multiplex) ist die Bezeichnung für ein universelles Übertragungsprotokoll für die Kommunikation zwischen entsprechenden Geräten und Controllern. Ein DMX-Controller sendet DMX-Daten an das/die angeschlossene(n) DMX-Gerät(e). Die DMX-Datenübertragung erfolgt stets als serieller Datenstrom, der über die an jedem DMX-fähigen Gerät vorhandenen DMX IN- und DMX OUT-Anschlüsse (XLR-Steckverbinder) von einem angeschlossenen Gerät an das nächste weitergeleitet wird, wobei die maximale Anzahl der Geräte 32 nicht überschreiten darf. -
Page 33: Technische Daten
TECHNISCHE DATEN Artikelnummer: CLDROPB4(WH) Produktart: LED Wash Light Typ: Outdoor Scheinwerfer Farbspektrum LED: RGBWA+UV LED Anzahl: LED Typ: 15 W Prolight LED PWM Frequenz: 800 Hz Abstrahlwinkel: Beam Angle 22° / Field Angle 38° 1. Filter Medium BA 32° 2. Filter Wide BA 45° DMX-Eingang: W-DMX (Wireless DMX) -
Page 34: Herstellererklärungen
HERSTELLERERKLÄRUNGEN HERSTELLERGARANTIE & HAFTUNGSBESCHRÄNKUNG Unsere aktuellen Garantiebedingungen und Haftungsbeschränkung finden Sie unter: https://cdn-shop.adamhall.com/media/pdf/ MANUFACTURERS-DECLARATIONS_CAMEO.pdf. Im Service Fall wenden Sie sich bitte an Adam Hall GmbH, Adam-Hall-Str. 1, 61267 Neu Anspach / E-Mail Info@adamhall.com / +49 (0)6081 / 9419-0. KORREKTE ENTSORGUNG DIESES PRODUKTS (Gültig in der Europäischen Union und anderen europäischen Ländern mit Mülltrennung) Dieses Symbol auf dem Produkt oder dazugehörigen Dokumenten weist darauf hin, dass das Gerät am Ende der Produktlebenszeit nicht zusammen mit dem normalen Hausmüll entsorgt werden darf, um Umwelt- oder Personenschäden durch unkontrollierte Abfallentsorgung zu vermeiden. -
Page 35: Francais
Cet appareil a été développé et fabriqué en appliquant des exigences de qualité très élevées: il garantit des années de fonctionnement sans problème.Veuillez lire attentivement ce Manuel Utilisateur : vous apprendrez rapidement à utiliser votre appareil Cameo Light de façon optimale. - Page 36 34. Respectez une distance minimale de 0,5m par rapport à des matériaux inflammables. 35. Si vous désirez alimenter plusieurs projecteurs simultanément, les conducteurs du câble secteur doivent posséder une section minimale de 1,5 mm². Dans l’Union Européenne, les câbles électriques doivent être de type H05VV-F ou équivalent. Adam Hall propose des câbles secteur adaptés.
- Page 37 SÉCURITÉ DE LA BATTERIE • Tenez le projecteur à batterie à l’écart d’une chaleur excessive et de la lumière directe du soleil. Ne le posez pas sur ou dans des appareils de chauffage tels que des micro-ondes, des fours ou des radiateurs. Les batteries peuvent exploser en cas de surchauffe.
-
Page 38: Introduction
INTRODUCTION Projecteur d’extérieur fonctionnant sur batterie à 4 LED RGBWA + UV de 15 W et W-DMX™ CLDROPB4 / CLDROPB4WH FONCTIONS DE PILOTAGE Pilotage DMX sur 3 canaux, 4 canaux, 6 canaux, 7 canaux, 13 canaux 1, 13 canaux 2 et 20 canaux via W-DMX™ Fonctions Standalone (mode autonome) Pilotable par télécommande infrarouge (télécommande disponible en option) CARACTÉRISTIQUES 4 LED RGBWA+UV de 15W Boîtier d’extérieur avec indice de protection IP65. -
Page 39: Raccordements, Éléments De Commande Et D'affichage
RACCORDEMENTS, ÉLÉMENTS DE COMMANDE ET D’AFFICHAGE INTERRUPTEUR DE MARCHE ET D’ARRÊT Interrupteur à pression pour allumer et éteindre le projecteur. ÉCRAN OLED L’écran OLED affiche le mode de fonctionnement actuellement activé (affichage principal 1), l’état du projecteur (affichage principal 2 = état W-DMX et batterie), les options du menu d’édition et la valeur numérique ou l’état de fonctionnement dans certaines options de menu. -
Page 40: Utilisation
• Après la mise sous tension du projecteur s’affichent successivement à l’écran pendant la phase de démarrage les mentions : « Software Update Please Wait... » (uniquement à des fins de maintenance), un message de bienvenue (« Welcome to Cameo »), la référence du modèle et la version du logiciel. À l’issue de cette phase, le projecteur est opérationnel et le mode de fonctionnement précédemment activé... - Page 41 W-DMX™ Pour coupler un récepteur W-DMX à un émetteur compatible W-DMX, il est nécessaire d’activer W-DMX (W-DMX On) sous Wireless Set- tings dans le menu du récepteur et d’exécuter la commande Reset au même point du menu (sélectionner Reset et confirmer par ENTER). Le récepteur est maintenant prêt pour le couplage et attend la demande de couplage d’un émetteur.
- Page 42 Menu Menu DMX Mode DMX Address DMX Address DMX Address 3 CH 001 - 510 DMX Mode DMX Mode 4 CH DMX Delay DMX Delay 6 CH durée de décalage pour tous les projecteurs (DMX Delay by DMX ? Yes). Stand Alone Stand Alone 7 CH...
- Page 43 Menu Menu DMX Mode DMX Mode by DMX? DMX Address No/Yes ------ DMX Delay ------ DMX Address DMX Address 3 CH DMX Delay Delay 0.0s 001 - 510 Group DMX Mode DMX Mode 4 CH Stand Alone by DMX? DMX Delay DMX Delay 6 CH Settings...
- Page 44 Settings Blue DMX Mode Color Macro Strobe System Info White DMX Delay User Color Color 8 Amber Stand Alone Auto Green Settings Blue System Info White -------- Menu -------- Stand Alone Auto Program x Amber DMX Address Static Program 1 Dimmer DMX Mode Color Macro...
- Page 45 Blue White Info Amber LED Calibra- = Étalonnage des couleurs Red, Green, Blue, Étalonnage spécifique des couleurs. Réglage de la nu -------- Stand Alone Color Macro tion White, Amber, UV luminosité des 6 groupes de LED RGBWA+UV entre 000 dress Color O Static Blue...
-
Page 46: Télécommande Infrarouge (En Option)
TÉLÉCOMMANDE INFRAROUGE (en option) Activer le pilotage par la télécommande infrarouge dans les paramètres système de réglage sous « IR Remote » (IR Remote On). Diriger ensuite la télécommande infrarouge par contact visuel directement vers le capteur infrarouge situé sur la face avant du projecteur. Sa portée maximale est d’environ 8 mètres. -
Page 47: Diffuseurs
DIFFUSEURS Le projecteur est fourni avec deux diffuseurs comportant des angles de diffusion différents (32°, 45°). L’angle de diffusion du projecteur peut ainsi être modifié et réglé de façon personnalisée sur 22° (sans diffuseur), 32° ou 45°. Placez le diffuseur souhaité devant les lentilles de sortie de lumière et faites-la tourner dans le sens antihoraire comme dans le cas d’une fermeture à... - Page 48 Pour pouvoir utiliser efficacement la fonction d’inclinaison à l’aide de la vis d’inclinaison, en cas d’utilisation comme luminaire Uplight, et obtenir un aspect plus discret, démontez l’équerre de montage en desserrant à l’aide d’un outil approprié les quatre vis Torx T20 (B) qui maintiennent l’équerre de montage sur le boîtier du projecteur.
-
Page 49: Technologie Dmx
TECHNIQUE DMX DMX-512 Le terme DMX (Digital Multiplex) désigne un protocole de transport universel permettant la communication entre des appareils et des contrôleurs à ce format. Un contrôleur DMX envoie des données DMX aux appareils DMX qui lui sont connectés. Les données DMX sont transportées sous forme d'un flux série, renvoyé... -
Page 50: Caractéristiques Techniques
CARACTÉRISTIQUES TECHNIQUES Référence : CLDROPB4(WH) Catégorie de produit : Projecteur wash à LED Type : Projecteur à usage extérieur Spectre de couleurs des LED : RGBWA+UV Nombre de LED : Type de LED : LED Prolight de 15 W Fréquence du signal PWM : 800 Hz Angle de dispersion : Beam Angle 22°... -
Page 51: Déclarations Du Fabricant
DECLARATIONS GARANTIE FABRICANT & LIMITATION DE RESPONSABILITÉ Nos conditions actuelles de garantie et de limitation de responsabilité sont disponibles à l‘adresse suivante : https://cdn-shop.adamhall.com/ media/pdf/MANUFACTURERS-DECLARATIONS_CAMEO.pdf. Pour les réparations, veuillez contacter Adam Hall GmbH, Adam-Hall-Str. 1, 61267 Neu Anspach / E-Mail Info@adamhall.com / +49 (0)6081 / 9419-0. TRI ET MISE AUX DÉCHETS CORRECTE DE CE PRODUIT (Valid in the European Union and other European countries with waste separation) (Applicable dans l‘Union Européenne et les autres pays européens pratiquant le tri des déchets) La présence de ce symbole sur le... -
Page 52: Español
Este equipo está diseñado y fabricado con los estándares de calidad más exigentes, para garantizar un correcto funcionamiento durante muchos años.Lea atentamente este manual de usuario para poder aprovechar rápidamente toda la funcionalidad de su nuevo producto de Cameo Light. Más información sobre Cameo Light en la web WWW.CAMEOLIGHT.COM. MEDIDAS DE SEGURIDAD 1. - Page 53 33. La acumulación de polvo y otras partículas en el interior del equipo puede causar daños. Dependiendo de las condiciones ambientales (polvo, nicotina, niebla, etc.), deberá realizarse periódicamente el mantenimiento o la limpieza del equipo por personal especializado, para evitar cualquier sobrecalentamiento o fallo de funcionamiento (mantenimiento y limpieza no cubiertos por la garantía). 34.
- Page 54 SEGURIDAD DE LA BATERÍA • Mantenga el foco con batería alejado del calor excesivo y de la radiación solar directa. No lo coloque encima ni dentro de aparatos calefactores como microondas, hornos o radiadores. Las baterías pueden explotar si se sobrecalientan. •...
-
Page 55: Introducción
INTRODUCCIÓN Foco a batería para exteriores con 4 LED RGBWA+UV de 15 W y W-DMX™ CLDROPB4 / CLDROPB4WH MODOS DE CONTROL Control DMX de 3 canales, 4 canales, 6 canales, 7 canales, 13 canales 1, 13 canales 2 y 20 canales a través de W-DMX™ Funciones autónomas Controlable mediante mando a distancia por infrarrojos (mando a distancia opcional) CARACTERÍSTICAS... -
Page 56: Conexiones, Elementos De Manejo Y Elementos De Visualización
CONEXIONES, ELEMENTOS DE MANEJO Y ELEMENTOS DE VISUALIZACIÓN INTERRUPTOR DE ENCENDIDO/APAGADO Pulsador para encender y apagar el foco. PANTALLA OLED La pantalla OLED muestra el modo operativo activado actualmente (pantalla principal 1), el estado del foco (pantalla principal 2 = estado de W-DMX y de la batería), las opciones del menú... -
Page 57: Funcionamiento
• Tras encender el foco, durante el proceso de arranque se mostrarán de forma consecutiva en pantalla los mensajes «Software Update Please Wait...» (Actualización del software, espere) (solo con fines de servicio técnico) y «Welcome to Cameo» (Bienvenidos a Cameo), así... - Page 58 W-DMX™ Para emparejar el W-DMX Receiver (receptor) a un W-DMX Transmitter compatible (transmisor), es necesario activar W-DMX en Wireless Settings (W-DMX On) y ejecutar el comando Reset en la misma opción de menú (seleccione Reset y confirme con ENTER). Ahora el receptor está...
- Page 59 Mode Mode Mode Mode Static Color Macro User Color Auto DMX DELAY Con la función DMX Delay se puede crear un efecto de luces en movimiento de manera sencilla con un gran número de focos del mismo modelo y con la misma versión de software, lo que normalmente solo se podría hacer con un controlador DMX adecuado y mucha progra- Menu Menu DMX Mode...
- Page 60 DMX Address Group DMX Delay DMX Delay 6 CH DMX Mode by DMX? No/Yes Stand Alone Stand Alone 7 CH DMX Delay Settings Delay 0.0s Settings 13CH01 Mode Mode Mode Mode Stand Alone System Info System Info 13CH02 Static Color Macro User Color Auto Settings...
- Page 61 Settings Blue DMX Mode Color Macro Strobe System Info White DMX Delay User Color Color 8 Amber Stand Alone Auto Green Settings Blue System Info White -------- Menu -------- Stand Alone Auto Program x Amber DMX Address Static Program 1 Dimmer DMX Mode Color Macro...
- Page 62 Blue Info White Amber LED Calibra- = Calibración del color Red, Green, Blue, Calibración individual de colores. Configuración del nu -------- Stand Alone Color Macro tion White, Amber, UV brillo común a los modos operativos de los 6 grupos de dress Static Color O...
-
Page 63: Mando A Distancia Por Infrarrojos (Opcional)
MANDO A DISTANCIA POR INFRARROJOS (opcional) En la configuración del sistema «Settings», activar en la opción «IR Remote» el control mediante el mando a distancia por infrarrojos (IR Remote On). Apunte con el mando a distancia por infrarrojos directamente al sensor de infrarrojos incorporado en la parte delantera del foco. -
Page 64: Difusores
DIFUSORES En el contenido suministrado con el foco se encuentran dos difusores que generan distintos efectos de dispersión (un difusor de 32° y otro de 45°). De esa forma, el ángulo de dispersión del foco puede ajustarse de forma individual a 22° (sin difusor), 32° o 45°. Coloque el difusor deseado delante de la lente de salida luminosa y gírelo, al igual que con una conexión tipo bayoneta, en sentido contrario al de las agujas del reloj hasta que las cuatro pestañas exteriores del borde del difusor encajen en los huecos correspondientes del parasol. - Page 65 En caso de utilización como foco de luz vertical, para poder utilizar la función de inclinación de manera eficaz con el tornillo de inclinación y lograr un aspecto más discreto, se debe desmontar el soporte de montaje aflojando los cuatro tornillos Torx T20 (B), que fijan el soporte de montaje a la carcasa del foco, con una herramienta adecuada.
-
Page 66: Tecnología Dmx
TECNOLOGÍA DMX DMX512 DMX (Digital Multiplex) es el nombre de un protocolo universal utilizado como medio de comunicación entre dispositivos y controladores. El controlador DMX envía datos DMX a los equipos DMX conectados. Los datos DMX se envían como datos serie que se transmiten de equipo a equipo a través de los conectores XLR «DMX IN»... -
Page 67: Datos Técnicos
DATOS TÉCNICOS Número de artículo: CLDROPB4(WH) Clase de producto: Washer LED Tipo: Foco para exteriores Espectro cromático de los LED: RGBWA+UV Cantidad de LED: Tipo de LED: LED Prolight de 15 W Frecuencia de la modulación por ancho de pulsos: 800 Hz Ángulo de dispersión: 22°... -
Page 68: Declaraciones Del Fabricante
DECLARACIÓN DEL FABRICANTE GARANTÍA DEL FABRICANTE Y LIMITACIÓN DE RESPONSABILIDAD Consulte nuestras condiciones de garantía y limitaciones de responsabilidad en: https://cdn-shop.adamhall.com/media/pdf/MANUFACTU- RERS-DECLARATIONS_CAMEO.pdf. En caso de necesitar servicio técnico, póngase en contacto con Adam Hall GmbH, Adam-Hall-Str. 1, 61267 Neu Anspach (Alemania); correo electrónico Info@adamhall.com; +49 (0)6081 / 9419-0. ELIMINACIÓN CORRECTA DE ESTE PRODUCTO (Aplicable en la Unión Europea y en los países europeos que dispongan de un sistema de recogida selectiva) El símbolo que aparece sobre el producto o en la documentación adjunta indica que al final de la vida útil del equipo, no deberá... -
Page 69: Polski
To urządzenie zostało zaprojektowane i wyprodukowane przy zastosowaniu najwyższych kryteriów jakościowych w celu zapewnienia wieloletniej bezawaryjnej eksploatacji. Proszę starannie przeczytać niniejszą instrukcję obsługi, aby móc jak najszybciej zacząć użytkować ten produkt marki Cameo Light. Więcej informacji na temat Cameo Light znajdą Państwo na naszej stronie internetowej pod adresem WWW.CAMEOLIGHT.COM. - Page 70 32. Instalacja urządzenia powinna odbywać się, gdy urządzenie nie jest podłączone do źródła zasilania (należy wyjąć wtyczkę z gniazda). 33. Kurz i inne osady wewnątrz urządzenia mogą je uszkodzić. W zależności od warunków otoczenia (kurz, nikotyna, opary itp.) urządzenie powinno być konserwowane lub czyszczone przez wykwalifikowanego specjalistę (usługa nieobjęta gwarancją), aby zapobiec przegrzaniu i nieprawidłowemu działaniu.
-
Page 71: Zasady Bezpieczeństwa
ZASADY BEZPIECZEŃSTWA • Chroń reflektor z akumulatorem przed wysoką temperaturą i bezpośrednim oddziaływaniem promieniowania słonecznego. Nie kładź go na urządzeniach grzejnych, takich jak kuchenki mikrofalowe, piece i kaloryfery, ani nie wkładaj go do środka tych urządzeń. W razie przegrzania akumulator może wybuchnąć. •... -
Page 72: Wprowadzenie
WPROWADZENIE Zewnętrzny reflektor zasilany akumulatorowo z 4 diodami LED 15 W RGBWA+UV i W-DMX™ CLDROPB4 / CLDROPB4WH FUNKCJE STEROWANIA Sterowanie DMX 3-kanałowe, 4-kanałowe, 6-kanałowe, 7-kanałowe, 13-kanałowe 1, 13-kanałowe 2 i 20-kanałowe za pośrednictwem W-DMX™ Funkcje standalone Sterowanie za pomocą opcjonalnego pilota na podczerwień CHARAKTERYSTYKA 4 x dioda LED RGBWA+UV 15 W. -
Page 73: Przyłącza, Elementy Obsługi I Wskaźniki
PRZYŁĄCZA, ELEMENTY OBSŁUGI I WSKAŹNIKI WŁĄCZNIK/ WYŁĄCZNIK Przycisk do włączania i wyłączania reflektora. WYŚWIETLACZ OLED Wyświetlacz OLED pokazuje bieżący tryb pracy (widok główny 1), stan reflektora (wyświetlacz główny 2 = stan W-DMX i stan akumulatora), pozycje w menu edycji oraz wartość liczbową lub stan pracy w poszczególnych pozycjach menu. Aby przełączać się między dwoma główny- mi wyświetlaczami, należy krótko nacisnąć... -
Page 74: Obsługa
• Po włączeniu reflektora podczas procesu uruchamiania wyświetlana jest następująca sekwencja komunikatów: „Software Update Please Wait...” (tylko do celów serwisowych), „Welcome to Cameo”, a także nazwa modelu i wersji oprogramowania. Następnie reflektor jest gotowy do pracy w ostatnio wybranym trybie. - Page 75 W-DMX™ Aby sparować odbiornik W-DMX z nadajnikiem kompatybilnym z W-DMX, funkcja W-DMX musi być włączona (W-DMX On) w menu odbior- nika w sekcji Wireless Settings (Ustawienia sieci bezprzewodowej), a polecenie Reset musi być wykonane w tej samej pozycji menu (wybierz Reset i potwierdź przyciskiem ENTER). Odbiornik jest teraz w stanie gotowości do sparowania i czeka na żądanie z nadajnika. Roz- począć...
- Page 76 Static Color Macro User Color Auto Menu Menu DMX Mode DMX Address DMX Address DMX Address 3 CH 001 - 510 Czas opóźnienia (czas opóźnienia sygnału DMX) może być ustawiony ręcznie na każdym reflektorze oddzielnie z różnymi czasami opóźnie- DMX Mode DMX Mode 4 CH nia (DMX Delay by DMX? No), a z drugiej strony przez podłączony sterownik DMX na specjalnie zarezerwowanym kanale DMX z tym samym...
- Page 77 Mode Mode Mode Mode Warning! Delay System Info Group Group 20 CH Group Static Color Macro User Color Auto is controllable by DMX? by DMX? by DMX? -------- Menu -------- ------ DMX Delay ------ by DMX now! Delay 0.0s Delay 0.0s DMX Address Group...
- Page 78 Stand Alone Auto Green DMX Address Static Color 1 Dimmer Settings Blue DMX Mode Color Macro Strobe System Info White DMX Delay User Color Color 8 Amber Stand Alone Auto Green Settings Blue System Info White -------- Menu -------- Stand Alone Auto Program x Amber...
- Page 79 nu -------- Stand Alone Color Macro dress Static Color O Blue Mode Color Macro Lavender elay User Color Amber Mauve Alone Auto Yellow W Magenta Auto Lock = automatyczna blokada elementów automatyczna blokada elementów obsługi włącza się Yellow Pink obsługi po ok.
-
Page 80: Pilot Zdalnego Sterowania (Opcjonalny)
PILOT ZDALNEGO STEROWANIA (opcjonalny) W ustawieniach systemu w pozycji „IR Remote” włącz sterowanie pilotem na podczerwień (IR Remote On). Skieruj pilota na podczerwień bezpośrednio na czujnik podczerwieni wbudowany z przodu reflektora. Maksymalny zasięg wynosi około 8 metrów. Wyłącz sterowanie za pomocą... -
Page 81: Dyfuzory
DYFUZORY W zestawie reflektora znajdują się dwa dyfuzory o różnym kącie rozwarcia wiązki świetlnej (32°, 45°). A zatem kąt rozwarcia wiązki świetlnej reflektora można ustawić na 22° (bez dyfuzora), 32° lub 45°. Umieść żądaną tarczę dyfuzora przed soczewkami emitującymi światło i obróć ją w lewo do zatrzaśnięcia złącza bagnetowego, aż cztery zewnętrzne ucha na krawędzi tarczy dyfuzora znajdą się w odpowiednich miejscach osłony soczewki. - Page 82 Aby móc efektywnie korzystać z funkcji pochylania ustawianej za pomocą śruby, w przypadku zastosowania urządzenia jako reflektora, i uzyskać bardziej dyskretny wygląd, należy zdemontować uchwyt montażowy przez poluzowanie za pomocą odpowiedniego narzędzia czterech śrub T20 Torx (B), które mocują wspornik montażowy do obudowy reflektora.
-
Page 83: Technika Dmx
TECHNIKA DMX DMX-512 DMX (Digital Multiplex) to nazwa uniwersalnego protokołu transmisji do komunikacji między odpowiednimi urządzeniami a kontrolerami. Kontroler DMX wysyła dane DMX do podłączonych urządzeń DMX. Transmisja danych DMX następuje zawsze w formie szeregowego strumienia danych, który jest przekazywany z jednego urządzenia do następnego przez znajdujące się... -
Page 84: Dane Techniczne
DANE TECHNICZNE Numer artykułu: CLDROPB4(WH) Rodzaj produktu: Naświetlacz LED Wash Light Typ: Reflektory zewnętrzne Widmo kolorów LED: RGBWA+UV Liczba diod LED: Typ diod LED: 15 W Prolight LED Częstotliwość modulacji PWM: 800 Hz Kąt rozwarcia wiązki świetlnej: Beam Angle 22° / Field Angle 38° 1. -
Page 85: Oświadczenia Producenta
DEKLARACJE PRODUCENTA GWARANCJA PRODUCENTA I OGRANICZENIE ODPOWIEDZIALNOŚCI Nasze aktualne warunki gwarancji i informacje dotyczące ograniczenia odpowiedzialności znajdą Państwo na stronie: https://cdn-shop. adamhall.com/media/pdf/MANUFACTURERS-DECLARATIONS_CAMEO.pdf. W razie konieczności skorzystania z serwisu proszę skontaktować się z firmą Adam Hall GmbH, Adam-Hall-Str. 1, 61267 Neu Anspach / e-mail Info@adamhall.com / +49 (0)6081 / 9419-0. PRAWIDŁOWA UTYLIZACJA NINIEJSZEGO PRODUKTU (Obowiązuje w Unii Europejskiej i innych krajach europejskich stosujących system sortowania odpadów) Niniejszy symbol na produk- cie lub związanych z nim dokumentach wskazuje, iż... -
Page 86: Italiano
Questo dispositivo è stato sviluppato e prodotto in conformità con elevati standard qualitativi che ne garantiscono il regolare funzionamento per molti anni. Leggete attentamente questo manuale d‘uso per utilizzare al meglio il vostro nuovo prodotto Cameo Light. Per maggiori informazioni su Cameo Light consultare la nostra pagina Web WWW.CAMEOLIGHT.COM. - Page 87 35. I cavi di rete utilizzati per l’alimentazione elettrica di più dispositivi devono avere una sezione di almeno 1,5 mm². I cavi impiegati nell’Unione Europea devono essere di tipo H05VV-F o simile. Adam Hall offre cavi idonei. Tali cavi consentono di collegare più dispositivi dalla presa di uscita POWER OUT di un apparecchio alla presa POWER IN di un altro dispositivo.
- Page 88 SICUREZZA DELLA BATTERIA • Tenere il proiettore con batteria lontano da fonti di calore eccessivo e non esporlo alla luce diretta del sole. Non collocarlo in prossimità di dispositivi di riscaldamento o sopra di essi, come forni a microonde, stufe o termosifoni. Le batterie surriscal- date rischiano di esplodere.
-
Page 89: Introduzione
INTRODUZIONE Faretto da esterno alimentato a batteria con 4 LED RGBWA+UV da 15 W e W-DMX™ CLDROPB4 FUNZIONI DI CONTROLLO Controllo DMX a 3 canali, 4 canali, 6 canali, 7 canali, 13 canali 1, 13 canali 2 e 20 canali tramite W-DMX™ Funzioni stand-alone Comandabile mediante telecomando a infrarossi (telecomando a infrarossi opzionale) CARATTERISTICHE... -
Page 90: Connessioni, Elementi Di Comando Edi Visualizzazione
CONNESSIONI, ELEMENTI DI COMANDO E DI VISUALIZZAZIONE INTERRUTTORE DI ACCENSIONE/ SPEGNIMENTO Pressostato per l’accensione e lo spegnimento del proiettore. DISPLAY OLED Il display OLED mostra la modalità di funzionamento attualmente attivata (schermata principale 1), lo stato dei proiettori (schermata principale 2 = stato di W-DMX e batteria), le voci di menu nel menu operativo e il valore numerico o lo stato operativo in determinate voci di menu. -
Page 91: Utilizzo
• Dopo l’accensione del proiettore, durante la procedura di avvio sul display vengono visualizzati in successione i messaggi “Software Update Please Wait...” (solo per manutenzione) e “Welcome to Cameo”, seguiti dall’indicazione del modello e della versione del software. Al termine della procedura il proiettore è pronto e viene avviata la modalità di funzionamento precedentemente attivata. - Page 92 W-DMX™ Per accoppiare un ricevitore W-DMX (ricevitore) con un trasmettitore W-DMX compatibile (trasmettitore) richiamare il comando Wireless Settings W-DMX (W-DMX On) ed eseguire il comando Reset nella stessa voce di meni (selezionare “Reset” e confermare con ENTER). Il ricevitore è ora pronto per essere accoppiato e aspetta la relativa richiesta di un trasmettitore. Avviare l’accoppiamento selezionando e confermando Link dal menu del trasmettitore.
- Page 93 Mode Mode Mode Mode Static Color Macro User Color Auto DMX DELAY Con l’ausilio della funzione DMX Delay, è possibile creare facilmente un effetto chaser con un numero qualsiasi di proiettori dello stesso modello e della stessa versione software, che altrimenti si potrebbe ottenere solo con un idoneo controller DMX e una programmazione Menu Menu DMX Mode...
- Page 94 DMX Address Group DMX Delay DMX Delay 6 CH DMX Mode by DMX? No/Yes Stand Alone Stand Alone 7 CH DMX Delay Settings Delay 0.0s Settings 13CH01 Mode Mode Mode Mode Stand Alone System Info System Info 13CH02 Static Color Macro User Color Auto Settings...
- Page 95 Stand Alone Auto Green DMX Address Static Color 1 Dimmer Settings Blue DMX Mode Color Macro Strobe System Info White DMX Delay User Color Color 8 Amber Stand Alone Auto Green Settings Blue System Info White -------- Menu -------- Stand Alone Auto Program x Amber...
- Page 96 Blue Info White Amber LED Calibra- = Calibrazione dei colori Red, Green, Blue, Calibrazione singola dei colori. Impostazione della lumi- nu -------- Stand Alone Color Macro tion White, Amber, UV nosità per più modalità di funzionamento dei 6 gruppi dress Static Color O Blue...
-
Page 97: Telecomando A Infrarossi (Opzionale)
TELECOMANDO A INFRAROSSI (opzionale) Nelle impostazioni di sistema, alla voce “IR Remote”, attivare il controllo tramite telecomando a infrarossi (IR Remote On). Dirigere quindi il telecomando a infrarossi direttamente verso il sensore a infrarossi posto sul pannello frontale del proiettore. Il raggio d’azione massimo è di circa 8 metri. -
Page 98: Diffusori
DIFFUSORI Il proiettore è fornito di serie con due diffusori caratterizzati da dispersioni diverse (32°, 45°). In questo modo l’angolo di emissione luminosa del proiettore può essere impostato a piacere su 22° (senza diffusore), 32° o 45°. Posizionare il diffusore desiderato davanti alle lenti di emissione della luce e ruotarlo in senso antiorario utilizzando il principio della chiusura a baionetta fino a quando le quattro alette esterne sul bordo del diffusore si innestano nei loro supporti nel paraluce. - Page 99 Per poter utilizzare efficacemente la funzione Tilt con l’apposita vite quando viene utilizzata come proiettore e per ottenere un aspetto più discreto, la staffa di montaggio deve essere rimossa allentando le quattro viti Torx T20 (B), che fissano la staffa di montaggio all’alloggia- mento del proiettore, con un utensile adeguato.
-
Page 100: Tecnologia Dmx
TECNOLOGIA DMX DMX512 DMX (Digital Multiplex) è la sigla di un protocollo di trasmissione universale per la comunicazione tra dispositivi e controller. Un controller DMX invia dati DMX ai dispositivi DMX collegati. I dati DMX vengono sempre trasmessi come flusso di dati seriale, che viene inoltrato da un dispositivo collegato al successivo attraverso le connessioni (connettori XLR) DMX IN e DMX OUT presenti per ogni dispositivo DMX compatibile, per un massimo di 32 dispositivi. -
Page 101: Dati Tecnici
DATI TECNICI Codice articolo: CLDROPB4(WH) Tipologia di prodotto: Wash Light a LED Tipo: Proiettori da esterni Spettro cromatico LED: RGBWA+UV Numero di LED: Tipo di LED: LED Prolight da 15 W Frequenza PWM: 800 Hz Angolo di emissione: Beam Angle 22° / Field Angle 38° 1. -
Page 102: Dichiarazioni Del Produttore
DICHIARAZIONI DEL PRODUTTORE MANUFACTURER’S WARRANTY & LIMITATION OF LIABILITY Le nostre attuali condizioni di garanzia e la limitazione di responsabilità sono consultabili alla pagina: https://cdn-shop.adamhall.com/media/ pdf/MANUFACTURERS-DECLARATIONS_CAMEO.pdf. In caso di assistenza, rivolgersi a Adam Hall GmbH, Adam-Hall-Str. 1, 61267 Neu Anspach / E-mail Info@adamhall.com / +49 (0)6081 / 9419-0. CORRETTO SMALTIMENTO DEL PRODOTTO (In vigore nell‘Unione Europea e in altri Paesi europei in cui si attui la raccolta differenziata) Questo simbolo apposto sul prodotto o sui relativi documenti indica che, per evitare danni all‘ambiente e alle persone causati da uno smaltimento incontrollato dei rifiuti,... -
Page 103: Dmx Control
DMX CONTROL / DMX STEUERUNG / PILOTAGE DMX / CONTROL DMX / STEROWANIE DMX / CONTROLLO DMX The DMX Delay channel of each DMX mode is only enabled, if by DMX? in the menu item DMX Delay is set to Yes. Der Kanal DMX Delay ist in den DMX-Modi nur aktiviert, wenn im Menüpunkt DMX Delay unter by DMX? Yes eingestellt ist. - Page 104 Color off Amber Yellow warm Yellow Green Turquoise Cyan Blue Lavender Mauve Magenta Pink Color Macros Warm White (override Color Macros White RGBWA+UV) Cold White Color Jumping stop Color Jumping speed slow -> fast Color Fading speed slow -> fast User Color_1 User Color_2 User Color_3...
- Page 105 no function Spare Dimmer Response LED (hold 3s) Dimmer Response Halogen (hold 3s) Spare Display on (hold 3s) Display off (hold 3s) Spare Dimmer Curve Linear (hold 3s) Device Settings (please read Dimmer Curve Exponential (hold 3s) Control remark 1*) Dimmer Curve Logarithmic (hold 3s) Dimmer Curve S-Curve (hold 3s) Spare...
- Page 106 Color off Amber Yellow warm Yellow Green Turquoise Cyan Blue Lavender Mauve Magenta Pink Color Macros Warm White (override Color Macros White RGBWA+UV) Cold White Color Jumping stop Color Jumping speed slow -> fast Color Fading speed slow -> fast User Color_1 User Color_2 User Color_3...
- Page 107 13 CH Mode 2 Function Values Sub-Group 0% to 100% Red fine 0% to 100% Green 0% to 100% Green Green fine 0% to 100% Blue 0% to 100% Blue Blue fine 0% to 100% White 0% to 100% White White fine 0% to 100% Amber...
- Page 108 Color off Amber Yellow warm Yellow Green Turquoise Cyan Blue Lavender Mauve Magenta Pink Color Macros 1 Color Macros 1 Warm White White Cold White no function User Color_1 User Color_2 User Color_3 User Color_4 User Color_5 User Color_6 User Color_7 User Color_8 no function Color Macros 2...
- Page 109 Color off Amber Yellow warm Yellow Green Turquoise Cyan Blue Lavender Mauve Magenta Pink Warm White Color Macros Color Macros White Cold White Color Jumping stop Color Jumping speed slow -> fast Color Fading speed slow -> fast User Color_1 User Color_2 User Color_3 User Color_4...
- Page 110 CAMEOLIGHT.COM Adam Hall GmbH | Adam-Hall-Str. 1 | 61267 Neu-Anspach | Germany Phone: +49 6081 9419-0 | adamhall.com REV: 03...
Need help?
Do you have a question about the DROP B4 and is the answer not in the manual?
Questions and answers