Table of Contents
Advertisement
Quick Links
Advertisement
Table of Contents

Related Manuals for Wine Corner WINE IN50+


Summary of Contents for Wine Corner WINE IN50+
- Page 1 U S E R G U I D E WINE IN50+ D E F Y I N G C O N V E N T I O N...
-
Page 2: Table Of Contents
User manual Table of contents CELLAR EQUIPMENT ................5 1.1. Evacuation room ................5 1.2. Cellar insulation ................6 1.2.1. Insulation of walls, ceiling and floor ........7 1.2.2. The door ................8 1.2.3. Insulation of other elements ..........8 INSTALLATION OF WINE CONDITIONNING UNIT WINEMASTER®... - Page 3 Introduction ® You purchased an air conditioner WINEMASTER and we thank you for your confidence. From conception to commercialisation, everything has been implemented to offer an exclusive and high quality product. Brainchild of a team who find in this a motivation to ®...
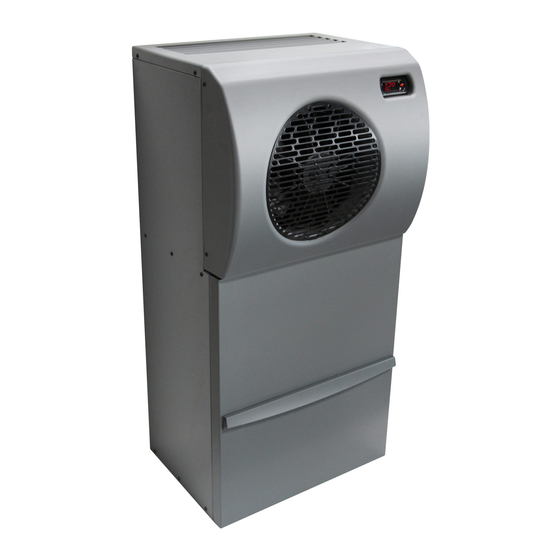
- Page 4 Technicals Datas WINE IN50+ Weight 52.6 kg Dimensions H.1044 X L.500 X P.428 Temperature setting Preset to 12°C, adjustable between 4 et 15°C Maximum outside temperature 35°C Cooling power 1200 W à 15°C Electric supply 230/240V-50 Hz + 3 m cable Electric power 550 W Heating power...
-
Page 5: Cellar Equipment
1. CELLAR EQUIPMENT The air conditioner has to be installed in the wine cellar on the su The air conditioner has to be installed in the wine cellar on the supplied horizontal supports adapted to the pplied horizontal supports adapted to the weight of the unit. -
Page 6: Cellar Insulation
The advantages of « ventilated cold »: No frost other than on the evaporator. Automatic defrosting and maximized refrigeration efficiency. Cold distribution improved by a permanent air circulation (without air stratification). The circulation of air allows maintaining the pre-selected temperature throughout the cellar. -
Page 7: Insulation Of Walls, Ceiling And Floor
IMPORTANT ® The WINEMASTER warranty is only valid if the insulation is in compliance with the board « Insulation selection » requirements for the whole cellar (walls, floor, door and ceiling) with perfect continuity of insulation. Insulation selection MINIMAL THICKNESS OF INSULATION (mm) MINIMAL Polystyrene Polystyrene... -
Page 8: The Door
Floor insulation The floor of the cellar must be able to support the shelves and the stored wine. Thus, it’s necessary to choose insulation with adequate compression strength. Improve the load capacity of the insulation (particularly under the shelve legs) by using : «... -
Page 9: Installation Of Wine Conditionning Unit Winemaster
® 2. INSTALLATION OF WINE CONDITIONING UNIT INSTALLATION OF WINE CONDITIONING UNIT WINEMASTER WINEMASTER THE UNIT HAS TO BE INSTALLED RESPECTING THE NATIONAL R THE UNIT HAS TO BE INSTALLED RESPECTING THE NATIONAL R THE UNIT HAS TO BE INSTALLED RESPECTING THE NATIONAL R ULES OF ELECTRIC INTALLATIONS. -
Page 10: Installation Of Ducting Connection
Duc ting Kit installation ting Kit installation 2.1. 2.1.1. Composition of the ducting kit Composition of the ducting kit Composition of the basic kit Composition of the basic kit 2 grids kit with telescopic sleeve 2 grids kit with telescopic sleeve (re duction Ø125 duction Ø125 non used) 1 meter isolated straight pipe... -
Page 11: Examples
2.1.2. Examples - Guidance in all elbow directions NB : The elbows are in option 2.1.3. Preparation Pipe Muff Elbow - Cut the pipe according to the type of (Option) installation. - Assembly the various elements with the muff USER MANUAL WINE IN50+ Page 11... -
Page 12: Wall Drilling
Fix the air-conditioner on to the isolated pipes. There is no collar, the pipes are equipped with lip seals put the reduction with the gasket at the other end of pipe 2.1.4. Wall drilling Drill 2 holes diam 165 through the wall to pass the telescopic sleeves. -
Page 13: Grids Installation
2.1.6. Installation of the grids ASSEMBLY DETAILS BLOWING ASPIRATION ATTENTION ! each case is composed of 2 grids (blowing and aspiration). it is necessary to adapt the type of grid 1. Grids 2. Frame 3. Telescopic sleeve 4. Reduction 5. Insulated pipe Connect the 2 pipes on the reduction fill the vacuum between the... -
Page 14: Installing The Water Drainage System
place the frame place the frame on the telescopi telescopi c sleeves trace the clamp holes trace the clamp holes Remove the frames, drill and Remove the frames, drill and put the ankles put the ankles Put again the frames and screw Put again the frames and screw Put the grids and the Put the grids and the plates... -
Page 15: Using The Wine Conditionning Unit Winemaster
The DRAINAGE PIPE SHOULD NOT BE WEDGES OR The DRAINAGE PIPE SHOULD NOT BE WEDGES OR MAKE a LOOP Upwards! The col lecting tray is likely to overflow if the pipe lecting tray is likely to overflow if the pipe is not directed downwards is not directed downwards Important :... -
Page 16: Plugging In The Wine Conditioning Unit Wine In50
Plugging in the wine conditionning unit WINE IN50+ 3.2. 3.2.1. Temperature setting of the air conditioner WINE IN50+ The setting of the targeted temperature is made on the thermostat : - Press button one second until the targeted temperature is blinking. - Use button to increase the temperature or - Use button... -
Page 17: Maintenance Of The Air Conditionner Winemaster
® 5. MAINTENANCE OF THE AIRCONDI MAINTENANCE OF THE AIRCONDI TIONER WINEMASTER WINEMASTER 5.1. Replacing the filter Replacing the filter Remove the filter Remove the filter (2) from the drawer Replace with a FONDIS filter FONDIS filter exclusively Dust Filter Close the filtre drawer Close the filtre drawer (1) Filter drawer... -
Page 18: Warranty
6. WARRANTY 6.1. Legal warranty The contractual warranty is not exclusive, the fundraiser for the purchaser profit of the legal warranty against latent defects that appliers in terms of articles 1641 and following from the Civil Code. 6.2. 2 years contractual warranty As a supplement to the legal warranty provided under the laws of the purchaser’s country, FONDIS offers an additional years contractual warranty against any manufacturing defect. - Page 19 © Wine Corner Limited 2012. We reserve the right to change product specifications and prices without prior notice. Wine Corner Limited does not accept any responsibility for any loss, which may arise as a consequence of reliance on information contained in this price list.
Need help?
Do you have a question about the WINE IN50+ and is the answer not in the manual?
Questions and answers