Advertisement
Quick Links
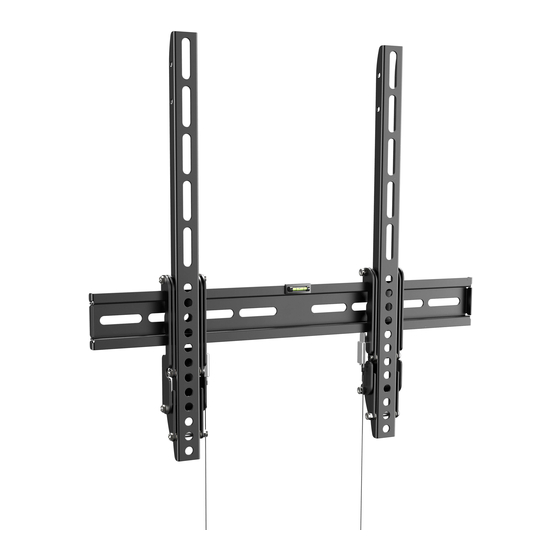
Assembly manual for wall mount
Montageanleitung für Wandhalterung
Typ: R01-11
v.17.03 rev1
Scope of the delivery
Lieferumfang
Wall plate
Metallscheiben
Wandplatte
Rails
Halteschienen
2 pcs / Stk.
For convenience of mounting a spirit level is included. We recommend using a professional level.
Für Erleichterung der Montage wird eine Wasserwaage mitgeliefert. Wir empfehlen jedoch den Einsatz einer professionelen Wasserwaage.
Please measure distance between VESA mounting holes.
STEP 1
Bitte den VESA-Lochabstand vor der Montage nachmessen.
1
SCHRITT
VESA Mounting holes
VESA Befestigungslöcher
Vertical /
Senkrecht
Horizontal / Waagerecht
Display back
Bildschirm Rückseite
+15
°
Tilt
Neigung
A
B
C
D
E
Plain washer
Metal washer
M6 x 50MM
S8 x 40MM
Unterlegscheibe
4 pcs/Stk.
4 pcs/Stk.
4 pcs/Stk.
4 pcs/Stk.
G
H
I
J
Plastic spacer
M6 x 25MM
M8 x 25MM
Abstandshalter
Bubble level
4 pcs/Stk.
4 pcs/Stk.
8 pcs/Stk.
Wasserwaage
Please note: The numbering on the plastic bag may di er / completely missing!
Bitte beachten: die Durchnummerierung auf dem Plastikbeutel kann abweichen / komplett fehlen!
Warning: Supplied plastic anchors are only suitable for solid concrete walls!
Achtung: Mitgelieferte Dübel sind nur für Massivbetonwände geeignet!
Please check BEFORE installation distance between
mounting holes on your display!
!
Bitte überprüfen Sie VOR der Montage
den Lochabstand zwischen den Befestigungslöchern
an Ihrem Bildschirm!
This wall mount supports the following distance between holes:
Diese Wandhalterung unterstützt folgende Lochabstände:
Horizontal / Waagerecht:
min. 100mm - max. 400mm
min. 50mm - max. 400mm
Vertical / Senkrecht:
STEP 2 A
SCHRITT
1
Stud finder
Balkenfinder
Warning: Supplied plastic anchors are only suitable for solid concrete walls!
Achtung: Mitgelieferte Dübel sind nur für Massivbetonwände geeignet!
STEP 2 B
F
SCHRITT
M4 x 20MM
M5 x 20MM
4 pcs/Stk.
4 pcs/Stk.
Concrete Wall
Betonwand
STEP 3 A
SCHRITT
For display's with a curved back
Für Bildschirme mit gewölbter
Rückseite
Display back
Bildschirm Rückseite
Wood stud mounting
Befestigung an der Holzbalkenwand
2 A
2
3
Wood stud
Holzbalken
Solid concrete mounting
Befestigung an der Massivbetonwand
2 B
Attaching rails to display
3 A
Anbringung der Schienen an den Bildschirm
* Use the matching screws and spacers for your display.
* Benutzen Sie die für Ihren Bildschirm passende Schrauben und Abstandshalter.
J
A
B
Drilling
Bohrung
50 mm
4 x
A
4 x
B
0 x
C
3 mm
C
A
B
Drilling
Bohrung
5 0 mm
4 x
A
J
4 x
B
4 x
C
8 mm
I
D
*
E F G H
, ,
,
Advertisement

Related Manuals for ricoo R01-11


Summary of Contents for ricoo R01-11
- Page 1 STEP 2 A Wood stud mounting Assembly manual for wall mount Befestigung an der Holzbalkenwand Montageanleitung für Wandhalterung SCHRITT Typ: R01-11 ° Drilling Stud finder Bohrung Tilt Balkenfinder Neigung 50 mm Wood stud Holzbalken 3 mm Warning: Supplied plastic anchors are only suitable for solid concrete walls! v.17.03 rev1...
- Page 2 STEP 3 B Attaching rails to display Anbringung der Schienen an den Bildschirm SCHRITT For display‘s with a flat back Für Bildschirme mit flacher Rückseite E F G H Display back * Use the matching screws and spacers for your display. Bildschirm Rückseite * Benutzen Sie die für Ihren Bildschirm passende Schrauben und Abstandshalter.
Need help?
Do you have a question about the R01-11 and is the answer not in the manual?
Questions and answers