Table of Contents
Advertisement
Advertisement
Table of Contents

Related Manuals for Bresser Thermo Hydro Quadro NLX


Summary of Contents for Bresser Thermo Hydro Quadro NLX
- Page 1 Wetterstation Thermo Hydro Quadro NLX Instruction manual...
- Page 2 Visit our website via the following QR Code or web link to find further information on this product or the available translations of these instructions. www.bresser.de/P7000023 WARRANTY www.bresser.de/warranty_terms...
-
Page 3: Validity Information
Errors excepted. Subject to technical modifications. © 2020 Bresser GmbH All rights reserved. Reproduction of this document, including extracts, in any form (photocopied, printed etc.) or the use and distribution of this document by electronic means (image file, website etc.) is not permitted without the prior written consent of the... -
Page 4: General Safety Instructions
Manual description: Quickstart_7000023_Thermo-Hydro-Quadro-NLX_en-US _BRESSER_v062020a With any service inquiries, please state these information. 3 About this Instruction Manual NOTICE These operating instructions are to be considered a component of the device. Please read the safety instructions and the operating in- structions carefully before use. Keep these instructions for renewed use at a later date. - Page 5 Disconnect the device from the power supply by pulling the power plug when it is not used or in case of longer interruption of operation and before starting any work on maintenance and cleaning. Position your device so that it can be disconnected from the power supply at any time.
- Page 6 DANGER Risk of explosion Improper use of this product can cause an explosion. The following safety information must be observed at all times to prevent an explosion. Do not expose the device to high temperatures. Use only the supplied power supply or the recommended batteries.
-
Page 7: Parts Overview And Scope Of Delivery
ferent brands or with different capacities. Remove the batteries from the unit if it has not been used for a long time. Never use rechargeable batteries. NOTICE Risk of voltage damage! The manufacturer is not liable for voltage damage due to improperly inserted batteries or through the use of an im- proper power adapter! 5 Parts overview and scope of... - Page 8 SET button (basic set- UP button (increase tings) value) DOWN button (decrease CH button (channel se- value or initiate RCC sig- lection) nal reception) SNZ/LIGHT button (set Battery compartment snooze function / dis- play brightness) DC connection socket 10 Battery compartment for coaxial power con- cover nector...
-
Page 9: Screen Display
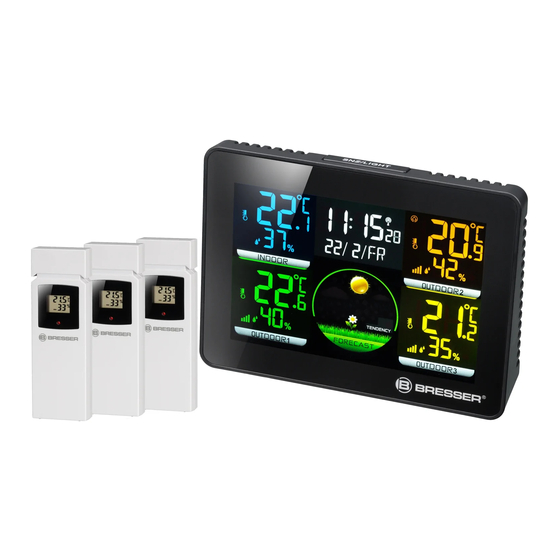
6 Screen display Illustration 2: Screen display Current time Symbol for enabled alarm Display of seconds or Trend symbol 'falling' symbol for the alarm time (depending on the selected mode) Temperature indoors (in Symbol for the temperat- °C or °F) Symbol for the humidity 8 Indoor humidity (in %) Temperature outdoors... -
Page 10: Before Starting Operation
13 Outdoor temperature (in 14 Humidity outdoors (in %) °C or °F) (remote sensor (remote sensor 2) 15 Temperature outdoors 16 Humidity outdoors (in (in °C or °F) (remote %) (remote sensor 3) sensor 3) 17 Weather trend symbol 18 Weather forecast graph- (better, steady, worse) ics (12 hours) 7 Before starting operation... -
Page 11: Setting Up Power Supply
exchanged in only one of the devices (i.e. the remote sensor) the signal can’t be received or can’t be received correctly. Note, that the effective range is vastly affected by building materials and position of the main and remote units. Due to external influences (various atomic devices and other sour- ces of interference), the maximum distance can be greatly re-duced. -
Page 12: Automatic Time Setting
Wait until the indoor temperature is displayed on the base station. NOTICE! When switching from mains power supply to battery power supply or vice versa, the power supply is being disabled for a short moment for technical reasons. Exception: permanent battery op- eration. -
Page 13: Alarm Setting
If no atomic signal is still received, the time setting must be made manually. Read the detailed manual for more information about manual time and alarm setting (see download information on page 2). 10 Alarm setting Alarm time setting In normal display mode, press SET button to switch to alarm time display (AL). -
Page 14: Receiving Measurements Automatically
NOTICE! In battery mode the display brightness reg- ulation is disabled. 13 EC Declaration of Conformity Hereby, Bresser GmbH declares that the equipment type with item number 7000023 : is in compliance with Directive: 2014/30/EU. The full text of the EU declaration of conform- ity is available at the following internet address: www.bresser.de/download/7000023/CE/7000023_CE.pdf... -
Page 15: Fcc Compliance Statement
14 FCC Compliance Statement This device complies with Part 15 of the FCC Rules. Operation is subject to the following two conditions: (1) this device may not cause harmful interference, and (2) this device must accept any interference received, including interference that may cause undesired operation. -
Page 16: Warranty
15 Disposal Dispose of the packaging materials properly, accord- ing to their type, such as paper or cardboard. Contact your local waste-disposal service or environmental au- thority for information on the proper disposal. 16 Warranty www.explorescientific.com/warranty 17 Specifications Power supply Mains adapter Batteries needed 6x AAA (Micro), 1.5V...
Need help?
Do you have a question about the Thermo Hydro Quadro NLX and is the answer not in the manual?
Questions and answers