Table of Contents
Advertisement
Advertisement
Table of Contents

Subscribe to Our Youtube Channel
Related Manuals for Bresser TemeoTrend FSX


Summary of Contents for Bresser TemeoTrend FSX
- Page 1 Weather Station · TemeoTrend FSX Instruction manual...
- Page 2 Entonces visite nuestra página web utilizando el siguiente enlace (código QR) para ver las versioneAs disponibles. Desidera ricevere informazioni esaustive su questo prodotto in una lingua specifica? Venga a visitare il nostro sito Web al seguente link (codice QR Code) per conoscere le versioni disponibili. www.bresser.de/P7060200 GARANTIE · WARRANTY · GARANTÍA · GARANZIA www.bresser.de/warranty_terms...
-
Page 3: Table Of Contents
Contents 1 Imprint ................................ 4 2 Validity information ............................ 4 3 About this Instruction Manual........................ 4 4 Parts overview and scope of delivery ...................... 5 5 Screen display .............................. 7 6 Before starting operation.......................... 8 7 Setting up power supply.......................... 8 8 Battery level indicator ............................ 9 9 Automatic time setting........................... 9 10 Manual time setting and other user defined settings ................. 9 11 Alarm settings.............................. 9 12 Snooze function............................ 10... -
Page 4: Imprint
Please be aware that any requests or submissions sent directly to the manufacturer cannot be processed. Errors excepted. Subject to technical modifications. © 2019 Bresser GmbH All rights reserved. Reproduction of this document, including extracts, in any form (photocopied, printed etc.) or the use and distribution of this document by electronic means (image file, website etc.) is not permitted without... -
Page 5: Parts Overview And Scope Of Delivery
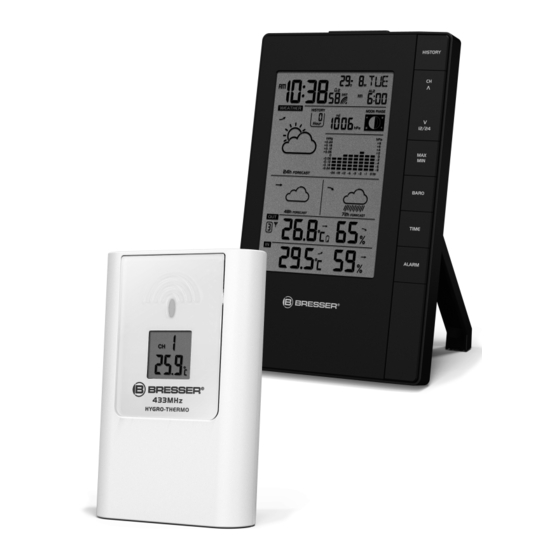
4 Parts overview and scope of delivery 12/24 BARO Illustration 1: Parts overview for base station (top) and remote sensor (bottom) 1 Display 2 Housing 3 SNOOZE/LIGHT button (snooze function and 4 HISTORY button (retrieve measurements for temporary background lighting) the past 24 hours) 5 CH/UP button (sensor channel selection or 6 12/24/DOWN button (time mode selection or value change upwards) - Page 6 19 Housing 20 Battery compartment 21 RESET button (reset all settings) 22 Wall mount fixture 23 Channel switch 24 Battery compartment cover Scope of delivery Base station (A), remote sensor (B) Also required (not included): 4 pcs. Mignon batteries (1.5V, AA type) 6 / 16...
-
Page 7: Screen Display
5 Screen display Illustration 2: Display of the base unit 1 AM/PM information in 12-hour time mode 2 Current time (hours:minutes:seconds) 3 Alarm symbol (alarm 1 or 2 enabled) 4 Symbol for active daylight saving time (DST) 5 Date (month-day or reverse) 6 Weekday 7 Transmission symbol (radio-controlled 8 Alarm (AL1 or AL2) -
Page 8: Before Starting Operation
13 Humidity outdoors 14 Humidity indoors 15 Battery status 16 Temperature (indoor) 17 Temperature (outdoor) 18 Channel info (sensors) 19 Sensor signal status 20 Weather trend (48 hours) 21 Weather trend (24 hours) 22 Singles values for air pressure history (up to 24 hours) 6 Before starting operation NOTICE... -
Page 9: Battery Level Indicator
8 Battery level indicator 1. When the batteries in the base station or in the remote sensor reach the low charge level, the cor- responding battery level indicator appears on the display. 2. When replacing a set of batteries, always also remove the batteries from the other part of the device and reinsert the batteries in the intended order (see chapter "Setting up power supply"). -
Page 10: Snooze Function
12 Snooze function 1. When the alarm sounds press the SNOOZE/LIGHT button to activate the snooze function. The alarm will sound again in 5 minutes. 2. Press ALARM button when the alarm sounds to interrupt the alarm until the alarm time will be reached again. -
Page 11: Weather Trend
Illustration 3: Moon phases for the northern hemispere. 1 New moon 2 Waxing crescent 3 First quarter 4 Waxing gibbous 5 Full moon 6 Waning gibbous 7 Third quarter 8 Waning crescent 15 Weather Trend The weather station will calculate a weather trend for the next 12 hours on basis of the measured val- ues. -
Page 12: Trend Arrow Indicators
Illustration 4: Weather trend indicators 1 Sunny 2 Partly cloudy 3 Cloudy 4 Rain 5 Storm 6 Snow 16 Trend arrow indicators 1 Rising 2 Steady 3 Falling The temperature and humidity trend indicator shows the trends of changes in the forthcoming few minutes. -
Page 13: Connecting Remote Sensors
7. Press CH/UP or 12/24/DOWN button to change the value. 8. Press the BARO button to save and exit the setting mode. NOTE 9. The default relative atmospheric pressure value is 1013 mb/hPa (29.91 inHg), which refers to the average atmospheric pressure. 10. -
Page 14: Technical Data
65 x 100 x 35 mm 23 EC Declaration of Conformity Hereby, Bresser GmbH declares that the equipment type with item number 7060200 : is in compli- ance with Directive: 2014/30/EU. The full text of the EU declaration of conformity is available at the following internet address: www.bresser.de/download/7060200/CE/7060200_CE.pdf... - Page 15 Batteries and rechargeable batteries are marked with a symbol of a crossed-out dustbin and the chemical symbol of the pollutant. “Cd” stands for Cadmium, “Hg” stands for mercury and “Pb” stands for lead. 15 / 16...
- Page 16 (de preferencia por e-mail: service@bresseruk.com Telephone*: +44 1342 837 098 e-mail). BRESSER UK Ltd e-mail: servicio.iberia@bresser-iberia.es Unit 1 starborough Farm, Teléfono*: +34 91 67972 69 Starborough Road, Nr Marsh Green,...
Need help?
Do you have a question about the TemeoTrend FSX and is the answer not in the manual?
Questions and answers