Advertisement
Available languages
Available languages
Quick Links
Advertisement

Related Manuals for Echogear EGAV-SSBTV1


Summary of Contents for Echogear EGAV-SSBTV1
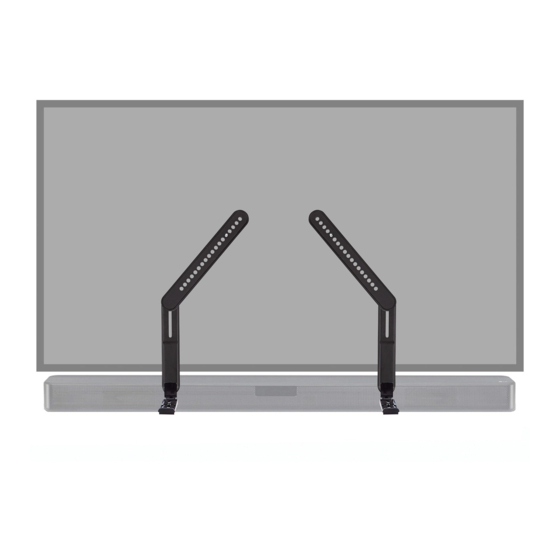
- Page 1 #YourGearUpgraded SoundBar Mount Model EGAV-SSBTV 1 INSTRUCTION MANUAL...
- Page 2 Grab Your Tools Phillips Screwdriver Level Party Certified T OY S U RP RISE TV stand or Wall Mount Inside Every Box Hex Key The TV mount styles illustrated will vary, though the install 3/16 in. procedures are the same.
- Page 3 What’s in the box ... What’s IN THE boooooxx WARNING: DON'T FEED TO CHILDREN — This product contains small items that could be a choking hazard if swallowed. Before starting assembly, verify all parts are included and undamaged. If any parts are missing or damaged, do not return the damaged item to your dealer;...
- Page 4 More Stuff for STEP 1 Stuff for STEP 3 Soundbar Soundbar Screws Washers qty. 2 each qty. 2 of 6 Mount Spacer M4 x 10mm M4 x 16mm M4 / M5 Washer M5 x 10mm M5 x 16mm 1/4-20 M6 / M8 qty.
- Page 5 More Stuff for STEP 3 TV Interface Screws Washers Spacers qty. 4 each qty. 4 of 6 qty. 4 M4 x 16mm M4 x 40mm M6 x 16mm M6 x 40mm TV Spacer M4 / M5 22mm Washer M8 x 20mm M8 x 40mm M6 / M8 2.5mm...
- Page 6 STEP 1 Install Brackets on Your Soundbar Look at the mounting holes A, B on the back or bottom of your soundbar to determine your install method A, B or C. INSERTS : Back-mount Holes THREADED OPTION with (PAGE 10) SLOTS : Back-mount Holes KEY HOLE...
- Page 7 INSERTS Back-mount Holes THREADED with OPTION Only one screw size fits your Soundbar. IMPORTANT: If soundbar brackets do not rest flat on your soundbar surface, use fender washers as shown.
- Page 8 Bottom of Soundbar...
- Page 9 SLOTS Back-mount Holes KEY HOLE with OPTION IMPORTANT: If soundbar brackets do not rest flat on your soundbar surface, use fender washers as shown.
- Page 10 Bottom of Soundbar...
- Page 11 Bottom-mount Holes OPTION...
- Page 13 STEP 2 Position your soundbar STEP 2.1 Prep Your TV (if mounted on a wall or stand) CAUTION: Follow your TV mount’s manual for instructions on how to safely remove your TV and TV bracket.
- Page 14 Adjust Soundbar to Your TV (VESA) Hole Pattern STEP 2.2 TV Hole Pattern...
- Page 16 Position the soundbar brackets NOTE: as vertically as possible.
- Page 17 STEP 3 Install Your Soundbar to Your TV TV Screw Diameter Only one screw size fits your TV. CAUTION: Verify adequate thread engagement with your screw , washer , spacer combination AND TV/sound bar brackets. NOTE: If your TV Too short will included inset spacers or hold your TV.
- Page 18 TV Screw Length NO SPACER SPACER NEEDED Flat Back TV Flat Back TV Rounded or Irregular Back TV with Extra Space Needed [TV brackets lay flat on your TV] [TV brackets NOT resting flat on your TV] [for deep inset holes or cable interference] GO TO PAGE 22 GO TO PAGE 23 GO TO PAGE 23...
- Page 19 Asssemmmbllllle (No Spacer) 3.3a NO SPACER Side View...
- Page 20 Asssemmmbllllle (Spacer Needed) 3.3b SPACER NEEDED Side View Alternate Spacer setups...
- Page 21 STEP 4 STEP 4 Adjust Soundbar Bracket ADJUST Soundbar Bracket NOTE: You may need to reposition the hole locations in soundbar brackets adjust your soundbar to the desired position.
- Page 22 STEP 5 Tighten Connections IMPORTANT! Do not over-tighten the screws — this will deform the washers.
- Page 23 STEP 6 Let’s Hang Follow your TV wall mount installation manual to hang your TV assembly.
- Page 24 Adjustments...
-
Page 25: Antes De Comenzar
Español INSTRUCCIONES IMPORTANTES DE SEGURIDAD LEA TODO EL MANUAL ANTES DE UTILIZAR ESTE PRODUCTO Y GUARDE ESTAS INSTRUCCIONES Antes de comenzar PÁGINA 2 Compruebe los siguientes elementos: ‡ Su televisor, barra de sonido, montura para la barra de sonido y cualquier accesorio que tenga previsto usar NO SUPERAN el límite de peso especificado para su soporte de pared para televisor. - Page 26 PÁGINA 4 NO SUPERAR LOS 6,8 kg (15 lb) Límite de peso para 6,8 kg para esta montura para la barra EGAV-SSBTV1 (15 lb) de sonido Límite de peso de su soporte para televisor PRECAUCIÓN: Evite posibles lesiones personales y daños materiales. El peso del televisor MÁS esta montura para la barra de sonido, la barra de sonido y cualquier accesorio DEBE SER INFERIOR al límite de peso máximo del...
- Page 27 Español PASO 1 Fije los soportes a la barra de sonido PÁGINA 9 Observe los orificios de montaje situados en la parte trasera de su barra de sonido para determinar su método de instalación A, B o C. A: Orificios roscados. B: Ranuras de cerradura. C: Orificios de montaje inferior Orificios roscados Solo se adapta a su televisor un tamaño de tornillo.
Need help?
Do you have a question about the EGAV-SSBTV1 and is the answer not in the manual?
Questions and answers