Table of Contents
Advertisement
Quick Links
Advertisement
Table of Contents

Related Manuals for Ross NK-IPS


Summary of Contents for Ross NK-IPS
- Page 1 NK-IPS User Guide...
- Page 2 Ross has become well known for the Ross Video Code of Ethics. It guides our interactions and empowers our employees. I hope you enjoy reading it below. If anything at all with your Ross experience does not live up to your expectations be sure to reach out to us at solutions@rossvideo.com.
- Page 3 Ross Video. While every precaution has been taken in the preparation of this document, Ross Video assumes no responsibility for errors or omissions. Neither is any liability assumed for damages resulting from the use of the information contained herein.
- Page 4 Notice — Changes or modifications to this equipment not expressly approved by Ross Video Limited could void the user’s authority to operate this equipment.
- Page 5 Ross. Warranty repairs will be conducted at Ross, with all shipping FOB Ross dock. If repairs are conducted at the customer site, reasonable out-of-pocket charges will apply. At the discretion of Ross, and on a temporary loan basis, plug in circuit boards or other replacement parts may be supplied free of charge while defective items undergo repair.
- Page 6 Company Address Ross Video Limited Ross Video Incorporated 8 John Street P.O. Box 880 Iroquois, Ontario Ogdensburg, New York Canada, K0E 1K0 USA 13669-0880 General Business Office: (+1) 613 4886 Fax: (+1) 613 4425 ...
-
Page 7: Table Of Contents
Adding Connections to the Tree View in DashBoard ................... 20 Using the NK-IPS Connection Interface ......................20 Manually Adding an NK-IPS to the Tree View in DashBoard ................21 Configuring the Communication Settings for the NK-IPS ..................21 Updating the Network Settings for the NK-IPS ....................21 Assigning a T-Bus Address to the NK-IPS ...................... - Page 8 Installing the Java Runtime Environment (JRE) ....................31 Installing the NK-VCP Application ........................32 Starting the NK-VCP .............................32 Using the Preferences Dialog ..........................32 Adding an NK-IPS ..............................33 Client Control Password ............................34 Selecting the Source, Destination, and Levels .......................34 Overview ................................34 Switching ................................34 Protecting Outputs ...............................35...
-
Page 9: Introduction
• “DashBoard Interface Overview” provides an overview of the DashBoard menus and parameters available for the NK-IPS. If you have questions pertaining to installation of this Ross Video product, please contact us at the numbers listed in the section “Contacting Technical Support” on page 10. Our technical staff is always available for consultation, training, or service. -
Page 10: Important Instructions
When the NK-IPS cannot connect to the network, a Message dialog box opens to report the connection problem. Contacting Technical Support At Ross Video, we take pride in the quality of our products, but if problems occur, help is as close as the nearest telephone. -
Page 11: Getting Started
General Overview The NK-IPS provides an Ethernet port that connects to a LAN or directly to a computer. This port is used to communicate to a web browser or the DashBoard Control System to configure and control the NK Series Routing System. -
Page 12: Features
Features The NK-IPS includes the following features: • Network configuration and monitoring of NK Series devices via DashBoard • Compact size: 1RU, depth 2.4cm • Password protection to prevent unauthorized changes • Front panel status and communication indicators • 8 port hub for T-Bus compliant devices •... -
Page 13: Hardware Overview
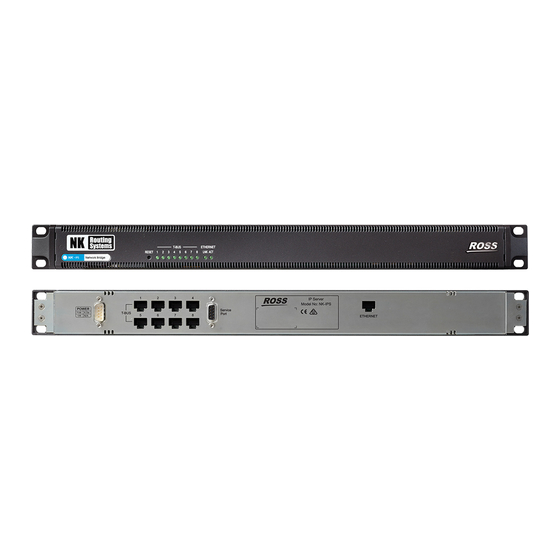
Reset 3. T-BUS COMM LEDs The front panel includes eight T-BUS LEDs that each represent a T-BUS connector on the rear panel of the NK-IPS. These LEDs will light when data is transmitted to, or sent from, the NK-IPS. 4. ETHERNET COMM LEDs Table 3.1 Front Panel LEDs... -
Page 14: Rear Panel Overview
4) ETHERNET Connection 1. PSU Connection The NK-IPS is powered by a +15V DC external power supply. This can be either an NK-RP1 power supply which is shipped as standard or an NK-RP1/NK-RPN1 redundant power supply purchased as an option. -
Page 15: Physical Installation
• Ensure that adequate space exists in front, behind, and on both sides of the NK-IPS for airflow exhaust. • Ensure that adequate space exists on both sides of the NK-IPS and side access is not blocked from the rear. -
Page 16: Connecting The Nk-Ips To A Network
IP Address of the PC can be configured and can be used to configure the IP Address for the NK-IPS. • If a PC that is on a network is used to interface with the NK-IPS, a spare network card is required to connect the two (the other network card is used to communicate with the network). - Page 17 To connect the NK-IPS to other NK Series devices Connect a CAT5 cable to one of the T-Bus RJ-45 ports on the rear of the NK-IPS. Connect the other end to either of the RJ-45 ports of the NK Series device.
-
Page 18: Powering On The Nk-Ips
Powering on the NK-IPS Each NK-IPS is powered by a +15V DC external power supply. This can be either an NK-RP1 power supply which is shipped as standard or an NK-RP1/NK-RPN1 redundant power supply purchased as an option. For redundancy, each power cord should be connected to a separate power source for protection against failure of the A/C power circuit. -
Page 19: Configuration
Configuring the IP Addresses Once either a single PC or a standalone PC has been physically connected to the NK-IPS, the IP address for both the PC and the NK-IPS needs to be configured. It is recommended that users familiar with networking configure the IP addresses for both a single and a standalone PC, as well as the NK-IPS. -
Page 20: Navigating To The Nk Switchboard Interface
Adding Connections to the Tree View in DashBoard Once you have assigned the NK-IPS a static IP Address, you can then manually add it to the Tree View. Manually adding the NK-IPS displays its node in the Tree View, granting you access to the interfaces described in the chapter “DashBoard Interface Overview”... -
Page 21: Manually Adding An Nk-Ips To The Tree View In Dashboard
Finish Manually Adding an NK-IPS to the Tree View in DashBoard If an NK-IPS is not listed in the NK-IPS Connection interface, it can be manually added by entering its IP Address via the Manual Connection dialog. To manually add an NK-IPS connection in DashBoard Launch DashBoard. -
Page 22: Assigning A T-Bus Address To The Nk-Ips
DHCP When DHCP is enabled, the NK-IPS will attempt to acquire network settings from a DHCP server on power up. If successful, the NK-IPS will use the acquired network settings. If it is unable to acquire the network settings after one minute, the NK-IPS will use the following values: IP Address of 192.168.20.100, Netmask of... -
Page 23: Enabling Automatic Device Discovery For The Nk-Ips
Group field in the NK Series IPS interface enables you to specify the Group that the NK-IPS is included in. This field has a maximum of 10 characters and by default is blank. To assign the NK-IPS to a Group Display the NK Series IPS interface as outlined in the procedure “To access the NK Series IPS interface in... -
Page 24: Specifying The Client Connections
Use the Remote IPS IP Address field to specify the IP Address of the primary NK-IPS. The Remote IPS IP Address and Remote IPS Port fields are only used when using a second NK-IPS to segregate traffic from other devices such as control panels and the NK-3RD. -
Page 25: Specifying The Number Of Inputs, Outputs, And Levels
Display the Configure IPS dialog as outlined in the procedure “To navigate to the Configure IPS dialog”. In the Configure IPS dialog, locate the row for the NK-IPS you wish to configure. To save the settings when saving to an *.nks file, select the Custom check box. - Page 26 26 • Configuration NK-IPS Installation Guide (v5.0)
-
Page 27: Operation
Operation The NK Switchboard enables the routing matrix to be monitored and optionally controlled on any router on any NK-IPS detected on the network. The NK Switchboard is configured using the NK Switchboard tab in DashBoard. It is recommended to configure the NK Switchboard globally before performing any switches. -
Page 28: Launching The Nk Switchboard Interface
For the protect system to be accurate, each panel and computer running a DashBoard client must have its own unique address, specified in the Configure IPS dialog. You enable the protect function on the specific NK-IPS and then select which outputs will be protected in the matrix. -
Page 29: Switching
Display the Configure IPS dialog as outlined in the procedure “To navigate to the Configure IPS dialog” on page 20. In the Configure IPS dialog, locate the row for the NK-IPS you wish to configure. Select the MC box for the required NK-IPS. - Page 30 30 • Operation NK-IPS Installation Guide (v5.0)
-
Page 31: Using An Nk-Vcp
If required, it is also possible to control multiple systems, alternating between each as needed. As the NK-VCP works in conjunction with the NK-IPS, NK-VCP control can be password protected to only allow authorized users to perform router functions. -
Page 32: Installing The Nk-Vcp Application
Using the Preferences Dialog The Preferences dialog box is used to add or change configuration of the NK-VCP, the NK-IPS device(s) to be interfaced, and the network details required for the NK-VCP and the NK-IPS to communicate with each other. -
Page 33: Adding An Nk-Ips
Preferences dialog, the remaining inputs will not be shown on the NK-VCP. Adding an NK-IPS Multiple NK-IPS configuration devices can be added to the one NK-VCP. When the NK-VCP is first loaded, the default NK-IPS will need to be configured. -
Page 34: Client Control Password
Client Control Password If the Client Control Password is enabled on an NK-IPS, users will be prompted to enter that password after the NK-IPS has been selected. For More Information on... -
Page 35: Protecting Outputs
Click MC to enable machine control operation and then press the required destination and source. For More Information on... • the Machine Control operation and reciprocal switching, refer to the NK Series User Guide. NK-IPS Installation Guide (v5.0) Using an NK-VCP • 35... - Page 36 36 • Using an NK-VCP NK-IPS Installation Guide (v5.0)
-
Page 37: Dashboard Interface Overview
The NK-IPS uses the NK Series IPS interface in DashBoard to allow users to configure interface and security options for the NK-IPS, as well as having the ability to assign a name and brief details for the device itself. ... - Page 38 DHCP Selected Automates the assignment of the Ethernet settings for the NK-IPS Cleared User must manually specify the Ethernet settings for the NK-IPS Selected Enables usage of Automatic Device Discovery in DashBoard. This is enabled by default. Cleared Disables Automatic Device Discovery...
-
Page 39: Update Ips Network Settings Dialog
NK-IPS, enter the IP address of the primary NK-IPS. Remote IPS Port For a primary NK-IPS, this field can be left to the default port of 5000. On a secondary NK-IPS, enter the TCP Client port of the primary NK-IPS. -
Page 40: Nk Switchboard Interface
Use DHCP Selected The NK-IPS automatically obtains its network settings from a Dynamic Host Configuration Protocol (DHCP) server. Cleared The user must assign static network settings to the NK-IPS Address #.#.#.# Specifies the IP Address for the NK-IPS Netmask #.#.#.#... -
Page 41: Configure Ips Interface
Custom Selected Saves the custom settings when saving the setup to an *.nks file. Any changes to the settings of an NK-IPS in the Configure IPS dialog will automatically select this box. Cleared The change in settings are not captured when saving to an *.nks file. - Page 42 Enables Virtual Routing and Resource Management for the device. This box is selected by default if an NK-VRC is installed as part of the system connected via T-Bus to the NK-IPS. Cleared Disables the Virtual Routing and Resource Management for the...
Need help?
Do you have a question about the NK-IPS and is the answer not in the manual?
Questions and answers