Advertisement
Installing with an install bracket
1. Determine placement of speakers in
the room.
2. Install the speaker bracket by nailing
or stapling the wings of the speaker
bracket to the studs of the wall or ceiling.
The bracket has a 1/2" lip that should
face into the room. This lip will provide
a guide for the sheetrock installers
to cut the hole for the speaker.
3. Run speaker wire from the audio equipment
location to the speaker bracket. Make sure
you have plenty of wire at the speaker
location to connect to the speaker.
Destination Audio recommends three feet.
4. If you are running wire through studs,
consider using nail guards to protect your
wires from sheetrock nails or screws.
Installing without an install bracket
1. Determine the location of the speakers
in the room.
2. Run speaker wire from the audio equipment
location to the speaker location. Make
sure you have plenty of wire at the speaker
location to connect to the speaker.
Destination Audio recommends three feet.
3. Secure the speaker wire to a stud or floor
joist with a twist tie or staple. If you are
using a staple, be careful not to nick or
pierce the wire and leave the wire loose
enough that you can reach into the hole
you will cut into the sheetrock. Make sure
the wire is back far enough that the sheet
rockers blade or router will not cut it. If
you are running your wire through studs,
consider using nail guards to protect your
wires from sheetrock nails or screws.
4. After the sheetrock or finish material has
been installed, use the cutout template that
came in the speaker box to cut a hole in the
sheetrock. Be mindful of the studs or floor
joists as you place the template.
382 Marshall Way, Layton, Utah • USA • 84041 • Toll Free: (800) 543-2205 • Fax: (801) 543-3300 • www.destinationaudio.com
It is Destination Audio policy to continuously incorporate improvements into products; all specifications are subject to change without notice. Copyright © 2006 Destination Audio. All Rights Reserved.
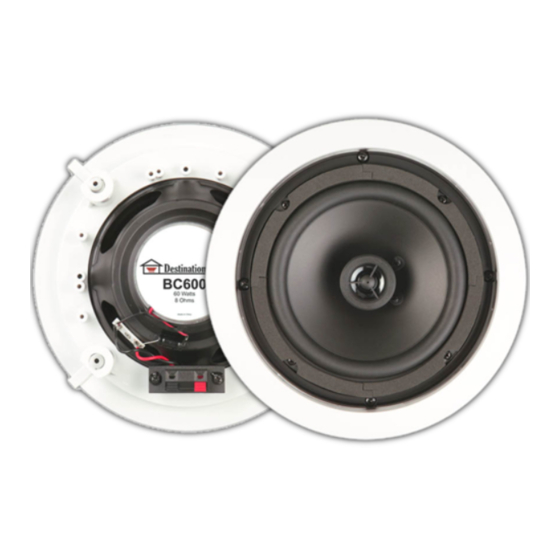
Install Guide for In-wall Speakers
Installing the speaker
1. Locate the speaker wire previously run
to the speaker location and connect the
speaker wire to the terminal connections
on the rear of the speaker. The positive
conductor connects to the red terminal
and the negative conductor connects to
the black terminal.
2. The speaker is secured by the four dog
ears. Tighten the four screws on the front
of the speaker, which will rotate the dog
ears out, then pull them up to secure the
speaker. Tighten the screws until they are
snug. Do not over tighten as this may
make it difficult to install the grill.
3. Place speaker grill on speaker.
Painting the speaker
When you received you speaker, a paint
shield was included. This shield can be used
to protect the speaker when you paint the
speaker rim. Painting the speaker grill should
be done with a sprayer set to fine. Remove
the grill from the speaker, and place it on a
flat surface. Do not use a brush or roller on
the speaker grill as it will clog the holes.
Be sure to remove the paint shield before
reinstalling the grill and using the speakers.
Speaker adjustment
Depending on the model of Destination Audio
speaker you are installing, it may have a
pivoting tweeter and/or a +3/-3 dB gain switch.
Adjust these to obtain the desired sound.
Advertisement
Table of Contents

Related Manuals for Destination Audio Builder Series


Summary of Contents for Destination Audio Builder Series
- Page 1 Install Guide for In-wall Speakers Installing with an install bracket Installing the speaker 1. Determine placement of speakers in 1. Locate the speaker wire previously run the room. to the speaker location and connect the speaker wire to the terminal connections 2. Install the speaker bracket by nailing on the rear of the speaker. The positive or stapling the wings of the speaker conductor connects to the red terminal bracket to the studs of the wall or ceiling. and the negative conductor connects to The bracket has a 1/2” lip that should the black terminal. face into the room. This lip will provide a guide for the sheetrock installers 2. The speaker is secured by the four dog to cut the hole for the speaker. ears. Tighten the four screws on the front of the speaker, which will rotate the dog 3. Run speaker wire from the audio equipment ears out, then pull them up to secure the location to the speaker bracket. Make sure speaker. Tighten the screws until they are you have plenty of wire at the speaker snug. Do not over tighten as this may...
- Page 2 10 Year Limited Warranty Destination Audio warrants to the original This Warranty does not include the purchaser only that this product will service or parts to repair damage caused be free from defects in materials and by accident, disaster, misuse, abuse, workmanship for a period of ten (10) years, negligence, inadequate packing or provided the speaker was purchased from shipping procedures, commercial use, a Destination Audio Authorized Dealer. voltage inputs in excess of the rated Defective products must be shipped, maximum of the unit, or service, repair prepaid, with proof of purchase, to the or modification of the product which Destination Audio Authorized Dealer from has not been authorized or approved by whom the speakers were purchased, or Destination Audio. This Warranty also to Destination Audio at the address listed excludes normal cosmetic deterioration below. COD shipments will be refused. If caused by environmental conditions. possible, ship this product in the original This Warranty will be void if the Serial shipping container to lessen the chance of Number of the product has been removed, transit damage. In all cases, the risk of loss tampered with or defaced. This Warranty or damage in transit is to be borne by the is in lieu of all other expressed warranties. purchaser. If the product is defective in materials or If, upon examination it is determined workmanship as warranted above, the that the unit was defective in materials purchaser’s sole remedy shall be repair or workmanship during this warranty...
Need help?
Do you have a question about the Builder Series and is the answer not in the manual?
Questions and answers