Table of Contents
Advertisement
Quick Links
Advertisement
Table of Contents

Subscribe to Our Youtube Channel
Related Manuals for EXFO XTM-50 Series


Summary of Contents for EXFO XTM-50 Series
- Page 1 XTM-50 Optical Tunable Filter User Guide www.EXFO.com XTM-50_UM_2.0v1.1...
-
Page 3: About This Manual
Copyright © 2013–2018 by EXFO. Published by EXFO. All rights reserved. This documentation is provided as a user guide to EXFO customers and potential customers only. The contents of this document may not be reproduced in any part or as... - Page 4 About This Manual Product Warranty For detailed information about the sales terms and conditions, visit the EXFO web site at and Limitation of www.exfo.com/how-to-buy/sales-terms-conditions Warranty Contact To obtain after-sales service or technical support for this product, contact EXFO at one of Information the following numbers.
-
Page 5: Table Of Contents
Table of Contents About This Manual ............................. 3 Table of Contents ............................5 Product Presentation .......................... 7 Technical Specifications ........................7 Product Overview ........................... 8 Installing and Connecting the XTM-50....................11 Unpacking and Installing the XTM-50....................11 Connecting an Optical Source to the XTM-50..................12 Setting the Wavelength/Frequency and FWHM Values............... - Page 6 Table of Contents XTM-50 User Guide...
-
Page 7: Product Presentation
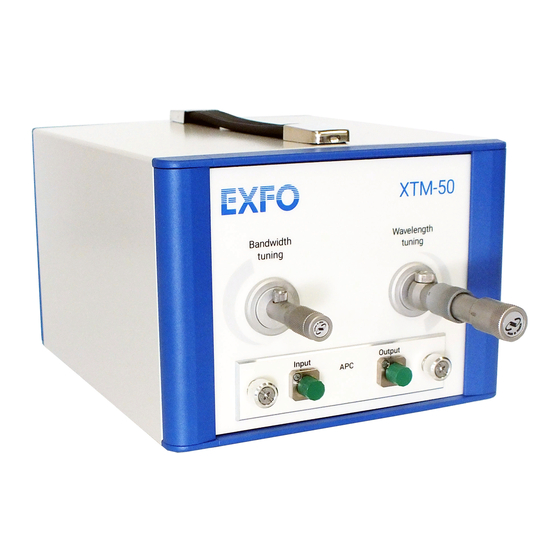
1. Product Presentation The XTM-50 is a reliable optical tunable filter that features wavelength and bandwidth tuning. The large wavelength range, the narrow FWHM and the flat-top shape ensure a clean extraction of the optical signal. It is designed for closely-spaced channel selection and extraction in DWDM applications. -
Page 8: Product Overview
Product Presentation Size & Weight Dimensions (W x D x H) 230 x 173 x 136 mm Weight 2.2 kg All optical specifications apply at constant temperature. *1: Specifications apply for wavelengths not equal to any water absorption line. *2: Typical, related to user dexterity. *3: From -3 and -40 dB for FWHM <800 pm. - Page 9 Product Presentation Micrometer Actuators Two high resolution micrometer actuators enable you to perform wavelength and bandwidth tuning. The screw located on top of the actuators enable you to lock the actuator at the wanted setting. • The bandwidth actuator is composed of two graduated scales: •...
- Page 10 Product Presentation XTM-50 User Guide...
-
Page 11: Installing And Connecting The Xtm-50
When unpacking, handle the device with care and do not damage the original shipping container in case the XTM-50 needs to be returned to EXFO. 2. Pull out the XTM-50 vertically from its packaging. 3. Set the XTM-50 on a flat stable surface free of excessive vibration. -
Page 12: Connecting An Optical Source To The Xtm-50
Installing and Connecting the XTM-50 Connecting an Optical Source to the XTM-50 Subject • Make sure you use the appropriate connector type, corresponding to the one mounted on your XTM-50 (see section Technical Specifications, p. 7 for available models). • Make sure optical connectors are perfectly clean. -
Page 13: Setting The Wavelength/Frequency And Fwhm Values
3. Setting the Wavelength/Frequency and FWHM Values IMPORTANT When using thimbles, account for any backlash in the system: always use the thimble in the same rotating direction. Adjusting the Central Wavelength Subject The wavelength actuator enables you to adjust the wavelength with coarse and fine adjustment positions. -
Page 14: Figure 4: Central Wavelength Tuning
Setting the Wavelength/Frequency and FWHM Values IMPORTANT Modifying the FWHM can slightly alter the central wavelength setting. So you may need to re-adjust the central wavelength after FWHM change. Procedure 1. Move the Wavelength tuning coarse thimble as follows: • To increase the central wavelength from lower wavelength to higher wavelengths, turn the thimble clockwise (from high to low values). -
Page 15: Adjusting The Fwhm
Setting the Wavelength/Frequency and FWHM Values Adjusting the FWHM Subject The bandwidth actuator is graduated from 0 to 250. Two complete revolution of the thimble reach one graduated marking on the sleeve. • On the sleeve: 13 mm stroke with 0.5 mm graduation interval. •... -
Page 16: Figure 7: Fwhm Tuning
Setting the Wavelength/Frequency and FWHM Values Procedure 1. Move the Bandwidth tuning actuator as follows: • To increase the FWHM, turn the actuator clockwise (from high to low values) • To decrease the FWHM, turn the actuator counterclockwise (from low to high values) Caution To avoid damaging your XTM-50, do not turn the bandwidth actuator... -
Page 17: Reaching A Position On The Bandwidth Or Wavelength Tuning Actuator
Setting the Wavelength/Frequency and FWHM Values Reaching a Position on the Bandwidth or Wavelength Tuning Actuator Subject The Acceptance Test Report delivered with your instrument indicates the actuator position (in mm) of the central wavelength and FWHM on your XTM-50. This section explains how to adjust the actuators to reach the wanted position. - Page 18 Setting the Wavelength/Frequency and FWHM Values XTM-50 User Guide...
-
Page 19: Performing Basic Maintenance Operations
Never remove the protective cover of the chassis to perform servicing or maintenance operations to the XTM-50 internal parts and optical components. You must refer to EXFO service representative (see section Contact Information, p. 4). Cleaning Optical Connectors Subject To optimize the performance of the instrument and prevent loss of optical power, you must verify that optical connectors are clean every time you connect a fiber. -
Page 20: Cleaning The Cover Of The Xtm-50
Performing Basic Maintenance Operations 4. At the rear of the drawer plate, remove one connector end from the plate: 5. Gently clean the connector end, with the following instructions: a. Hold the can of compressed air upright and spray the can into the air to purge any propellant. -
Page 21: Packaging For Shipment
Performing Basic Maintenance Operations Packaging for Shipment Subject If you need to return the XTM-50 to EXFO for servicing or calibration, use the original packaging. For instructions on returning the XTM-50, please contact EXFO (see section Contact Information, p. 4). - Page 22 Performing Basic Maintenance Operations XTM-50 User Guide...
-
Page 23: List Of Figures
List of Figures Figure 1: Front Panel ..............................8 Figure 2: Possible Operating Positions......................... 11 Figure 3: Wavelength-tuning Actuator – Scale values ..................13 Figure 4: Central Wavelength Tuning ........................14 Figure 5: Bandwidth-tuning Actuator – Scale values................... 15 Figure 6: Bandwidth vs Actuator Graduations (Typical values) – XTM-50 Wide only ........15 Figure 7: FWHM Tuning ............................ - Page 24 List of Figures XTM-50 User Guide...
Need help?
Do you have a question about the XTM-50 Series and is the answer not in the manual?
Questions and answers