
Related Manuals for Texas Instruments TI-InnovatorHub


Summary of Contents for Texas Instruments TI-InnovatorHub
- Page 1 TI-Innovator™ Hub with TI LaunchPad™ Board Getting Started Guide Learn more about TI Technology through the online help at education.ti.com/eguide.
- Page 2 "as-is" basis. In no event shall Texas Instruments be liable to anyone for special, collateral, incidental, or consequential damages in connection with or arising out of the...
-
Page 3: Table Of Contents
Contents TI-Innovator™ Hub Overview Learn More What's in the Box TI-Innovator™ Hub with On-Board Components Built-in Ports USB Cables Auxiliary Power Connecting TI-Innovator™ Hub Connecting to a Graphing Calculator Connecting to a Computer Running TI-Nspire™ CX Software Updating the Hub Software What is the TI-Innovator™ sketch? Do I need to update the sketch on the TI-Innovator™... - Page 4 Breadboard Basics Learn More Using an Auxiliary Power Source Connecting the Power Source TI-Innovator™ Hub Troubleshooting TI-RGB Array What is TI-RGB Array? TI-RGB Array – Industrial design and markings Requirements for TI-RGB Array: Connecting the TI-RGB Array Connect the TI-RGB Array to the TI-Innovator™ Hub Connect the TI-Innovator™...
-
Page 5: Ti-Innovator™ Hub Overview
TI-Innovator™ Hub Overview The TI-Innovator™ Hub lets you use your compatible TI graphing calculator or TI-Nspire™ CX computer software to control components, read sensors, and create powerful learning experiences. • You communicate with the Hub through TI Basic programming commands. • Hosts that are compatible with TI-Innovator™ Hub include: TI CE Family of Graphing Calculators (TI-83 Premium CE, TI-84 Plus CE, and TI-84 Plus CE-T) with operating system version 5.3 or later installed. -
Page 6: What's In The Box
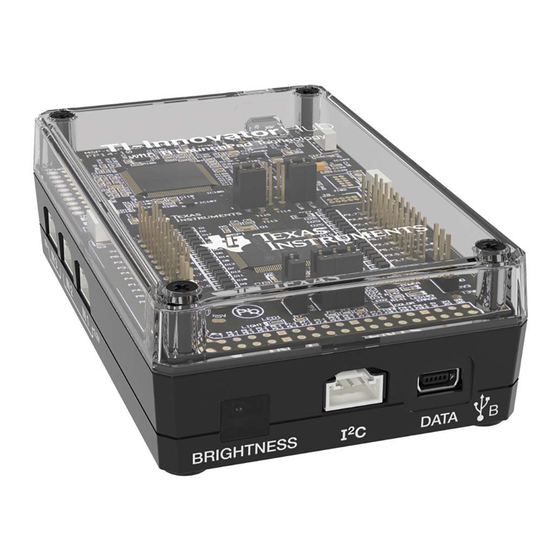
What's in the Box TI-Innovator™ Hub with On-Board Components À A Light Brightness Sensor at the bottom of the Hub can be read as "BRIGHTNESS" in Hub command strings. Á Red LED is addressable as "LIGHT" in Hub command strings. Â Speaker (at back of Hub, not shown) is addressable as "SOUND"... -
Page 7: Usb Cables
Top - Two connectors: • USB-Micro connector ( PWR ) for auxiliary power required by some components. Also used for updating the Hub internal software. • Breadboard Connector with 20 labeled pins for communication with connected components. A breadboard and jumper cables are included with the TI-Innovator™... -
Page 8: Connecting To A Graphing Calculator
Note: Some peripherals, such as motors, may require auxiliary power. For more information, see Using an Auxiliary Power Source (page 27). Connecting to a Graphing Calculator 1. Identify the " B " connector on the USB Unit-to-Unit (Mini-A to Mini-B) cable. Each end of this cable is embossed with a letter. -
Page 9: Connecting To A Computer Running Ti-Nspire™ Cx Software
Connecting to a Computer Running TI-Nspire™ CX Software 1. Identify the " B " connector on the USB Standard A to Mini-B cable for Windows®/Mac®. Each end of this cable is embossed with a letter. 2. Insert the " B " connector into the DATA port at the bottom of the TI-Innovator™ Hub. -
Page 10: What Is The Latest Version Of The Sketch
What is the latest version of the sketch? For best results always use the latest version of TI-Innovator sketch. You can always find the latest version of the sketch at education.ti.com/go/innovator. Why would I update the sketch? There are a couple of different reasons to upgrade the sketch. 1. -
Page 11: Hub Programming On Ti Ce Graphing Calculator
Hub Programming on TI CE Graphing Calculator These instructions apply to TI CE graphing calculator. For similar instructions for Note: TI-Nspire™ CX technology, refer to Hub Programming on TI-Nspire™ CX Technology (page 15). The TI-Innovator™ Hub responds to TI Basic programming commands such as Send and •... -
Page 12: How To Create And Execute A Program
PRGM: BLINK For(N,1,10) Send("SET LIGHT ON") Wait 1 Send("SET LIGHT OFF") Wait 1 How to Create and Execute a Program These are abbreviated instructions. For detailed instructions on creating and Note: executing programs, refer to TI-Basic Programming for the TI CE Graphing Calculator. The guide is available through the TI-Innovator™... -
Page 13: Using The Hub Menu To Build Commands
To Close the Program Editor ▶ Press y 5 to return to the Home Screen. The program remains available through the ¼ key. To Run the Program: 1. Ensure that the TI-Innovator™ Hub is connected to your calculator. 2. Ensure that any needed I/O Modules or Breadboard components are connected to the Hub. -
Page 14: Tips For Coding With Ti Ce Graphing Calculator
1. Open (or create) the program that you will use to communicate with the Hub. 2. Position the cursor where you want to place the command. 3. Press ¼ and select Hub . The Hub menu appears. 4. Select Send "SET and press Í, and then select SOUND and press Í. -
Page 15: Learn More
Learn More To find sample programs and details about programming the TI-Innovator™ Hub, see the TI-Innovator™ Technology eGuide (page ii). -
Page 16: Ti-Innovator™ Hub App For The Ti Ce Graphing Calculator(S)
TI-Innovator™ Hub App for the TI CE Graphing Calculator(s) What is the TI-Innovator™ Hub App? The TI-Innovator™ Hub App adds the HUB menu to the programming menu on a TI CE graphing calculator. This menu option makes it easy to select commands that are commonly used when creating programs to use with the TI-Innovator™... - Page 17 What version of the TI-Innovator™ Hub App do I need? For best results always use the latest version of the TI-Innovator™ Hub App and TI CE Family of Graphing Calculators. Visit education.ti.com/en/product-resources/whats- new-84-ce to get the latest. How do I know what the version number of my TI-Innovator™ Hub App is? To determine the version of the Hub App that is loaded on your TI CE Graphing Calculator, follow these steps.
- Page 18 Will I need to update the TI-Innovator™ Hub app every time I update the calculator The TI-Innovator™ Hub app would only need to be updated when new functionality is added to the app. However, it is strongly recommended that you always keep your TI products up to date with the latest OS and versions.
-
Page 19: Hub Programming On Ti-Nspire™ Cx Technology
Hub Programming on TI-Nspire™ CX Technology These instructions apply to TI-Nspire™ CX technology. For similar instructions for Note: TI CE graphing calculator, refer to Hub Programming on TI CE Graphing Calculator (page 7). The TI-Innovator™ Hub responds to TI Basic programming commands such as Send and •... -
Page 20: How To Create And Execute A Program
Define blink()= Prgm For n,1,10 Send "SET LIGHT ON" Wait 1 Send "SET LIGHT OFF" Wait 1 EndFor EndPrgm How to Create and Execute a Program These are abbreviated instructions. For detailed instructions, refer to the Note: TI-Nspire™ CX Program Editor, accessible through the TI-Innovator™ Technology eGuide (page ii). -
Page 21: Using The Hub Menu To Build Commands
To Store the Program: You must store your program before you can run it. ▶ On the handheld, press and select Check Syntax & Store > Check Syntax & Store On the Program Editor menu, click Check Syntax & Store > Check Syntax & Store . To Close the Program Editor ▶... -
Page 22: Tips For Coding With Ti-Nspire™ Cx Technology
Example of Using the Hub Menu: This TI-Nspire™ CX example builds the command Send "SET SOUND 440 TIME 2" to sound a 440Hz tone for 2 seconds on the on-board speaker. 1. Open (or create) the program that you will use to communicate with the Hub. 2. -
Page 23: Learn More
• To type relational operators such as = , < , and ≤ , press • To type a space, press • If your program becomes unresponsive while running: · TI-Nspire™ CX Handheld: Hold down the key and press repeatedly. Windows®: Hold down the F12 key and press Enter repeatedly. Mac®: Hold down the F5 key and press ... -
Page 24: Ti-Innovator™ I/O Modules
TI-Innovator™ I/O Modules TEST These Input/Output modules (purchased separately) include cables for connecting the modules to the TI-Innovator™ Hub. Module Ports Image Sample code for TI CE Graphing Calculator White LED OUT 1 Turn on the White LED module connected to OUT 2 OUT 1 OUT 3 Send("CONNECT LED 1 TO OUT 1") - Page 25 Module Ports Image Sample code for TI CE Graphing Calculator Send( "READ DHT 1 TEMPERATURE") Get temperature Read the humidity from the DHT sensor: Send "READ DHT 1 HUMIDITY" Get humidity Hall Sensor IN 1 Connect the Hall effect sensor to IN3 port: IN 2 Send "CONNECT ANALOG.IN 1 TO IN 3...
-
Page 26: Connecting An I/O Module
Connecting an I/O Module You use the I/O cable included with the module to connect it to a Hub Input or Output port. 1. Check the above table to ensure that you know which I/O ports support the module that you are connecting. 2. - Page 27 To find sample programs, a list of additional I/O Modules, and details about programming I/O Modules, see the TI-Innovator™ Technology eGuide (page ii).
-
Page 28: Ti-Innovator™ Breadboard Pack
TI-Innovator™ Breadboard Pack The breadboard and its components (purchased separately) let you build breadboard projects and connect them to the TI-Innovator™ Hub through its Breadboard Connector pins. The breadboard components include: • A breadboard and jumper cables for creating electrical connections. •... -
Page 29: Sample Code To Blink A Breadboard Led
generate power. software PWM) TTL Power BB 1-10 Transistor used for MOSFET amplifying or switching electronic signals. TI Analog BB 5,6,7 Sensor that reports a Temperature (analog voltage proportional to Sensor input the ambient required) temperature within a range of −55°C to 130°C. Visible Light BB 5,6,7 Sensor that reports the... -
Page 30: Breadboard Basics
PRGM: BLINKBB Send("CONNECT LED 1 TO BB1") For(N,1,10) Send("SET LED 1 ON") Wait 1 Send("SET LED 1 OFF") Wait 1 Send("DISCONNECT LED 1") If you are using Note: TI-Nspire™ CX technology, omit the parentheses, and change End to EndFor . The Hub command string "CONNECT LED 1 TO BB1" tells the Hub that an LED on the breadboard is connected to pin 1 on the Hub. -
Page 31: Learn More
Front of board showing power rails and connection Interconnections at back of board (normally pins hidden). The 5-pin groups in each power rail are interconnected. All other 5-pin groups are isolated. The gap at the center of the breadboard allows easy connection of electronic components provided as dual-inline packages. -
Page 32: Connecting The Power Source
TI Wall Charger (included with the Hub) • Plugs into a wall outlet. • Does not use batteries. External Battery Pack (sold separately) • Rechargeable. • Has On/Off button with a row of LEDs that momentarily indicate the battery charge when you turn the battery on. •... -
Page 33: Ti-Innovator™ Hub Troubleshooting
TI-Innovator™ Hub Troubleshooting I don't see the green LED when I connect TI-Innovator™ Hub. • Make sure that the calculator is turned on. • If you are using a USB Unit-to-Unit (Mini-A to Mini-B) cable to connect to a calculator, make sure to connect the "B" end of the cable to the DATA connector at the bottom of the Hub. - Page 34 Learn More To find more troubleshooting information, see the TI-Innovator™ Technology eGuide (page ii).
-
Page 35: Ti-Rgb Array
TI-RGB Array What is TI-RGB Array? TI-RGB Array is an accessory to TI-Innovator™ Hub. TI-RGB Array has 16 programmable RGB LEDs. Multiple applications • Smart greenhouse • Binary counter • STEAM projects • Coding lessons TI-RGB Array – Industrial design and markings Top view of TI-RGB Array. -
Page 36: Requirements For Ti-Rgb Array
Requirements for TI-RGB Array: Hardware: Add-on TI-RGB Array to TI-Innovator™ Hub Use Hub Sketch v1.4 or later Connecting the TI-RGB Array Follow these set of steps in this order to connect and use the TI-RGB Array. Connect the TI-RGB Array to the TI-Innovator™ Hub TI-RGB Array Provided Cable TI-Innovator™... -
Page 37: Connect The Ti-Innovator™ Hub To A Graphing Calculator
Connect the TI-Innovator™ Hub to a Graphing Calculator The TI-Innovator™ Hub connects by a USB cable to a graphing calculator or computer. The connection lets the Hub receive power and exchange data with the host. See complete details (page 33). Connecting TI-Innovator™ Hub The TI-Innovator™ Hub connects by a USB cable to a graphing calculator or computer. -
Page 38: Connecting To A Computer Running Ti-Nspire™ Cx Software
Hub connected to Hub connected to TI-Nspire™ CX Handheld TI CE Graphing Calculator 4. Turn on the calculator if it is not already on. The power LED on the Hub glows green to show that it is receiving power. Connecting to a Computer Running TI-Nspire™ CX Software 1. -
Page 39: Ti-Rgb Array Commands
3. Insert the free end of the cable (the " A " connector) into a USB port on the computer. The power LED on the Hub glows green to show that it is receiving power. TI-RGB Array Commands Prerequisite: Use the Send "Connect RGB" Command First The "... -
Page 40: Set Rgb
Command: CONNECT RGB AS LAMP Command CONNECT RGB AS LAMP Syntax: Code Send "CONNECT RGB AS LAMP" Sample: Range: Describe: This command will enable the “high brightness” mode of the TI-RGB Array as long as an external power source (like the USB battery) is connected to the port. -
Page 41: Set Rgb All
SET RGB ALL Command: SET RGB ALL r g b Command SET RGB ALL r g b Syntax: Code SET RGB ALL 255 0 255 Sample: SET RGB ALL 255 0 0 SET RGB ALL eval(R) eval(G) eval(B) SET RGB ALL 0 0 0 Range: Describe: To control all the LEDs in a single command use: SET RGB ALL r g b... -
Page 42: General Precautions Ti-Rgb Array
General Precautions TI-RGB Array • Do not expose the TI-RGB Array to temperatures above 140 ˚ F (60 ˚ C). • Use only the Ribbon cable provided with the TI-RGB Array. • When inserting the Ribbon cable into the TI-RGB Array connectors, make sure the red (dark) wire pin is inserted into the 5v hole. -
Page 43: I/O Modules
When connecting components that are sensitive to polarity, such as LEDS and the TTL Power MOSFET. I/O Modules • Use the correct Input or Output port as required for each module. Vibration Motor – supported on OUT 1 , OUT 2 , and OUT 3 . Servo Motor –... - Page 44 • For best performance, use Rover on a hard surface. Carpet may cause the Rover wheels to catch or drag. • Do not turn the Holder pegs on the Calculator Platform without lifting them first. They could break. • Do not use the marker as a lever to pull or push the Rover. •...
-
Page 45: General Information
General Information Online Help education.ti.com/eguide Select your country for more product information. Contact TI Support education.ti.com/ti-cares Select your country for technical and other support resources. Service and Warranty education.ti.com/warranty Select your country for information about the length and terms of the warranty or about product service.
Need help?
Do you have a question about the TI-InnovatorHub and is the answer not in the manual?
Questions and answers