Table of Contents
Advertisement
Quick Links
Advertisement
Table of Contents

Related Manuals for CDA FW284


Summary of Contents for CDA FW284
- Page 1 FW284 Integrated/ under counter freezer Use and maintenance...
- Page 2 Contents Important information Before first use Storage and use Controls Super freeze function Care and cleaning Defrosting the freezer Troubleshooting Installation and ventilation Mounting the fascia doors Reversing the fridge door Ensuring the door seals correctly Electrical information Energy efficiency information IMPORTANT: Please read the user instructions carefully before using the appliance for the first time and before installing it.
-
Page 3: Appliance Information
Appliance information: Please enter the details on the appliance rating plate below for reference, to assist CDA Customer Care in the event of a fault with your appliance and to register your appliance for guarantee purposes. - Page 4 Important Never store inflammable or explosive items and strong corrosive acids or alkalis in the appliance. This is a household appliance, which is produced in accordance with the national standard. It is intended for food storage only, not for storage of blood, medicine and biological products. To prevent risk of fire, keep the appliance away from petrol or any other inflammables.
- Page 5 IMPORTANT INFORMATION FOR CORRECT DISPOSAL OF THE PRODUCT IN ACCORDANCE WITH EU DIRECTIVE 2012/19/EU. At the end of its working life, the product must not be disposed of as urban waste. The refrigeration system contains insulating gases and refrigerants, which require specialised waste disposal. The valuable materials contained in this appliance can be recycled.
-
Page 6: Before First Use
Before first use You must allow the freezer to settle for at least twenty four hours prior to switching the power on. It is recommended that you clean the interior of the appliance prior to first use, using a solution of bicarbonate of soda and warm water and then thoroughly drying the interior. - Page 7 Freezer • The freezer compartments are designed to store only frozen food • Never put hot foods in the freezer, allow food to cool fully before storing them in the freezer • Follow the instructions on the food packaging for storage of frozen food.
-
Page 8: Storage And Use
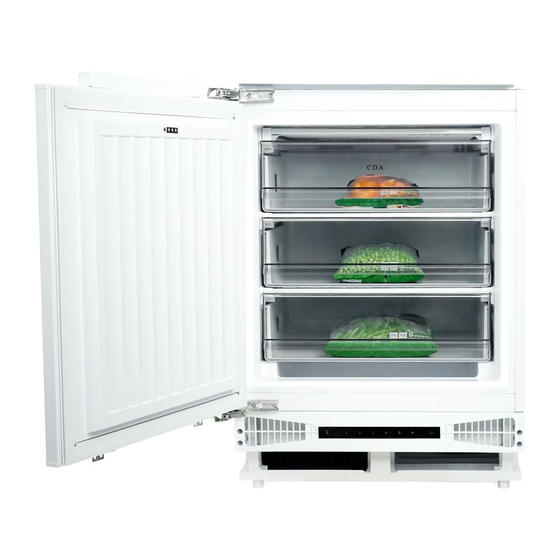
Storage and use This freezer is suitable for storing deep frozen food (food which has already been frozen before being added to the freezer), for storing fresh food for a short period (2-3 weeks) by freezing it and for making ice and ice cream. Always remember to observe and adhere to the recommended expira- tion date of food. - Page 9 Controls Fig. 2 A. Freezer temperature adjustment sensor This button is used to adjust the temperature within the freezer. Press this sensor once to activate adjustment, and then as many times as necessary until the desired level is selected. The settings range from 1 to super freeze ( ) with 1 being the warmest and super freeze being the coldest.
-
Page 10: Super Freeze Function
Super freeze function The 6th setting on the control panel, represented by the snowflake (Fig. 3), is a super freeze function. This should be used when freezing large quantities of food all at once. Activate this function 2 or 3 hours before introducing the food and do not leave it to run for more than necessary. -
Page 11: Defrosting The Freezer
Defrosting the freezer Do not use heaters or defrosting sprays in this appliance. Never use any metallic or sharp objects such as knives or forks to remove the ice as this could damage the lining. The freezer compartment should be defrosted regularly to ensure the most efficient running of the freezer. -
Page 12: Troubleshooting
Troubleshooting If you have any problems with your appliance, you should check the troubleshooting prior to calling CDA Customer Care to prevent unnecessary service calls and potential cost. Contact details are on the back cover of this manual If the appliance is not working, check the following: •... - Page 13 • Check the door seal for any kinks, debris or damage. If you notice any, and are unable to resolve the issue yourself, contact CDA Customer Care so that the seal can be replaced If excessive ice has formed in the freezer: •...
-
Page 14: Installation And Ventilation
Installation and ventilation This appliance must never be installed close to heat sources, e.g. heating elements, cookers or in damp places. • To ensure the appliance is level, you should use the height adjustable feet at the front of the appliance •... - Page 15 Mounting the fascia doors Fig. 6 - Fitting the decor door bracket Remove the white decorative cover (Fig. 5) by lifting it upwards. Obtain the below measurements: Dimension B = Measure from the underside surface of kitchen unit to the bottom of fixing bracket.
- Page 16 Locate the washers and screw the nuts onto the adjustment bolts. Fig. 9 - Aligning the decor door Close the door and check the alignment with the other unit doors. Adjust the decor door by screwing or unscrewing the adjustment bolts for Fig.
-
Page 17: Reversing The Freezer Door
Reversing the freezer door We recommend you seek the help of another individual to support the doors whilst performing this operation. 1. Open the door 2. Carefully prise off the white cover caps for the side that you wish to switch the hinges to 3. - Page 18 Ensuring the door seals correctly: It is normal for the seal to be compressed after the door has been reversed. With the door closed, use a hair dryer to expand the seal and fill the gap between the door and the body of the appliance. Take care not to use the hair dryer too close to the appliance, which could damage the seal.
-
Page 19: Electrical Information
Electrical information Warning! This appliance must be earthed. Green and yellow to earth Brown to live 13A Fuse Cord Clamp Blue to Neutral Fig. 11 The mains lead of this appliance has been fitted with a BS 1363A 13A fused plug. To change a fuse in this type of plug, follow the steps below: 1. - Page 20 N.B. Ensure that the plug socket is situated in an easily accessible place after installation. E & O E. All instructions, dimensions and illustrations are provided for guidance only. CDA reserve the right to change specifications without prior notice. 20 | Instruction Manual...
-
Page 21: Energy Efficiency Information
Energy Efficiency Information Attribute Symbol Value Units Model identification FW284 Category of the household refrigerating appliance Voltage / Frequency 220 - 240V ~ / 50Hz Dimensions (W x D x H mm) 596 x 550 x 818-870 Mass of the appliance... - Page 22 Notes: 22 | Instruction Manual...
- Page 23 Notes: Instruction Manual | 23...
- Page 24 The CDA Group Harby Road Langar Nottinghamshire NG13 9HY Sales Department Phone: 01949 862010 Email: sales@cda.eu CDA Customer Care Phone: 01949 862012 Email: customer.care@cda.eu ©2020 CDA Group Ltd...
Need help?
Do you have a question about the FW284 and is the answer not in the manual?
Questions and answers