
Related Manuals for Mira Elite ST


Summary of Contents for Mira Elite ST
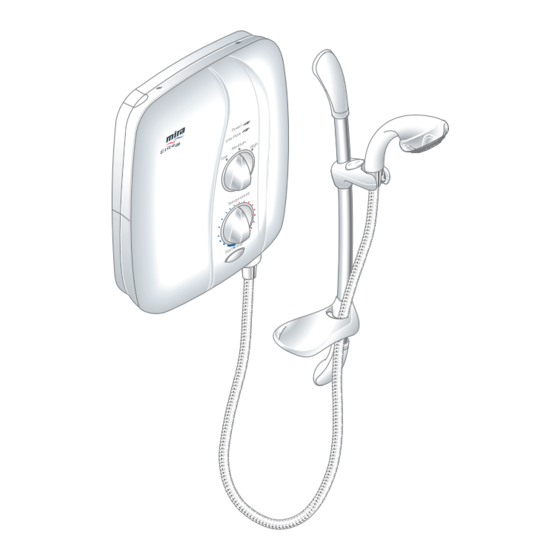
- Page 1 PUmPed electrIc Shower Installation and User Guide These insTrucTions are To be lefT wiTh The user Uploaded on http://www.qssupplies.co.uk - Document BY MIRA...
-
Page 2: Table Of Contents
....................28 wiring diagram ..................29 Spare Parts ..................... 30 mira elite St Spare Parts list ............30 mira logic electric Shower Fittings Spare Parts list ......32 optional Accessories ................33 Notes ....................... 34 customer Service ...............Back Page... -
Page 3: Introduction
St comes complete with a set of mira logic electric Shower Fittings. Products covered by This Guide: mira elite sT - A 9.8 kw @ 240 Volts Ac (9.0 kw @ 230 Volts Ac) heater. Available in white/chrome finish. mira logic electric shower fittings... -
Page 4: Important Safety Information
1.7.5 If the cover is not correctly fitted. 1.8 Do noT fit any form of outlet flow control as the outlet acts as a vent for the tank body. Only Mira recommended outlet fittings should be used. - Page 5 2. caution! 2.1 read all of these instructions and retain this guide for later use. 2.2 Pass on this guide in the event of change of ownership of the installation site. 2.3 Follow all warnings, cautions and instructions contained in this guide, and on or inside the appliance.
-
Page 6: Pack Contents Checklist
Tick the appropriate boxes to familiarize yourself with the part names and to confirm that the parts are included. 1. mira elite sT 1 x case Insert 3 x rubber Feet 1 x olive 1 x compression Nut 3 x Fixing Screws 3 x wall Plugs 1 x mira elite St... -
Page 7: Documentation
2. mira logic electric shower fittings 2 x wall Plugs 2 x Fixing Screws 2 x Slide Bar end caps 2 x Slide Bar end Supports 1 x Applicator 1 x handset 1 x Slide Bar 2 x hose Seals 1 x clamp Bracket Assembly 1 x 1.25 m Flexible hose... -
Page 8: Specifications
St is 30°c. 2.3 the following power ratings for the heater tanks are available with their respective voltages: mira elite St 9.8 kw @ 240 V / 45 Amps (9.0 kw @ 230 V / 40 Amps). -
Page 9: Installation Requirements
(0.008 bar / 80 millimetres head) to 100 kPa (1 bar / 10 metres head) (i.e. the vertical distance from the base of the cold cistern to the top of the elite St). however, the minimum head required will increase with pipe length and the guide given in paragraph 1.17 should be used to make sure that adequate head... - Page 10 1.5 The Elite ST must be fitted oNto the finished wall surface i.e. on top of the tiles. Do noT block the air ventilation gaps around the sides of the unit, either by tiling up to the sides of the unit or by using a sealant around the case.
- Page 11 1.17 Long pipe runs and excessive use of 90° elbows will significantly reduce the available head to supply the elite St. the pipework table should be completed to ensure that adequate head is available for any given application.
- Page 12 Pipework the dimension (x) is calculated from the table below to give you a minimum effective head of 80 mm which is necessary to produce a satisfactory shower in all conditions. Plumbing schematic Diagram example! the example below is based on the diagram above with 15 mm pipework, A = 1.5 m, B = 0.75 m.
-
Page 13: Electrical
2.1 electrical read the section 'important safety information' first. checklist 2.1.1 electrical supply fuse and consumer unit are adequate for the product. 2.1.2 Shower unit is earthed. 2.1.3 The minimum required supply cable size must conform to BS 7671. 2.1.4 double pole isolating switch. 2.1.5 do not twist live or neutral cable cores. -
Page 14: Electrical (Checklist In Detail)
In a domestic installation, the rating of the electricity supplier's fuse and the consumer unit must be adequate for the additional demand. the mira elite St is a high power unit, therefore it is essential to contact your electricity supplier to ensure that the supply is adequate for the product. -
Page 15: Installation
'important safety information' first. 200 mm ↑ ↓ Medium High electrical supply is turned 200 mm minimum gap remove the four cover off at the mains. from ceiling. screws. remove the cover and... - Page 16 Feed cable into case. Fit earth connect supply pipe. Do not sleeve (not supplied) and strip overtighten! insulation. Do not twist cable cores. l = brown e = Green n = blue Firmly connect the conductors. make sure wires are clear of all Do not exert strain on the mounting holes.
-
Page 17: Mira Logic Electric Shower Fittings
'important safety information' first. clamp Bracket Button Applicator Soap dish/retaining ring 25 mm minimum Slide Bar Spill-over level depress button fullY and Position as shown to prevent assemble clamp Bracket. back siphonage. - Page 18 cauTion! Do not drill into mark the position of the middle slot on both top and bottom buried cables or pipes. Supports. First fix the bottom Slide Bar Fit the end caps to the Slide Support and fully tighten the Bar supports.
-
Page 19: Commissioning
commissioning If you are unsure how electric showers work, please read through the 'user instructions' Section before continuing. Power Low Flow Medium High Temperatur e electrical supply is turn Bottom control turn water supply fully on. Start Stop turned off at the mains. to full cold. - Page 20 0-5 secs Set the toP control to hIGh. the temperature will rise further. Power Adjust temperature as required. Press StoP and isolate power. Flow rate will adjust automatically. 0-5 secs the shower will purge water from residual water may drain over its tank for a few seconds.
-
Page 21: User Instructions
COLD Medium High Stop Start operation of the mira elite sT... -
Page 22: Using Your Shower
using Your shower read the section 'important safety information' first. Switch on electrical supply. Press StArt button. Set to desired position. check water temperature before entering shower. Allow 10-15 seconds for any temperature adjustments to reach the handset. Power Press StoP button. Shower A small amount of water may will continue to run for a few continue to drain over a few... - Page 23 changing the spray setting the handset has four different spray settings (eco, Start, Soothe and Force). start turn the Spray Plate fully t u r n t h e S p r a y P l a t e clockwise. A reduced flow of anticlockwise until it 'clicks'.
-
Page 24: Fault Diagnosis
/ medium light / high Elite ST fails electrical supply isolated S w i t c h o n e l e c t r i c a l at double pole switch. supply via pullcord or to operate. - Page 25 No water cistern has run out of turn off the elite St and motor water. immediately and resolve tone cistern storage difficulty.
- Page 26 symptom Power heater setting Probable cause Possible remedy light flow low / medium light / high Service tunnel or cover check case inserts are not fitted correctly causing cut and fitted correctly. Start/Stop button not to c h e c k s e r v i c e s operate.
-
Page 27: Maintenance
maintenance handset - cleaning clean with mild washing up detergent or soap solution. wipe dry with soft cloth. Poor shower performance can be avoided by descaling the spray head, which must be done regularly. Use thumb or soft cloth to wipe rubber nozzles. -
Page 28: Dimensions
Dimensions 95 mm 266 mm Power Low Flow Medium High 340 mm Temperatur e Start Stop 344 mm 659 mm... -
Page 29: Wiring Diagram
wiring Diagram PRESSURE / POWER SELECTOR SWITCH HIGH LOAD BROWN LOW FLOW NEON MOTOR THERMAL TRIP THERMAL CUTOUT DUAL DISC BROWN C 0.1u TANK CONNECTION INLET CONNECTOR POWER ON NEON BLUE STOP/START SOLENOID VALVE... -
Page 30: Spare Parts
Parts mira elite sT spare Parts list 215 12 thermal trip Pack 416 38 clamp Bracket 416 41 thermal Switch 416 43 Splash Guard 416 48 latching Switch 416 51 Solenoid coil Assembly 428 56 cover Seal (not shown) - Page 31 Parts Diagram 416 41 416 43 1563 607 1563 504 1563 606 1563 509 872 01 872 28 1563 516 416 38 1563 507 215 12 428 62 428 59 416 48 416 51 428 64 1563.691...
-
Page 32: Mira Logic Electric Shower Fittings Spare Parts List
Parts list 450.01 hose 1.25 m - chrome 450.03 Adjuster Ring 450.06 clamp Bracket Assembly - white 450.08 Service Pack 'O' seals - components identified 'A' 450.17 Slide Bar Wall Fixing Pack - components identified 'B' 450.26... -
Page 33: Optional Accessories
DcV-h: An outlet double check valve, designed to prevent the backflow or back- siphonage of potentially contaminated water, through shower controls which are fitted with a flexible hose as part of the outlet shower fitting. Available as an optional accessory from your Kohler mira stockists. -
Page 34: Notes
Notes... - Page 35 Notes...
-
Page 36: Customer Service
Customer Service UKAS 1056830-W2-B © Kohler Mira Limited, July 2006...
Need help?
Do you have a question about the Elite ST and is the answer not in the manual?
Questions and answers