Table of Contents
Advertisement
Available languages
Available languages
Quick Links
Advertisement
Chapters
Table of Contents

Related Manuals for Wabtec Mors Smitt Nieaf Smitt NI 19 PLUS


Summary of Contents for Wabtec Mors Smitt Nieaf Smitt NI 19 PLUS
- Page 1 NI 19 PLUS Handleiding Manual Nieaf-Smitt is a brand name of Mors Smitt...
- Page 2 (c) Copyright 2015 All rights reserved. Nothing from this edition may be multiplied, or made public in any form or manner, either electronically, mechanically, by photo-copying, recording, or in any manner, without prior written consent from Mors Smitt B.V. This also applies to accompanying drawings and diagrams.
-
Page 3: Table Of Contents
Inhoud Veiligheid Stroomtang beschrijving Voorpaneel Functietoetsen Aan- / uitschakelen Automatisch uitschakelen Automatisch uitschakelen uitschakelen Navigator toets Metingen Algemeen Spanningmeting Stroommeting Automodus Peak hold Inschakelstroom DC stroom nullen Meetfrequentie Max/min/avg 10. Harmonische vervorming 11. Individuele harmonische meting 20 12. Hoge frequentie ruis 13. -
Page 4: Veiligheid
Veiligheid Ter waarborging van veilig gebruik en service van de stroomtang, volg deze instructies. Nalaten van bestuderen van de waarschuwingen kan leiden tot ernstige verwondin- gen of de dood. LET OP: Aanduiding van omstandigheden en acties die de meter of uitrusting die getest wordt kunnen beschadigen. - Page 5 Maak de kring stroomloos en ontlaad alle hoog- spanningscondensatoren voor het testen van weerstand, doorgang, of elektrische capaciteit. Gebruik de meter niet bij explosieve gassen of dampen. Stel dit product niet bloot aan regen of vocht om het risico op brand of elektrische schok te verminderen.
-
Page 6: Stroomtang Beschrijving
Stroomtang beschrijving Kenmerken • Schermresolutie 10.000d • Actieve verlicht, display met duidelijke aflezing • VoltSense (contactloze spanningsdetectie) • Analoog staafdiagram • True RMS afleeswaarde op AC en AC+DC modus • Verlichting bij stroom meting • Auto Ohm/Doorgang/Diode selectie • 100 K weerstand vermogen •... -
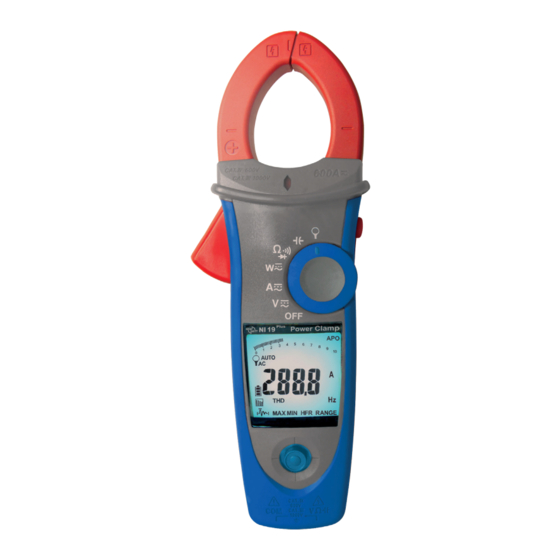
Page 7: Voorpaneel
Voorpaneel Stroombek VoltSense indicator Hold/DCA zero toets Trigger Draaischakelaar Display Navigator toets COM-ingang V, Ω, ingang Nieaf-Smitt is a brand name of Mors Smitt www.nieaf-smitt.com... -
Page 8: Functietoetsen
Functietoetsen Aan-/uitschakelen Na het inschakelen van de meter zal het display Full, hAlf of Lo weergeven als indicatie van de batterijcapaciteit. Automatisch uitschakelen After idle 15 min De meter werkt weer na inschakelen vanuit de UIT-stand. Automatisch uitschakelen (APO) uitschakelen Druk op ‘Naar beneden’... -
Page 9: Navigatortoets
Navigatortoets LEFT ENTER RIGHT DOWN De navigatortoets heeft 4 richtingen om te schakelen op het display, kies met de navigatortoets de gewenste functie en activeer deze functie door middel van de enter toets. Nieaf-Smitt is a brand name of Mors Smitt www.nieaf-smitt.com... -
Page 10: Metingen
Metingen Algemeen Voorbereiding en voorzorgsmaatregelen voor het meten: Neem de regels, waarschuwingen en maning tot voorzichtigheid in acht. De afbeeldingen op de volgende pagina’s tonen hoe de metingen kunnen worden uitgevoerd. Sluit bij het aansluiten van de meetsnoeren aan het te meten apparaat eerst het meetsnoer verbonden met de COM ingang aan en dan het snoer onder spanning. -
Page 11: Spanningmeting
Spanningmeting Waarschuwing: Voer geen metingen uit welke 1000 VAC/DC RMS kunnen overschrijden, ter voorkoming van een elektrische schok, gevaar of schade aan de meter. Pas niet meer dan 1000 VAC/DC RMS toe tussen de algemene ingangsaansluiting en aarding. Opmerking: Als de gemeten spanning hoger is dan 30 VAC/DC RMS, is het symbool ‘... -
Page 12: Stroommeting
Stroommeting CAT IV 600 V / CAT III1000 V t.o.v. de aarde voor de stroommeetbek Fysieke barrière voor hand- bescherming. Houd de meter niet vast boven deze barrière. I + (-I )= 0 LET OP Klem niet op een geleider terwijl de meter ingeschakeld is De LED verlichting in de kop van de stroomtang gaat auto- matisch aan bij het openen van de stroommeet bek. -
Page 13: Automodus
Auto modus Het meetresultaat bij AC wordt alleen weergeven met RMS-waarde of DC-waarde, afhankelijk van welke waarde groter is. AC modus AC alleen met RMS waarde. DC modus DC waarde. AC+DC modus AC+DC RMS waarde. • Selecteer de ‘AC’ , ‘DC’ of ‘AC+DC’ indicator met de navigatortoets en druk vervolgens op de navigator toets om de gewenste modus te activeren •... -
Page 14: Peak Hold
Peak hold (alleen AC modus) • Selecteer in VAC (wisselspanning) modus de ‘ ‘ indi- cator op het display middels de navigatortoets om naar de Peak hold modus te gaan • Druk meer dan 2 sec op de navigatortoets om de Peak hold modus verlaten "ENTER"... -
Page 15: Inschakelstroom
Inschakelstroom (alleen AC modus) Als de inschakelstroom bij de meting hoger kan zijn dan 100 A AC, selecteer dan eerst het bereik 600 A voor het activeren van inschakelstroom. Watting Tigger After Tigger ENTER Nieaf-Smitt is a brand name of Mors Smitt www.nieaf-smitt.com... -
Page 16: Dc Stroom Nullen
DC stroom nullen Door het meetprincipe zal bij het gebruik van de DC stroom- meting de meter een kleine permanente stroom tonen. Deze is te compenseren als hieronder beschreven: • Verwijder de bek van de geleider • Druk meer dan 2 sec op de hold toets om het overge- bleven restmagnetisme te compenseren HOLD>... -
Page 17: Meetfrequentie
Meetfrequentie (alleen AC modus) • Selecteer eerst de AC modus en kies daarna de ‘Hz’ indicator en druk vervolgens op de navigatortoets om de frequentiemeetmodus in of uit te schakelen "Hz" ENTER Nieaf-Smitt is a brand name of Mors Smitt www.nieaf-smitt.com... -
Page 18: Max/Min/Avg
Max/min/avg • Selecteer de ‘Max/min’ indicator en druk vervolgens op de navigatortoets om de modus max/min/avg te activeren • Druk om de modus Max/min/avg af te sluiten langer dan 2 sec op de navigatortoets. De Max/min/avg modus legt de minimale en maximale ingangswaarden vast. -
Page 19: Harmonische Vervorming
5.10 Harmonische vervorming (THD) meting (alleen AC modus) Deze meting is alleen mogelijk in de AC modus (V of A). • Selecteer de indicator ‘THD’ en druk vervolgens op de navigatortoets om in de THD modus te activeren THD-F=RMS van harmonischen ÷ RMS van fundamenteel x 100%. -
Page 20: Individuele Harmonische Meting
"THD" ENTER 5.11 Individuele harmonische meting "ENTER" " " >2SEC (alleen AC modus) • Selecteer de ‘ ‘ indicator en druk vervolgens op de " " navigatortoets om in de individuele harmonische "RIGHTWARD" modus te activeren • Druk om de individuele harmonische modus af te sluiten langer dan 2 sec. -
Page 21: Hoge Frequentie Ruis
5.12 Hoge frequentie ruis (HFR) (alleen AC modus) • Selecteer de ‘HFR’ indicator en druk vervolgens op de navigatortoets om hoogfrequente ruis te elimineren LET OP Peak hold, inschakelstroom, THD, HZ, individuele harmonische en HFR modus zijn alleen beschik- baar in AC modus. Nieaf-Smitt is a brand name of Mors Smitt www.nieaf-smitt.com... -
Page 22: Meten Actief Vermogen / Vermogensfactor
5.13 Meten actief vermogen (W) / Vermogensfactor (PF) Eén-fase vermogensmeting • Zet de draaiknop op de stand ‘W’ • Sluit het rode meetsnoer aan op L, en het zwarte meetsnoer op de N • Druk op de trekker om de stroomtang bek te openen en klem deze om slechts één geleider, zorg ervoor dat de bek stevig om de geleider gesloten is •... - Page 23 Teken vermogensfactor (PF) teken De fase van het stroomsignaal blijft achter bij het (Geen) spanningssignaal (inductieve belasting). ‘-’ teken De fase van het stroomsignaal loopt voor op het spanningssignaal (capacitieve belasting). Buiten bereik display: OL.U Overbelasting spanning OL.A Overbelasting stroom OL.UA Overbelasting van zowel spanning als stroom.
- Page 24 Drie-fase vermogensmeting 3 fase 3 draden gebalanceerd / ongebalanceerd • Zet de draaischakelaar op de stand ‘W’ • Gebruik de navigatortoets om de modus ‘W’ te selecteren en druk op de enter toets om deze te activeren W=W1+W2 Wye or star Black Black Nieaf-Smitt is a brand name of Mors Smitt...
- Page 25 3 fase 4 draden gebalanceerd / ongebalanceerd • Zet de draaischakelaar op de stand ‘W’ • Gebruik de navigatortoets om de modus ‘W’ te selecteren en druk op de enter toets om deze te activeren W=W1+W2+W3 Black Black Black Nieaf-Smitt is a brand name of Mors Smitt www.nieaf-smitt.com...
-
Page 26: Fase Volgorde
5.14 Fase volgorde LET OP: Sluit de drie-fase van de voeding aan zoals aange- geven. De test is alleen beschikbaar indien de systeem- frequentie stabiel is. Line 1 Line 2 Line 3 • Zet de draaiknop op de stand ‘W’ •... - Page 27 Indien de gemeten waarde binnen het bereik valt zal ‘L1’ weergegeven worden en ongeveer 3 sec knipperen • Indien ‘L2’ weergegeven word, zal de ZOEMER twee keer klinken, verwissel het rode meetsnoer en sluit deze aan op fase 2 voordat ‘L2’ is verdwenen •...
-
Page 28: Weerstand
5.15 Weerstand meting LET OP: Maak de kring stroomloos en ontlaad alle hoogspanningscondensatoren voor het meten van weerstand en diodes om mogelijke schade aan de meter of geteste apparatuur te vermijden. • Selecteer ‘Ω’ , ‘ ’ of ‘ ’ en druk vervolgens op de navigatortoets om de gewenste modus te activeren •... -
Page 29: Capaciteit Meting
5.16 Capaciteit meting • Zet de draaiknop op de stand ‘ ‘ Capcitance LET OP: Maak de kring stroomloos en ontlaad alle hoog spanningscondensatoren voor het meten van elektrische capaciteit om mogelijke schade aan de meter en de geteste apparatuur te voorkomen. Gebruik de functie DC spanning om te bevestigen dat de condensator ontladen is. -
Page 30: Meten Van Stroom I.c.m. Eazyflex
5.16 Meten van stroom in combinatie met de EazyFlex • Zet de draaiknop op de stand ‘ ‘ • Houd het bereik van de EazyFlex op 3000A Opmerking: Meet een bekende stroom om te controleren of NI 19 & EazyFlex correct functioneren. PLUS Nieaf-Smitt is a brand name of Mors Smitt www.nieaf-smitt.com... -
Page 31: Andere Functies
Andere functies Auto/handmatig bereik Auto Range mode Manual Range mode "Range" "ENTER" "Range" "Range" >2SEC • Selecteer de ‘range’ indicator en druk vervolgens op de navigatortoets om in de modus handmatig bereik te gaan • Druk langer dan 2 sec op de navigatortoets om terug te gaan naar modus automatisch bereik Hold toets •... -
Page 32: Voltsense
VoltSense De rode ruitvormige led zal gaan branden als er een elektrisch veld gedetecteerd wordt uit de bek. Opmerking: Deze functie is uitgeschakeld tijdens de weerstand meting. Let op: Het lampje gaat aan als de tangpunten dicht- bij een elektrisch veld zijn. Als er geen lampje brandt, kan er nog steeds spanning aanwezig zijn. -
Page 33: Specificaties
Specificaties Algemene specificaties Weergave LCD, 10000 digit Meetsnelheid 3 keer / sec Buiten bereik indicatie OL of -OL Voeding 9 V batterij Batterij indicatie Vervang de batterij als de lege batterij indicator in het display verschijnt Levensduur batterij Alkaline 9 V 50 uur (zonder verlichting) Automatische Na ca. -
Page 34: Electrische Specificaties
Electrische specificaties Nauwkeurigheid is + (% uitlezing + aantal digits) bij 23 C + 5 bij een vochtigheidsgraad van minder dan 80 %. 1 Spanning Functie Bereik Nauwkeurigheid 99.99 V + (0.7 % + 2 dgt) 999.9 V 99.99 V + (1.0 % + 5 dgt) 50~500 Hz 999.9 V 99.99 V... -
Page 35: Stroom
2 Stroom Functie Bereik Nauwkeurigheid 99.99 A 50~60 Hz + (1.5 % + 5 dgt)* 599.9 A >60~400 Hz + (2.0 % + 5 dgt)* 0.10 A~99.99 A 50~60 Hz + (1.5 % + 5 dgt)* 599.9 A >60~400 Hz + (5.0 % + 5 dgt)* * De gemeten waarde <1000 dgt, voeg 5 dgt toe aan de nauwkeurigheid. -
Page 36: Frequentie
4 Frequentie Functie Bereik Nauwkeurigheid 20.00 ~ 99.99 Hz Frequentie 20.0 ~ 999.9 Hz + (0.5 % + 3 dgt) 0.020 ~ 9.999 kHz Bescherming tegen 1000 V rms 600 A rms overbelasting Sensitiviteit 10~100 V rms voor AC 100 V bereik 10~100 A rms voor AC 100 A bereik ( >400 Hz ongespecificeerd) 100~1000 V rms voor AC 1000 V bereik... -
Page 37: Actief Vermogen
7 Actief vermogen: Watt (DC/AC) Functie Bereik Nauwkeurigheid 9.999 kW* A, fout×V, afleeswaarde+ ACW / DCW 99.99 kW V, fout×A, afleeswaarde 599.9 kW * De gemeten waarde <1.000kW , voeg 10 dgt toe aan de nauw- keurigheid. Bescherming tegen 1000 V rms 600 A rms overbelasting Nauwkeurigheid ACW : Sinusgolf , ACV >... -
Page 38: Capaciteit
10 Capaciteit Functie Bereik Nauwkeurigheid 3.999 μF Elektrische 39.99 μF ± (1.9% + 8 dgt) capaciteit 399.9 μF 3999 μF Bescherming tegen 1000 V rms overbelasting (11) Flex AC stroom (voltage input) Functie Bereik Nauwkeurigheid* 300.0 A / 3000 A 1 %+5 dgt (50~500 Hz) ** 1 %+5 dgt (50~60 Hz) ** HFR ACA... -
Page 39: Onderhoud
Onderhoud Batterij vervangen Batterijstatus Omschrijving De batterij is volledig opgeladen De batterij is nog 2/3 vol De batterij is nog 1/3 vol Vervang de batterij zodra de indicator voor lege batterij verschijnt om onjuiste afleeswaarden te vermijden. Let op Verwijder meetsnoeren uit de meter voor het openen van het batterijvak of de meterbehuizing. -
Page 40: Reiniging
Reiniging Bescherm de meter tegen slechte weersomstandig- heden. De meter is niet waterdicht. Stel het LCD-scherm niet gedurende lange perioden bloot aan direct zonlicht. Reinig de buitenkant van de meter met een pluisvrije doek. Voorkom dat u krassen maakt op het LCD-scherm. Om schade aan de meter te voorkomen, dient u geen schuurmiddelen of chemische schoon- maakmiddelen te gebruiken. - Page 41 Beperkte aansprakelijkheid Voor deze meter geldt voor de eerste koper een garantie van 2 jaar vanaf de aankoopdatum tegen materiaal- en productiefouten. Tijdens deze garantieperiode zal de fabrikant naar eigen keuze het defecte apparaat ver- vangen of repareren, op basis van het onderzoek van het defect of storing.
- Page 42 Nieaf-Smitt is a brand name of Mors Smitt www.nieaf-smitt.com...
- Page 43 NI 19 PLUS Manual Nieaf-Smitt is a brand name of Mors Smitt www.nieaf-smitt.com...
- Page 44 (c) Copyright 2015 All rights reserved. Nothing from this edition may be multiplied, or made public in any form or manner, either electronically, mechanically, by photo-copying, recording, or in any manner, without prior written consent from Mors Smitt B.V. This also applies to accompanying drawings and diagrams.
- Page 45 Inhoud Safety Description Front panel Keys Power on/off Auto power off Auto power off disable Navigator key Measurements General Voltage measuring Current measuring Auto sense modus Peak hold Inrush current DCA zero Measuring frequency Max/min/avg 10. THD measurement 11. Individual harmonic measurement 12.
-
Page 46: Safety
Safety Understand and follow operating instructions carefully. Use the meter only as specified in this manual; otherwise, the protection provided by the meter may be impaired. Identifies hazardous conditions and actions that could cause bodily harm or death. Caution: Identifies conditions and actions that could damage the meter or equipment under test. - Page 47 Do not use Meter around explosive gas or vapor. To reduce the risk of fire or electric shock do not expose this product to rain or moisture. Probe assemblies to be used for mains measurements shall be rated as appropriate for measurement category III or IV according to EN 61010-031 and shall have a voltage rating of at least the voltage of the circuit to be...
-
Page 48: Description
Description Features • 10000 count digital display • Active backlit, large scale display • VoltSense (none contact voltage) • Analog bar graph • True RMS reading on AC and AC+DC mode • Torch lightening when clamping • Auto ohms/continuity/diode selection •... -
Page 49: Front Panel
Front panel VoltSense light Hold/DCA zero key Trigger Rotary switch Display Navigator key COM-input V, Ω, input Nieaf-Smitt is a brand name of Mors Smitt www.nieaf-smitt.com... -
Page 50: Keys
Keys Power on/off After turning on the meter, the LCD will show Full, hAlf, or Lo to indicate the battery capacity. Auto power off After idle 15 min The meter can work again by turning it on from the OFF position. -
Page 51: Navigator Key
Navigator key LEFT ENTER RIGHT DOWN The navigator key has 4 directions of switch on the display, toggle the navigator key to select the desired feature to activate the feature by a simple click. Nieaf-Smitt is a brand name of Mors Smitt www.nieaf-smitt.com... -
Page 52: Measurements
Measurements General Preparation and caution before measurement: Observe the rules of warnings and cautions. The figures on the following pages show how to make the measurements. When connecting the test leads to the device under test, connect the common test lead before connecting the live lead. -
Page 53: Voltage Measuring
Measuring voltage Warning: To avoid electrical shock, hazard or damage to meter, do not attempt to measurement that might exceed 1000 VDC or AC RMS. Do not apply more then 1000 VDC or AC RMS between the common input terminal and earth ground. Note: If the measured voltage is greater than 30 VDC or AC RMS, the display will show the ‘... -
Page 54: Current Measuring
Measuring current CAT IV 600 V / CAT III1000 V with respect to earth for the jaw. Tactile barrier for hand guard. Do not hold the meter across the tactile barrier. I + (-I )= 0 Note: Don’t clamp on any conductor while the meter power on. -
Page 55: Auto Sense Modus
Auto sense mode Display measurement result at AC only with RMS value or DC value, it depends on whichever is greater. AC mode: AC only with RMS value DC mode: DC value AC+DC mode: AC+DC RMS value • Select ‘AC’ , ‘DC’ or ‘AC+DC’ indicator then press the navigator key to enter the AC/DC/AC+DC mode •... -
Page 56: Peak Hold
Peak hold (AC modus only) • In ACV mode, select ‘ ‘ indicator on the display to enter Peak hold mode • To quit from Peak hold mode, press the navigator key for more than 2 sec "ENTER" >2SEC • In ACA mode, select ‘... -
Page 57: Inrush Current
Inrush current (AC mode only) If the under testing Inrush current could be bigger than 100 A AC, please select the range to 600 A in advance before activating inrush current. Watting Tigger After Tigger ENTER Nieaf-Smitt is a brand name of Mors Smitt www.nieaf-smitt.com... -
Page 58: Dca Zero
DCA ZERO • Remove the jaw out of the conductor • Press Hold key > 2 sec to compensate the residual magnetism HOLD> 2 Sec HOLD Note: DCA zero is only available in Auto sense, DC and AC+DC mode Nieaf-Smitt is a brand name of Mors Smitt www.nieaf-smitt.com... -
Page 59: Measuring Frequency
Measuring frequency (AC mode only) • Select the ‘Hz’ indicator then press the navigator key to enter/exit the frequency measurement mode "Hz" ENTER Nieaf-Smitt is a brand name of Mors Smitt www.nieaf-smitt.com... -
Page 60: Max/Min/Avg
Max/min/avg • Select the ‘Max min’ indicator then press the navigator key to enter the Max/min/avg mode • To quit from the Max/min/avg mode, press the navigator key for more than 2 sec The Max/min/avg mode records the minimum and maximum input values. -
Page 61: Thd Measurement
5.10 THD measurement (AC mode only) • Select the ‘THD’ indicator then press the navigator key to enter the THD mode THD-F=RMS of harmonics ÷ RMS of fundamental ×100%. (harmonics up to the 25th) "THD" "ENTER" ENTER " " >2SEC "... -
Page 62: Individual Harmonic Measurement
"THD" ENTER 5.11 Individual harmonic measurement " " "ENTER" >2SEC (AC mode only) " " • Select the ‘ ‘ indicator then press the navigator key to enter the individual harmonic mode "RIGHTWARD" • To quit from the individual harmonic mode, press the navigator key for more than 2 sec "LEFTWARD"... -
Page 63: Hfr
5.12 HFR (AC mode only) • Select the ‘HFR’ indicator then press the navigator key to eliminate high frequency noise Note : Peak hold, Inrush, THD, HZ, individual harmonic and HFR mode are only available in AC mode. Nieaf-Smitt is a brand name of Mors Smitt www.nieaf-smitt.com... -
Page 64: Measuring Active Power / Power Factor
5.13 Measuring active power(W)/Power factor(PF) Single phase power measurement • Set the rotary switch to the ‘W’ position • Connect the red test lead to the L, and the black test lead to the N • Press the trigger to open the transformer jaws and clamp one conductor only, make sure that the jaw is firmly closed around the conductor •... - Page 65 Power factor sign sign The phase of the current signal is lagging behind (No) the voltage signal (inductive load) ‘-’ sign The phase of the current signal is leading the voltage signal (capacitive load). Overrange display: OL.U Voltage overload OL.A Current overload OL.UA Both voltage and current overload...
- Page 66 Three phase power measurement 3 phase 3 wire balanced / unbalanced • Set the rotary switch to the ‘W’ position • Using the navigator key to choose the ‘W mode W=W1+W2 Wye or star Black Black Nieaf-Smitt is a brand name of Mors Smitt www.nieaf-smitt.com...
- Page 67 3 phase 4 wire balanced / unbalanced • Set the rotary switch to the ‘W’ position • Using the navigator key to choose the ‘W mode W=W1+W2+W3 Black Black Black Nieaf-Smitt is a brand name of Mors Smitt www.nieaf-smitt.com...
-
Page 68: Phase Rotation
5.14 Phase rotation Note: Connect the supposed three phase of power source as shown. The test is only available while the system frequency is stable Line 1 Line 2 Line 3 • Set the rotary switch to the ‘W’position • Using the navigator key to choose the ‘... - Page 69 • If it displays ‘L2’ , then the buzzer will be sound for twice, switch the red test lead to connect to the supposed phase line 2 immediately before the ‘ L2’ is disappeared. • When ‘L2’ is disappeared, it will display the testing result If it displays ‘1 2 3’...
-
Page 70: Ohm Measurement
5.15 Ohm measurement Caution: To avoid possible damage to the Meter or to the equipment under test, disconnect circuit power and discharge all high voltage capacitors before measuring resistance and diode. • Select ‘Ω’ , ‘ ‘ or ‘ ‘ indicator then press the navigator key to enter the ‘Ω’... -
Page 71: Measuring Capacitance
5.16 Measuring capacitance • Set the rotary switch to the ‘ ‘ position Capcitance Caution: To avoid possible damage to the meter or to the equipment under test, disconnect circuit power and discharge all high-voltage capacitors before measuring capacitance. Use the DC voltage function to confirm that the capacitor discharged. -
Page 72: Measuring Current With The Eazyflex
5.16 Measuring current with the EazyFlex • Set the rotary switch to the ‘ ‘ position • Keep the range of EazyFlex at 3000 A Note Measure a known current to make sure the NI 19 & EazyFlex operate correctly. PLUS Nieaf-Smitt is a brand name of Mors Smitt www.nieaf-smitt.com... -
Page 73: Other Functions
Other functions Auto/manual range Auto Range mode Manual Range mode "Range" "ENTER" "Range" "Range" >2SEC • Select the ‘Range’ indicator then press the navigator key to enter the manual range mode • To return to the auto range mode, press the naviga- tor key for more than 2 sec Hold key •... -
Page 74: Voltsense
VoltSense The red diamond shape of LED will Illuminate, If there has electric field been detected form the jaw. Note: This function is invalid for OHM measurement. Caution: The light indicator turns on while the clamp tips are close to a electric field. If no indication, voltage could still be present. -
Page 75: Specifications
Specifications General specifications Display count LCD, 10000 digit Measuring range 3 times / sec Overrange display OL or -OL Power requirement 9 V battery Battery indicator Replace the battery when the empty battery indicator appears in the display. Battery life Alkaline 9 V 50 hour (without backlight) Auto Power Off Approx. -
Page 76: Electrical Specificiations
Electrical specifications Accuracy is ±(% reading + number of digits) at 23 C + 5 C, < 80 % RH 1 Voltage Function Range Accuracy* 99.99 V + (0.7 % + 2 dgt) 999.9 V 99.99 V + (1.0 % + 5 dgt) 50~500 Hz 999.9 V 99.99 V 50~60 Hz + (1.0 % + 5 dgt) -
Page 77: Current
2 Current Function Range Accuracy 99.99 A 50~60 Hz + (1.5 % + 5 dgt)* 599.9 A >60~400 Hz + (2.0 % + 5 dgt)* 0.10 A~99.99 A 50~60 Hz + (1.5 % + 5 dgt)* 599.9 A >60~400 Hz + (5.0 % + 5 dgt)* * The measured value <1000 dgt, add 5 dgt to the accuracy. -
Page 78: Frequency
4 Frequency Function Range Accuracy 20.00 ~ 99.99 Hz Frequency 20.0 ~ 999.9 Hz + (0.5 % + 3 dgt) 0.020 ~ 9.999 kHz Overload protection 1000 V rms 600 A rms Sensitivity 10~100 V rms for AC 100 A range 10~100 A rms for AC 100 A range ( >400 Hz unspecified) 100~1000 V rms for 1000 V range... -
Page 79: Active Power
7 Active power: Watt (DC/AC) Function Range Accuracy 9.999 kW* A,error×V,reading+ ACW / DCW 99.99 kW V,error×A,reading 599.9 kW * The measured value <1.000 kW, add 10 dgt to the accuracy. Overload protection 1000 V rms 600 A rms Accuracy defined for ACW : Sine wavef , ACV >... -
Page 80: Capacitance
10 Capacitance Function Range Accuracy 3.999 μF 39.99 μF Capacitance ± (1.9% + 8dgt) 399.9 μF 3999 μF Overload protection 1000 V rms (11) Flex AC current (voltage input) Function Range Accuracy* 300.0 A / 3000 A 1 %+5 dgt (50~500 Hz) ** 1 %+5 dgt (50~60 Hz) ** HFR ACA 300.0 A / 3000 A... -
Page 81: Maintenance
Maintenance Battery replacement Battery state Description The battery is full charged The battery is remained 2/3 power The battery is remained 1/3 power Replace the battery as soon as the low battery indicator appears, to avoid inaccurate reading. Caution: Remove test leads from Meter before opening the battery cover or Meter case. -
Page 82: Cleaning
Cleaning Protect the clamp from adverse weather. The clamp is not waterproof. Do not adjust the LCD-screen for prolonged periodes in direct sunlight. To prevent damage to the meter, the meter should not be exposed to sprays, liquids or solvents. Periodically wipe the case with a dry cloth and detergent do not use abrasives or solvents Repair... -
Page 83: Repair
Limited Warranty This Meter is warranted to the original purchaser against defects in material and workmanship for 2 years from the date of purchase. During this warranty period, manu- facturer will, at its option, replace or repair the defective unit, subject to verification of the defect or malfunction. This warranty does not cover fuses, disposable batteries, or damage from abuse, neglect, accident, unauthorized repair, alteration, contamination, or abnormal conditions... - Page 84 +31 (0)30 288 13 11 +31 (0)30 289 88 16 Nieaf-Smitt is a brand name of Mors Smitt sales.msbv@wabtec.com www.nieaf-smitt.com (c) Copyright 2015 All rights reserved. Nothing from this edition may be multiplied, or made public in any form or manner, either electronically, mechanically, by photocopying, recording, or in any manner, without prior written consent from Mors Smitt B.V.
Need help?
Do you have a question about the Mors Smitt Nieaf Smitt NI 19 PLUS and is the answer not in the manual?
Questions and answers