Mutec MC-3+ Smart Clock Operating Manual
Hide thumbs
Also See for MC-3+ Smart Clock:
- Operating manual (30 pages) ,
- Quick start manual (4 pages) ,
- Quick start manual (4 pages)

Related Manuals for Mutec MC-3+ Smart Clock


Summary of Contents for Mutec MC-3+ Smart Clock
- Page 1 Operating Manual M U T EC Gmb H · F o n 0049- (0 )30- 74 68 8 0-0 · cont act @m utec-net. com · www. mutec-net. com...
-
Page 3: Table Of Contents
Warranty Regulations ................................5 Introduction General Description ..................................6 MC-3+ Features .................................... 6 MC-3+ Applications ..................................6 Peripheral MUTEC Products ................................7 Product Registration for Warranty and Support ..........................7 Installation Content of the Box ..................................8 Placing the Device ..................................8 Wiring the Interfaces .................................. -
Page 4: Safety Instructions
We herewith confirm that the product complies with the mediately! If the unit is damaged, please do NOT return it to MUTEC GmbH, but notify your European Commission’s standards on electromagnetic dealer and the shipping company immediately, otherwise claims for damage or replacement compatibility. -
Page 5: Warranty Regulations
§1 Warranty MUTEC GmbH warrants the flawless performance of this product to the original buyer for a period of two (2) years from the date of purchase. If any failure occurs within the specified warranty period that is caused by defects in material and/or workmanship, MUTEC GmbH shall either repair or replace the product free of charge within 90 days. -
Page 6: Introduction
Therefore, we have developed a totally new clocking technology, which we are calling the »MUTEC 1G-Clock«. That means in practice, we are running – for the first time in the audio industry – an audio clock synthesis... -
Page 7: Peripheral Mutec Products
Product Registration for Warranty and Support We ask you to be so kind to register your MUTEC product through our website immediately after buying. This ensures full warranty services over a period of two years after purchasing the product. More-over, for all registered products we offer to our customers technical support. -
Page 8: Installation
Installation Content of the Box Your MC-3+ was packed carefully. Nevertheless we recommend to check the content directly after opening the package: 1 x MC-3+ 1 x Power cable 1 x USB cable 1 x Manual If there are any damages visible, please refer to Safety Instructions and Warranty Regulations for further details. Placing the Device The unit should be set up as closely as possible to the devices to which it will be connected with to avoid excessive cable lengths. -
Page 9: General Recommendations For Interface Wirings & Cables
Information MUTEC offers optical cables of various lengths that have been specifically tested for the transmission of ADAT™ and S/P-DIF signals. Ask your local dealer for such cables! -
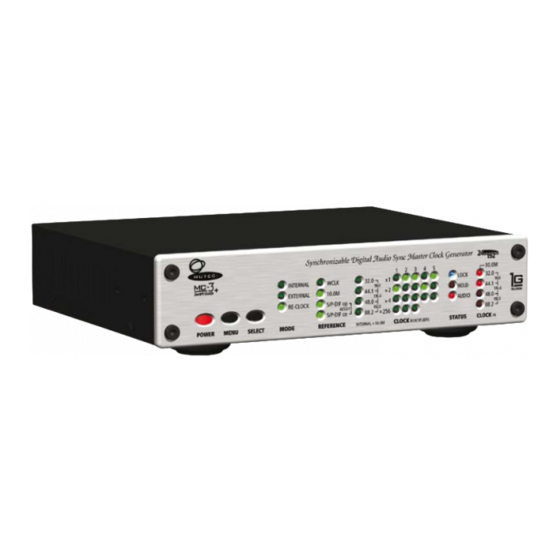
Page 10: Control Elements And Terminals
Control Elements and Terminals MC-3+ Front Panel 1 »POWER« This red LED lights up when the unit is switched on with the rear panel power switch. 2 »MENU« Use this key to access the different menus. 3 »SELECT« Use this key to select a function within a specific menu. 4 »MODE«... -
Page 11: Rear Panel
Control Elements and Terminals MC-3+ Rear Panel 1 »WCLK OUT 1 – 3« These 3 pairs of Word Clock outputs transfer all standard Word Clock rates and Word Clock × 256 for older digidesign Pro- Tools™ systems. Their numbering is aligned to the apropriate menus on the front panel. The individual BNC connectors are pairwise marked as »A«... -
Page 12: Operation
Main Function Menus The three main function menus offer access to the whole functionality of your MC-3+ Smart Clock. The »MODE« menu allows to select for the general operation mode of the MC-3+. It has to be selected first. The factory de- fault is set to »INTERNAL«. - Page 13 Operation 1) Which operation mode is basically needed? → »MODE« Should my MC-3+ work as clock generator (»INTERNAL«), as clock distributor (»EXTERNAL«) or as audio INTERNAL signal re-clocker (»RE-CLOCK«)? EXTERNAL RE-CLOCK MODE 2) Which reference do I need for my clocking application? → »REFERENCE« 32.0 WCLK 96.0...
- Page 14 »RE-CLOCK« & »EXTERNAL« This is a very special function only available in your MC-3+ Smart Clock! After selection of the first re-clocking mode press the »SELECT« key one time again and the »EXTERNAL« and »RE-CLOCK« LEDs light and show that re-clocking based on an exter- nally applied clock reference is active.
- Page 15 Operation Selecting References Selection of references is mainly used when the MC-3+ is set under »MODE« to »EXTERNAL« or »RE-CLOCK«. 32.0 INTERNAL WCLK 96.0 EXTERNAL 10.0M 44.1 176.4 RE-CLOCK S/P-DIF op 48.0 AES3/11 192.0 S/P-DIF co 88.2 x 256 MODE REFERENCE CLOCK INTERNAL + 10.0M...
-
Page 16: Status Information
Operation An optical S/P-DIF digital audio signal is re-clocked. All outputs provide their signals on the same clock rate like this one of the INTERNAL WCLK 32.0 96.0 incoming optical S/P-DIF digital audio signal. EXTERNAL 10.0M 44.1 176.4 RE-CLOCK S/P-DIF op 48.0 192.0 AES3/11... -
Page 17: Generic Functions
Operation »HOLD« This red LED lights when the external reference clock signal is interrupted or lost. The frequency synthesizer of the MC-3+ kee- ps generating all output signals continuously, based on the last incoming clock rate. Thus, your studio set-up receives non-in- terrupted clock supply, regardless if a valid external referecne signal is present, unstable or lost. -
Page 18: Appendix
Disconnect the unit from the mains before opening! Remount the aluminium cover thoroughly before you attempt to operate the unit! When the MC-3+ Smart Clock is shipped, the BNC-based Word Clock Jumper: input connector is terminated internally with 75 Ω. Therefore, one jumper is put on two pins - Position 2 - of the 3-pin socket JP1. - Page 19 Appendix When the MC-3+ Smart Clock is shipped, the BNC-based Word Clock input connector is terminated internally with 75 Ω. Therefore, one jumper is put on two pins - Position 2 - of the 3-pin socket JP1. Jumper Position 1 = no Terminaltion For additional information, please refer to page 11 under »Wiring the Interfaces –...
-
Page 20: Technical Data
10.0 MHz to Word Clock and AES11 conversion Digital audio re-clocking, internally- and externally-referenced Frequency Synthesis & Reference Clock Specifications Frequency Synthesis MUTEC’s propritary 1G-Clock Technology based on highest-clocked DDS process Oscillator Type XO, digitally-compensated crystal oscillator Clock Accuracy (shipped) <... -
Page 21: Generatable Word Clock (Wclk) Frequencies
Front Panel Size / Material 198 x 44 x 4 mm (W x H x D), aluminum, aluminum- or black-colored Weight ~ 1260 g MC-3+ Smart Clock Order Information Front aluminum-colored Item no. 8015-100, EAN code: 4260342460542 Front black-colored Item no. 8015-101, EAN code: 4260342460559... - Page 22 M U T EC GmbH · F on 0049- ( 0)30 -74 6 8 80- 0 · conta ct@ m ut ec-net. com · www. mut ec-net. com...
Need help?
Do you have a question about the MC-3+ Smart Clock and is the answer not in the manual?
Questions and answers