
Related Manuals for Fluke PLS XLD


Summary of Contents for Fluke PLS XLD
- Page 1 Laser Detectors Users Manual December 2018 (English) © 2018 Fluke Corporation. All rights reserved. Specifications are subject to change without notice. All product names are trademarks of their respective companies.
- Page 2 LIMITED WARRANTY AND LIMITATION OF LIABILITY This Fluke product will be free from defects in material and workmanship for three years from the date of purchase. This warranty does not cover fuses, disposable batteries, or damage from accident, neglect, misuse, alteration, contamination, or abnormal conditions of operation or handling.
-
Page 3: Table Of Contents
Table of Contents Title Page Introduction ......................How to Contact Fluke.................... Safety Information....................Product Familiarization ..................Features......................Display ......................Control Panel ....................Detection Accuracy..................On Grade Measurements ..................Attach Rod Clamp.................... Take Measurements ..................Maintenance ......................Clean the Product .................... - Page 4 Users Manual...
-
Page 5: Introduction
The Detector is battery-powered and very portable. Use the Detector with the rod clamp, a grade rod, and a red or green rotary laser level to identify new level and grade marks. How to Contact Fluke To contact Fluke, call one of the following telephone numbers: • Technical Support USA: 1-800-44-FLUKE (1-800-443-5853) •... - Page 6 • Be sure that the battery polarity is correct to prevent battery leakage. • Use only Fluke approved power adapters to charge the battery. • Do not short the battery terminals together. • Do not disassemble or crush battery cells and battery packs.
-
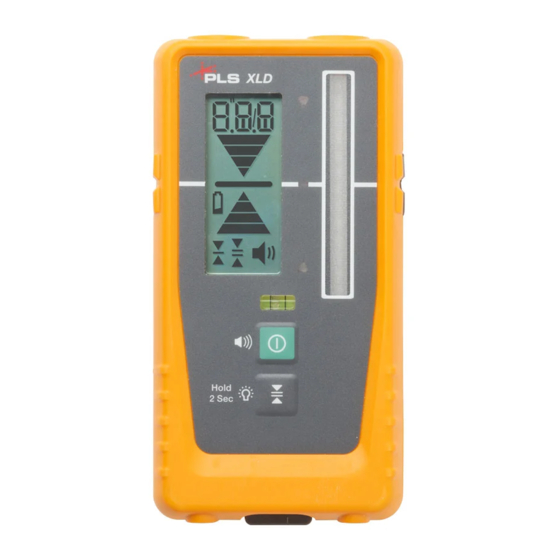
Page 7: Product Familiarization
Laser Detectors Product Familiarization Product Familiarization Features Table shows the features of the Product. Table 2. Features Item Description Function Control panel Multiple functions. See Control Panel. Bubble level Shows the horizontal position of the Product. Use to transfer reference marks 41 mm from the top edge of ... -
Page 8: Display
Users Manual Display Table shows the items on the display. Table 3. Display Item Description Battery level status Numeric or text display High grade arrows. Shows when the detector is too high and needs to be lowered. On grade indicator Low grade arrows. -
Page 9: Control Panel
Laser Detectors Product Familiarization Control Panel Table lists the functions of buttons on the control panel. Table 4. Control Panel Description Function Push once to turn on the Product. Power for ≥2 seconds to turn off the Product. Push and hold Push once to view the current detection accuracy setting and units of measure. -
Page 10: Detection Accuracy
Users Manual Detection Accuracy You can set the detection accuracy and units of measure. The numerical value of the detection accuracy depends on the measurement units. See Table 5. Table 5. Detection Accuracy Fine Medium Course Fractional inches (F.in) Millimeters (mm) Centimeters (cm) Inches (in) 0.05... -
Page 11: Take Measurements
Laser Detectors On Grade Measurements Figure shows how to connect the rod clamp to the Detector and a grade rod, measuring rod, or staff. Figure 1. Rod Clamp Attachment Take Measurements To identify new level and grade marks: 1. Put the bottom of the laser level on a stable surface or tripod. 2. -
Page 12: Maintenance
Users Manual Figure 2. Level and Detector Maintenance To maintain the Product, clean the case, front and rear displays, and laser beam reception window and replace the battery. W Caution To prevent damage to the Product, do not drop the Product. Treat the Product as a calibrated instrument. -
Page 13: Batteries
Laser Detectors Specifications Batteries Replace the battery when the battery indicator shows a low battery. To install or replace the battery (See Figure 3.): 1. Open the battery door. 2. Install one AA battery with the correct polarity. 3. Close the battery door. Figure 3. - Page 14 Users Manual Temperature -20 °C to 50 °C (-4 °F to 122 °F) Operating Storage -18 °C to 50 °C (-0.4 °F to 122 °F) With Batteries Without Batteries -40 °C to 70 °C (-40 °F to 158 °F) 0 % to 90 % (0 °C to 35 °C) 0 % to 75 % (35 °C to 40 °C) Relative humidity 0 % to 45 % (40 °C to 50 °C)
Need help?
Do you have a question about the PLS XLD and is the answer not in the manual?
Questions and answers