Sound Devices 744T Quick Start Manual
Time code hard drive field recorder
Hide thumbs
Also See for 744T:
- User manual (90 pages) ,
- User manual and technical information (88 pages) ,
- User manual (76 pages)
Table of Contents
Advertisement
Quick Links
CalArts Film/Video Sound
Quick Start for Sound Devices 744T
Time Code Hard Drive Field Recorder:
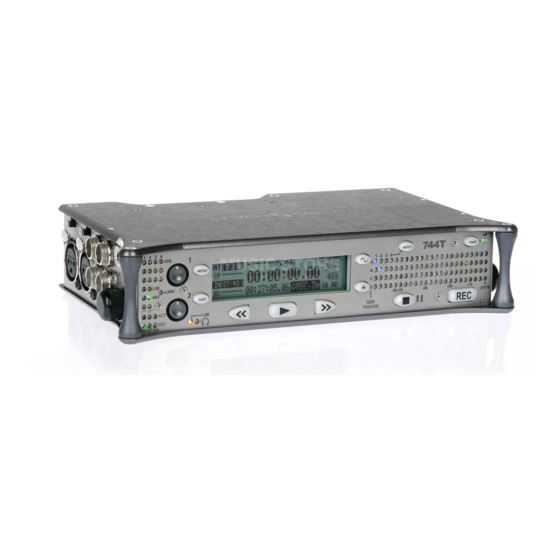
Front Panel Descriptions
1) Digital Input LEDs
!
Indicates the presence of digital signal on the
respective input. When flashing, indicates that
digital input is selected but no valid digital
clock signal is present.
2) Input 1 Gain
!
Controls the analog gain (input trim) of the
channel 1 input.
3) Input 2 Gain
!
Controls input 2 gain, as in #2 above. When
inputs are linked as a stereo pair, Input 2 Gain
controls left-to-right balance.
4) MENU Key
!
Used to access all 744T setup menu selections.
When in menu mode, used to move up
through the menu selections.
5) LCD Display
!
Primary display of 744T status. The LCD is
backlit using the LCD backlight control (#15).
6) Tone Oscillator
!
Press and hold to activate the tone oscillator.
7) Input-to-Track Matrix LEDs
!
Blue LEDs indicate inputs (1, 2, 3, 4) enabled
for recording to tracks (A, B, C, D).
8) INPUT Select Key
Pressing the INPUT key brings up the input
muting and routing menu. Hold down the IN-
PUT key and press one of the four indicated
soft keys to mute inputs. Pressing the STOP key
and the INPUT select key cycles through the six
factory preset input-to-track routing combina-
tions plus the custom routing menu. In the cus-
tom routing menu any input can be routed to
any track.
9) Level Meter LEDs
!
Four, 19-segment track level-meters indicate
level in dBFS..
10) Power Key
!
Press and hold (150 ms) to power up the 744T.
Press and hold (1 second) to power down.
11) Charge LED
!
Indicates the charge status of the onboard bat-
tery charger. LED flashes when external power
is connected and the removable battery is
charging; illuminates solid when battery is
fully charged.
12) Power LED
!
Indicates the 744T is powered and available for
operation. LED flashes when the removable
battery or external DC is in a low-voltage state.
13) Record Key
!
Press to record. The 744T is a record-priority
device; pressing this key activates recording
and discontinues all other functions, except file
operations. Pressing key during recording can
set a cue marker or start a new file, as selected
in the setup menu.
14) Stop/Pause Key
!
Press and hold this key for 150 ms to stop re-
cording. In playback mode, a single press
1
Advertisement
Table of Contents

Related Manuals for Sound Devices 744T


Summary of Contents for Sound Devices 744T
- Page 1 1 input. 10) Power Key 3) Input 2 Gain Press and hold (150 ms) to power up the 744T. Controls input 2 gain, as in #2 above. When Press and hold (1 second) to power down. inputs are linked as a stereo pair, Input 2 Gain 11) Charge LED controls left-to-right balance.
- Page 2 pauses playback (play-pause), allowing audio 22) LINK LED scrubbing with the FF and REW keys. Indicates that channels 1 and 2 are linked as a 15) LCD Backlight Key stereo pair. In link mode input 1 controls gain, Press to toggle LCD and keyboard backlight- input 2 controls left-to-right balance.
- Page 3 Indicates the source for headphone output. 15) External Digital Clock Indicator Sources are user selectable in the setup menus. The 744T is locked to a valid external digital or word clock source when the L is in the display. Left Panel Connectors and Controls...
- Page 4 Unbalanced digital inputs accept four channels 6) Word Clock Input and Out of either AES3 or S/PDIF on BNC connectors. Provides clock input and output for the 744T. 3) FireWire (IEEE-1394) Port 7) AES3id Output Bus 2 Connection to a computer to access the inter-...
- Page 5 ! •! record on hard drive AND compact flash ! •! reference tone: -20 dBFS ! •! phantom power off Turn on 744T with the button. ! •! normal gain on mic inputs Scroll down to and select menu item 4) Bit Depth.
- Page 6 If you have just gotten the recorder from the cage Hold the STOP button & press the INPUT & don't have any recordings on it, select menu button until only the blue light next to A & 1 is lit. item 81) INHDD: (Erase).
- Page 7 18 and 19. Connect your headphones. (Don't connect to the TAPE OUT jack!) (Note: the 744T will not provide T power for older Sennheiser mics.) Enabling phantom power will illuminate the 48V Adjust your mic level(s) with GAIN control(s) 1 & 2 lights on the front panel.
- Page 8 This guide is just a basic overview. Much important information has been left out. It is not a substitute for proper instruction or practice. It is very important that you plan your entire post-production path BEFORE you start recording sound for Please see the 744T User Guide for more complete information. ver.7 10-26-10...
Need help?
Do you have a question about the 744T and is the answer not in the manual?
Questions and answers