Table of Contents
Advertisement
Quick Links
Advertisement
Table of Contents

Related Manuals for TensCare Ova+


Summary of Contents for TensCare Ova+
- Page 1 INSTRUCTIONS FOR USE READ CAREFULLY BEFORE STARTING USE...
- Page 2 QUICK START GUIDE Connect the main unit with Place two electrodes on each electrodes using the Y-cable side of your lower tummy, distance between the electrodes should be over 3cm Select the mode which works Turn on the device by pressing and holding the “...
-
Page 3: Table Of Contents
Contents INTRODUCTION ................4 INTENDED USE ................4 PERIOD PAIN ................4 ADVANTAGES OF Ova+............... 6 HOW IT WORKS ................6 CONTRAINDICATIONS, CAUTIONS & WARNINGS ....7 PAIN RELIEF PROGRAMMES ........... 10 BATTERY..................11 CONTROLS AND DISPLAY ............13 CONTENTS OF PACK .............. 14 SETTING UP ................ -
Page 4: Introduction
INTRODUCTION Period Pain (Dysmenorrhoea) is a widespread problem which affects 40- 90% of women. Period pain can have a real impact on quality of life, leading to absences from work and school. The Ova+ Period Pain Reliever offers drug-free relief from period pain. If you are unsure of the cause of the pain, then you should seek medical advice to establish the cause and identify the correct treatment. - Page 5 symptom is a cramping type of pain in the lower tummy (abdomen); it may in some cases spread to the lower back, or to the top of the legs. Pains are generally worst in the first few years after starting your period, with symptoms tending to improve with age or after childbirth.
-
Page 6: Advantages Of Ova
ADVANTAGES OF Ova+ The Ova+ can be an option for women who prefer not to use medication. The Ova+ causes muscles in the uterine area to relax with a calming analgesic effect. By reducing menstrual pain, the Ova+ can help improve sense of wellbeing and allows everyday activity to resume while it is worn. -
Page 7: Contraindications, Cautions & Warnings
CONTRAINDICATIONS, CAUTIONS & WARNINGS In this manual: A Warning is used when failure to follow the instructions may result in serious injury or death. A Caution is used when failure to follow the instructions may result in a minor or moderate injury, or damage to the device or other property. - Page 8 malignancy should be avoided as it may stimulate growth and promote spread of cancer cells. CAUTIONS: Caution should be used if you have a bleeding disorder as stimulation may increase blood flow to the stimulated region. Caution should be used if you have suspected or diagnosed epilepsy as electrical stimulation may affect seizure threshold.
- Page 9 • Across the front of the head. Effect on patients who have had strokes or seizures is not known. May affect your sense of balance. The effects of stimulation of the brain are unknown. ELECTRODE PADS CAUTION: Caution: Do NOT ignore any allergic reaction to the electrode pads: If a skin irritation develops, stop using TENS, as this type of electrodes may not be suitable for you.
-
Page 10: Pain Relief Programmes
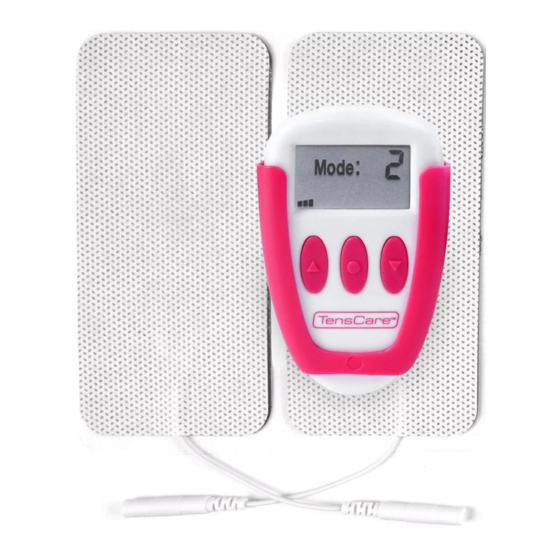
PAIN RELIEF PROGRAMMES The Ova+ offers four pre-set clinically tested programmes which are displayed on the screen as Mode 0, Mode 1, Mode 2, Mode 3. Each programme relieves pain in a different way. It is important to try all four programmes to find which suits you the best. -
Page 11: Battery
vii) The unit has a built-in Li-ion rechargeable battery & a micro USB port. To charge the device, use a phone or tablet charger, or the USB port of a computer. viii) When the device is switched ON, it will resume in the mode previously used. - Page 12 When the battery charging has completed, the bar stops cycling and remains at maximum to indicate full capacity. Remove the charging cable and adaptor from the device when charging is completed. WARNING: This product is equipped with a Lithium-ion battery. Failure to follow these instructions could cause the lithium-ion battery to leak acid, become hot, explode or ignite and cause injury and /or damage: Do NOT expose to temperatures over 60°C (140°F)
-
Page 13: Controls And Display
CONTROLS AND DISPLAY On / Up Off / Down Programme selector Left button ( Press and hold this key for 3 to 5 seconds to turn ON the device. When the device is ON, repeatedly press it to increase the strength of the electrical signal. -
Page 14: Contents Of Pack
Right button ( Repeatedly press this key to decrease the strength. To switch OFF the device, press and hold it for 3 to 5 seconds. The micro USB port provides a connection to the electrodes, or to charge the battery inside. The LCD display shows the selected Mode (through a number from 0 to 3) and the level and status of stimulation output (through a 20 segment bar graph). -
Page 15: Setting Up
11. SETTING UP 11.1. PREPARING THE OVA+ UNIT To test that the battery is charged (see section 8) and that the unit is working press and hold the “ ” button for at least three seconds. The display should appear, and an audible “Beep” will be heard. Press and hold the “... -
Page 16: Placement Of Electrode Pads
12. PLACEMENT OF ELECTRODE PADS In order to obtain the best relief, the pads need to be placed over the dermatomes T10, T11 and T12, which are the nerve roots that supply the sensory fibres to the uterus. These dermatomes wrap around the body, but do not quite meet up at the front. -
Page 17: Application Of Electrode Pads
On the front, in a vertical format: In the vicinity of your groin, place the pads vertically, about 10cms (4 inches) apart. The “pigtails” should be uppermost. On the front, in a diagonal format: In the vicinity of your groin, place the pads in a V-shape, narrowing to about 10cms (4 inches) apart at the lower end of the pads. - Page 18 • Make sure the Ova+ is switched off before applying or removing the pads. • Ensure that the skin is clean and thoroughly dry before attaching the pads, as they will not adhere well if the skin is wet or greasy. •...
-
Page 19: Cleaning
When not in use, the pads should be placed onto the plastic film liner and sealed in the bag. • When the pads initially lose their adhesive quality, it is possible to reactivate their adhesiveness by applying a fine mist of water. •... -
Page 20: Accessories
Replacement electrode pads, new batteries and lead wires are available from your supplier or distributor (see back cover for contact details), by mail order from TensCare, by telephone using a credit or debit card, or through the TensCare website. The following replacement parts may be ordered from TensCare at www.tenscare.co.uk or +44(0) 1372 723434. - Page 21 Note: For hospital use, full EMC advice tables are available on request. 18. TECHNICAL SPECIFICATIONS Waveform Symmetrical Bi-Polar rectangular Amplitude 52 mA zero to peak in 40 steps (over 500 Ohm load) +/- 10% Output plug Fully shielded: touch proof mini USB Channels Single channel Battery...
-
Page 22: Troubleshooting
Note: The electrical specifications are nominal and subject to variation from the listed values due to normal production tolerances of at least 5%. Pulse width μs Mode Description Frequency Hz Constant Output Constant Output Burst Output 2Hz Constant Output 19. TROUBLESHOOTING Problem Possible causes Solution... -
Page 23: Warranty
TensCare Ltd. We will repair, or at our option replace free of charge, any parts necessary to correct material or workmanship, or replace the entire unit and return to you during the period of the warranty. - Page 24 For hygiene reasons, please do not include used electrode pads. Send only the unit and lead wires. Please return the unit and warranty card (see page 25) at your cost TensCare Ltd PainAway House, 9 Blenheim Road, Longmead Business Park,...
- Page 25 PLEASE RETAIN THIS WARRANTY CARD. RETURN THIS PORTION ONLY WHEN YOU RETURN YOUR PRODUCT FOR REPAIR UNDER WARRANTY. NAME: ADDRESS: POSTCODE: DAYTIME TELEPHONE: E-MAIL: MODEL: DATE OF PURCHASE: ATTACH PROOF OF PURCHASE DO NOT SEND IN PROBE OR ELECTRODE PADS RETAILERS NAME: RETAILERS ADDRESS: RETAILERS POSTCODE:...
- Page 26 Notes...
- Page 27 TensCare aim to give you the best possible product and service. We listen to your suggestions and are constantly trying to improve our products. We also want to learn about the way our products are used, and the benefits they give. If you have anything you would like to share with us, please contact: www.tenscare.co.uk...
- Page 28 Distributed by: Manufactured by: TensCare Ltd, 9 Blenheim Road, Epsom, Surrey KT19 9BE, UK Tel: +44(0) 1372 723434 www.tenscare.co.uk Pub No.: I-OVAP-UK Version 3.2 07/19...
Need help?
Do you have a question about the Ova+ and is the answer not in the manual?
Questions and answers