Advertisement
Quick Links
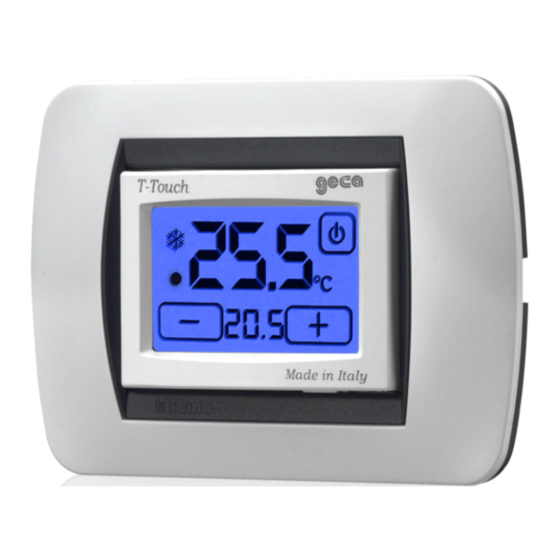
FLUSH-MOUNTED TOUCH SCREEN THERMOSTAT
T-Touch
UK
3.530.1652
TE401
3.531.1653
TE402
3.531.1705
TE403
ADAPTABLE SWITCH PLATES
ADAPTABLE SWITCH PLATES
ADAPTABLE SWITCH PLATES
ADAPTABLE SWITCH PLATES
ADAPTABLE SWITCH PLATES
AVE : serie Banquise and Noir.
VIMAR: serie Idea, Idea Rondò, Plana ed Eikon.
BTICINO: serie Living international, Light, Light Tech, Matix, Luna and Axolute.
LEGRAND: serie Vela.
GEWISS: serie Chorus One, Chorus Lux, Chorus Art, Chorus Flat, Chorus
*
*
Geo,
Playbus and
Playbus young.
GENERAL DESCRIPTION
GENERAL DESCRIPTION
GENERAL DESCRIPTION
GENERAL DESCRIPTION
GENERAL DESCRIPTION
T-Touch is a flush-mounted touch screen thermostat that facilitates setting
the temperature in your home.
T-Touch allows the setting of two modes of temperature:
The DAY temperature (
) and the NIGHT temperature (
T-Touch has
a backlight display with constant digital visualization of the
measured temperature and the set temperature.
T-Touch controls
the heating and air-conditioning systems.
It avoids wasting energy by activating the heating and air-conditioning systems
only when required.
Thanks to the holder plate the most diffused domestic series of switches
and accessories on the market can be mounted.
ELECTRICAL CONNECTION
ELECTRICAL CONNECTION
ELECTRICAL CONNECTION
ELECTRICAL CONNECTION
ELECTRICAL CONNECTION
The terminals for the electrical connections are positioned at the rear of the
thermostat's housing (Pic.1).
Pic.1
Connection to the burner, wall-
mounted boiler, air-conditioning
system and the spring return zone
valve:
U
NA C NC
3 2 1
T-Touch
Pic.2
INSTALLATION
INSTALLATION
INSTALLATION
INSTALLATION
INSTALLATION
The thermostat must be installed directly into the 3 module pattress box
(flush-mounted installation). The recommended height from the floor is 1.5
metres in a dry place without air currents and far away from heat sources.
1 Carry out the electrical connection as in Pic. 2.
2 Choose the
holder plate
to utilise on the basis of requirements (SWITCH
PLATE "A", SWITCH PLATE "B", SWITCH PLATE "C" or SWITCH PLATE "D").
3 Adapt the attachment of the
holder plate
plate.
4 Attach the
holder plate
to the base of the thermostat's housing.
N.B. T-Touch: Thanks to the
holder plate
of switches and accessories on the market can be mounted and easily adapted.
Made
Made
Made
Made
Made
i n i n
i n i n
i n
I t a l y
I t a l y
I t a l y
I t a l y
I t a l y
C O L O R
C O L O R
C O L O R
C O L O R
C O L O R
White
Anthracite grey
Silver
).
Connection to the zone valve.
CHIUDE
APRE
NA
C NC
3 2 1
T-Touch
on the basis of the required switch
the most diffused domestic series
HOLDER PLATE A
HOLDER PLATE A
HOLDER PLATE A
HOLDER PLATE A
HOLDER PLATE A
Using this holder plate the following domestic switch series can be mounted
1• AVE Banquise and Noir series.
2• VIMAR Idea and Rondò series.
3• BTICINO Living International, Light, Light Tech and Matix series.
1 • Switch plate for the AVE Banquise and Noir series.
No modification is necessary to holder plate A (Pic.3) for its assembly.
2 • Switch plate for the VIMAR Idea and Rondò series.
Using cutters on the section indicated in the figure, remove a part of all four
attachments of the thermostat's housing (Pic.4).
3 •Placca BTICINO serie Living International, Light e Matix
Using cutters on the section indicated in Pic.5, completely remove all four
attachments of the thermostat's housing.
HOLDER PLATE B
HOLDER PLATE B
HOLDER PLATE B
HOLDER PLATE B
HOLDER PLATE B
Using this backplate the following domestic switch series can be mounted:
1• VIMAR Plana and Eikon series.
2• BTICINO Luna series.
N.B. For the BTICINO Luna series switch plate use cutters to remove the
two tabs inside the switch plate.
3• LEGRAND Vela series.
No modification is necessary to the backplate for their assembly.
Pic. 3
Pic. 4
Pic. 5
Pic. 6
Advertisement

Related Manuals for Geca Tecno Control T-Touch TE401


Summary of Contents for Geca Tecno Control T-Touch TE401
- Page 1 HOLDER PLATE A HOLDER PLATE A HOLDER PLATE A HOLDER PLATE A HOLDER PLATE A FLUSH-MOUNTED TOUCH SCREEN THERMOSTAT T-Touch Made Made Made Made Made i n i n i n i n I t a l y I t a l y I t a l y I t a l y I t a l y...
- Page 2 SWITCHING ON/RESET SWITCHING ON/RESET SWITCHING ON/RESET N.B. If the thermostat must receive AVE Banquise or Noir, VIMAR Idea or SWITCHING ON/RESET SWITCHING ON/RESET Rondò or BTICINO Matix switch plates, insert adequate slot fillerstrips After inserting the batteries and initiating the RESET function, the thermostat supplied (Pic.
- Page 3 Pic.17A Pic.17B Pic.17C Pic.15A Pic.15B Pic.15C To modify the THERMAL DIFFERENTIAL (d.t.) in the PROGRAMMING mode Pic. 17B), lightly press the SET TEMPERATURE (Pic. 21) touch area on the display for approximately three seconds. On the display appears the abbreviation “d.t.” and amongst the lower figures Pic.15D Pic.15E appears the d.t.
- Page 4 -Weight: 110gr including the batteries. CERTIFICATE OF GUARANTEE GECA Srl via E.Fermi n°98 25064 Gussago (BS) Italy TO BE COMPILED AND SENT IN THE EVENT OF A FAULT Tel. +39 030 3730218 - +39 030 3730236...
Need help?
Do you have a question about the Tecno Control T-Touch TE401 and is the answer not in the manual?
Questions and answers