Advertisement
Quick Links
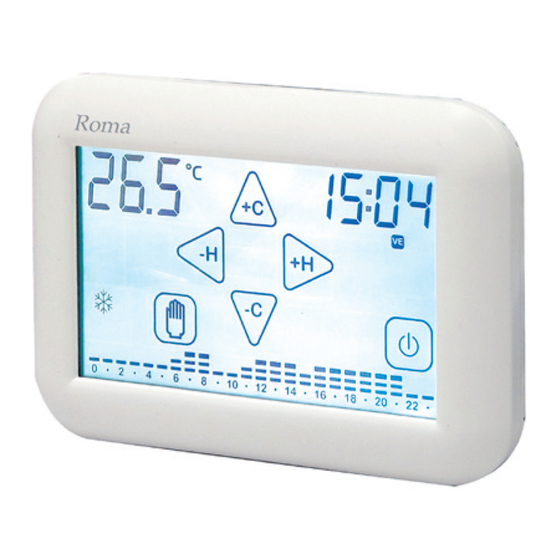
SEMI-RECESSED TOUCH-SCREEN PROGRAMMABLE CHRONOTHERMOSTAT
• In the WEEKLY PROGRAMMING screen, the target temperature flashes.
• To exit the WEEKLY PROGRAMMING, touch the ON/OFF button.
• Functions can be turned on by touching the display, pressing the touch areas.
GENERAL DESCRIPTION
Roma
is a touch-screen, wall-mounted programmable chronothermostat that
lets you easily set the temperature of your home.
graphically display the target temperatures, which can be changed using sim-
ple and practical commands that make programming it very easy.
Roma
can control heating and cooling systems. It avoids energy waste by run-
ning the heating or air conditioning system only when needed.
ELECTRICAL CONNECTION
The electrical connection terminals are located behind the
Wallplate
Fig. 1
Connection with a burner, wall-mounted
boiler, air conditioning system, or spring-
return zone valve (Fig. 2):
U
C NC NA
5 4 3
Roma
Fig. 2
Roma
can be installed both in a recessed 2-module junction box (502 type)
and in a recessed 3-module junction box (503 type). In both cases, the recom-
mended height is 1.5 m above the floor, in a dry, draught-free place, away from
heat sources. After making the electrical connections, fasten the Wallplate
to the recessed junction box using the included screws, making sure that the
Wallplate's Locking Clip is on the bottom side (Fig. 4).
Wallplate Tabs
Fig. 4
Screws
Wallplate
Locking Clip
Fig. 4
Roma
The
programmable chronothermostat requires two common AAA alka-
line batteries (1.5 V) to provide a 2-year lifespan (in stand-by operation).
The batteries can be easily inserted in the compartment located behind (Fig. 5)
the
Roma
programmable chronothermostat.
Roma
Fig. 5
Roma
BASICS
Roma
has a backlit display to
Wallplate (Fig. 1).
C NC NA
5
4
3
Connection with a zone valve
(Fig. 3):
CLOSES
Fig. 3
INSTALLATION
recessed box
POWER
Batteries
1
Latch the
Roma
English
rotate it downwards until the Locking Clip locks it in place (Fig. 6).
Conversely, to remove the
Wallplate, release the Locking clip and rotate it upwards (Fig. 7).
Roma
Fig.6
After inserting the batteries and selecting the RESET function, the program-
mable chronothermostat performs a checkup by turning on all parts of the
display and activating the load for a few seconds (Fig. 8). After a few sec-
onds the programmable chronothermostat goes into STAND-BY ON mode
(Fig. 9).
Roma
which can be modified at will.
REMOTE
+C
%
-H
2.
1
Fig.8
The programmable chronothermostat's RESET function can be accessed
from the Home Screen (Fig. 10) by pressing the measured temperature
area and the TIME area together.
OPENS
The
Roma
shows a diagram made up of 24 columns that represent the HOURS of the
C NC NA
day.
5 4 3
Two temperatures can be programmed for each HOUR:
-the temperature of the FIRST HALF HOUR (e.g. from 00:00 to 00:29)
-the temperature of the SECOND HALF HOUR (e.g. from 00:30 to 00:59)
Roma
The heights of the columns change only when setting the temperatures for
the FIRST HALF HOURS of each hour.
-Each COLUMN is made up of three temperature CURSORS (Fig. 8):
In WINTER mode "
The 3rd CURSOR includes temperatures from 20.0°C to 30.0° C.
The 2nd CURSOR includes temperatures from 16.1°C to 19.9°C.
The 1st CURSOR includes temperatures from 5.0°C to 16.0°C.
In SUMMER MODE "
The 3rd CURSOR includes temperatures from 29.0 °C to 35.0 °C.
The 2nd CURSOR includes temperatures from 27.0 °C to 28.9 °C.
The 1st CURSOR includes temperatures from 15.0 °C to 26.9 °C.
Let's assume you want to set the temperature of the
By setting the temperature to 18°C for the FIRST HALF HOUR, the col-
umn of HOUR "0" will change its height with respect to the pre-set program
(Fig. 12). If you set the temperature to 25°C in the SECOND HALF HOUR,
the "0" HOURS column will not change (Fig. 13).
Fig.12
Therefore: Setting the temperature of the SECOND HALF HOUR of each
HOUR does not make the corresponding HOUR column change, even you
set it to a different temperature with respect to the temperature of the FIRST
HALF HOUR of that HOUR. The display will show the trend of the target
temperatures throughout the day. The temperature CURSOR of the cur-
rently selected HOUR flashes.
ASSEMBLY
programmable chronothermostat to the Wallplate Tabs and
Roma
programmable chronothermostat from the
Wallplate Tabs
Wallplate
Locking Clip
POWER ON/RESET
is pre-programmed with a weekly temperature program,
G I V E S A DO
L U
MA
ME
+H
-C
Fig.9
TEMPERATURE CHART
programmable chronothermostat has a temperature chart that
Fig. 8
" :
" :
2
Fig. 7
Locking Clip
+C
L U
L U
L U
L U
-H
+H
-C
Fig.10
0
hour:
"
"
Fig.13
Advertisement

Related Manuals for Geca Roma


Summary of Contents for Geca Roma
- Page 1 ASSEMBLY SEMI-RECESSED TOUCH-SCREEN PROGRAMMABLE CHRONOTHERMOSTAT Roma Latch the Roma programmable chronothermostat to the Wallplate Tabs and English rotate it downwards until the Locking Clip locks it in place (Fig. 6). Conversely, to remove the Roma programmable chronothermostat from the Wallplate, release the Locking clip and rotate it upwards (Fig. 7).
- Page 2 SAVE will replace TIME, for a few seconds (Fig. 22). To activate the display, just touch it. ” button for about 2 seconds (Fig. 33) to enable MANUAL Press the “ Roma mode (Fig. 34). The programmable chronothermostat now behaves as a simple room chronothermostat.
- Page 3 When warranty’s terms are spent, the eventual reparations will debited in according to the replaced parts and to the hand costs. WARRANTY CERTIFICATE TO BE COMPLETED AND SENT IN CASE OF FAILURE DEVICE: Roma semi-recessed touch-screen programmable chronothermostat. Serial number (s/n) Fig. 46 Fig. 47 Fig.
- Page 4 REMOTE CONTACT LOW BATTERY When the Roma programmable chronothermostat is off (OFF) it can be The programmable chronothermostat detects two battery discharge controlled by a remote device connected to the REMOTE terminal board thresholds. When the FIRST THRESHOLD is reached, the BATTERY (Fig.
Need help?
Do you have a question about the Roma and is the answer not in the manual?
Questions and answers