Advertisement
- 1 GENERAL DESCRIPTION
- 2 ELECTRICAL CONNECTION
- 3 INSTALLATION
- 4 INSTALLATION ONTO PATTRESS BOX 503
- 5 WALL-MOUNTED INSTALLATION
- 6 POWER SUPPLY
- 7 INITIALIZATION
- 8 FUNCTIONING AND PROGRAMMING
- 9 SEGMENTS INDICATING THE DAY
- 10 COPY KEY
- 11 SET KEY
- 12 MANUAL FUNCTIONING
- 13 ON/OFF KEY
- 14 RESET FUNCTION
- 15 TECHNICAL CHARACTERISTIC
- 16 Documents / Resources
GENERAL DESCRIPTION
The Easy 503 chronothermostat is a daily and weekly electronic chronothermostat that permits the programming of the temperature of your home every hour of the day, every day of the week.
The Easy 503 chronothermostat is equipped with a backlight display and a graphic visualisation of the programmed temperature that can be modified by simple and functional commands that facilitate the programming. The Easy 503 chronothermostat avoids wasting energy by activating the heating or air-conditioning system only when needed.
ELECTRICAL CONNECTION

INSTALLATION
The Easy 503 chronothermostat can be installed directly onto a threegang pattress box or wall-mounted. In both cases the recommended height from the floor is 1.5 metres in a dry place with no air currents and far away from heat sources.
INSTALLATION ONTO PATTRESS BOX 503
Fix the BASE PLATE (with the slots of the FLAP at the bottom) directly onto the threegang pattress box utilizing the type "A" screws supplied (Fig. 2).
Lift the BATTERY COVER and fix the CHRONOTHERMOSTAT UNIT to the BASE PLATE utilizing the type "B" screws (Fig. 3).
Complete the installation by lowering the BATTERY COVER.

WALL-MOUNTED INSTALLATION
After fixing the BASE PLATE (with the slots of the FLAP at the bottom) to the wall using the wall plugs and supplied type "C" screws, electrically connect the chronothermostat and fix it to the BASE PLATE using the type "B" screws. Complete the installation by lowering the BATTERY COVER.

POWER SUPPLY

The Easy 503 chronothermostat is powered by two AA 1.5V alkaline batteries that ensure the chronothermostat operates for at least two years. To insert the batteries, slide out the BATTERY COVER and position the batteries in the correct polarity direction as indicated inside the compartment (Fig. 5).
The Easy 503 chronothermostat is equipped with two battery warning discharge levels. When the first level is superseded the symbol BAT appears ( ) whilst the chronothermostat continues to function correctly. On reaching the second level, the chronothermostat completely blocks its functions of thermoregulation whilst the display shows the hour, day and the flashing symbol of the discharged battery (). Whilst substituting the batteries, the data remains memorized for 30 seconds in the absence of power.
INITIALIZATION
As soon as Easy 503 chronothermostat is fed power it carries out a control cycle switching on all segments of the display and activating the charge for a few seconds. If the initialization might prejudice the correct functioning of the charge, power up the chronothermostat before carrying out the electrical connections.
FUNCTIONING AND PROGRAMMING
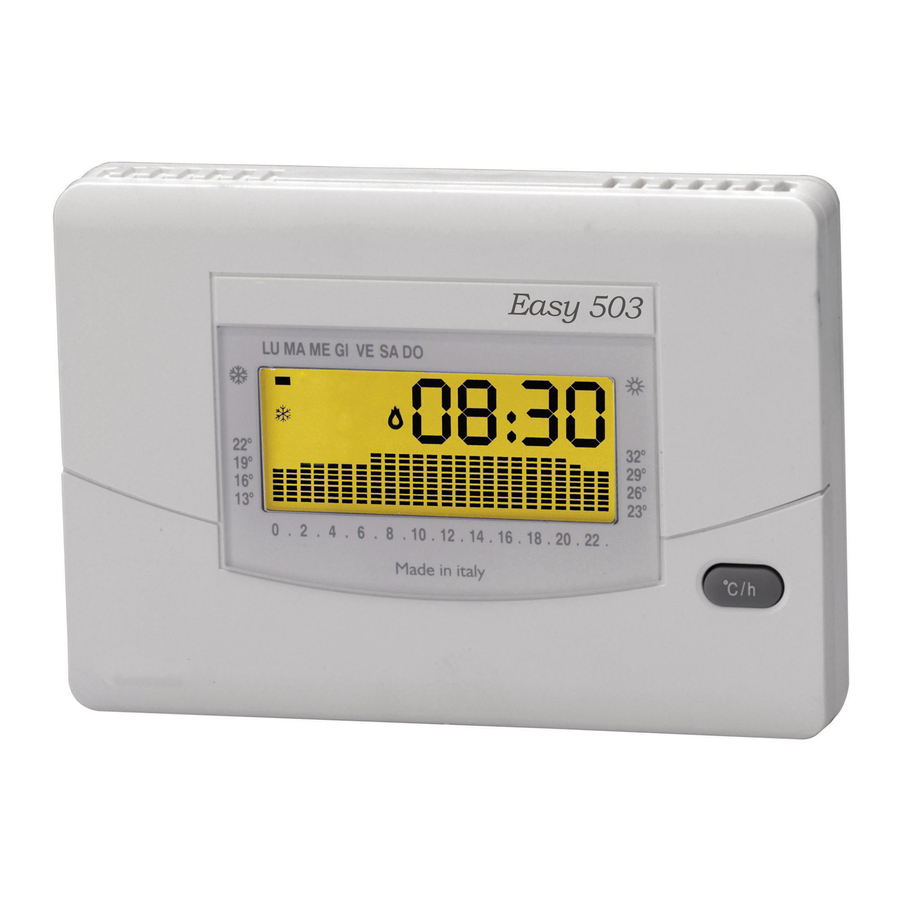
A fundamental part of the chronothermostat is the backlight graphic display that shows a diagram of 24 columns representing the 24 hours of the day and the height of each column indicates the programmed temperature for that hour.
The segment at the top on the right (A in Fig.6), in correspondence to the overprinted writing indicates the day to which the programme refers. The programmed temperature (B in Fig.6) is visualised at the top on the right whilst programming and is identified by the day flashing and the symbol "C" indicating the °C.
During normal functioning, the hour or the ambient temperature are alternately visualised by pressing the °C/h key (Fig.6).
A standard utilization diagram is shown once the Easy 503 chronothermostat is powered on; the clock starts at 00.00 of Monday (LU).
To modify the programme, move to the desired day using the DAY key (Fig.6) and adjust the daily graphic utilizing the four central keys designed in the shape of a cross. The +h and -h keys (Fig.6) shift the cursor horizontally along the HOUR axis, whilst the +°C and -°C keys (Fig.6) adjust the set temperature.
The weekly temperature programme can be modified at any moment by utilising the four central keys designed in the shape of a cross (+h, -h, +°C and -°C) and the DAY key. The minimum increase/decrease of the set temperature using the +°C and -°C keys is 0.1°C. Keeping +°C or -°C key pressed the increase/ decrease becomes 0.2°C.
After programming the first day, the following days can be programmed in two different ways:
- Pressing the DAY key (F in Fig.6), the following day is visualized displaying the memorized programme (if the previous programmed day does not exist, the standard graphic is visualized) that can be modified as previously described.
- Copying the day previously programmed into the successive day using the COPY function.
SEGMENTS INDICATING THE DAY
LU=Monday
MA=Tuesday
ME=Wednesday
GI=Thursday
VE=Friday
SA=Saturday
DO=Sunday
COPY KEY
To copy the programme of the day that was previously programmed in other days, press the COPY key for two seconds.
The word COPY appears on the display and the cursor of the day in which the programme is to be copied flashes.
Using the +h or -h key scroll the days of the week and to confirm the DAY in which to copy the programme press the COPY key.
To exit from the COPY function, wait a few seconds without pressing any key. Having finished programming the whole week, update the hour and the day by pressing the SET key using a pointed object (Fig. 6).
SET KEY
The HOUR, MINUTES and DAY can be updated using the SET key (G in Fig.6).
Pressing the SET key, the HOUR starts flashing.
The current HOUR is adjusted the using the +°C and -°C keys.
Pressing the +h key, the programming sequence shifts to the MINUTES which starts to flash.
The MINUTES are adjusted using the +°C and -°C keys.
Pressing the +h key, the programming sequence shifts to the DAY which starts to flash.
The DAY is adjusted using the +°C and -°C keys.
From this moment the Easy 503 chronothermostat starts its normal functioning, indicating each upload inserted (heating or air-conditioning) by the lighting up of the flame symbol  on the display (Fig. 6).
MANUAL FUNCTIONING
Pressing the AUT/MAN key (Fig.6) the chronothermostat goes into manual mode by closing the graphic display (which remains memorized) and lighting up the hand symbol (Fig. 6). Now the Easy 503 chronothermostat behaves like a normal ambience thermostat where the adjustment of the temperature is made by using the +°C and -°C keys (O and P in Fig.6). The set temperature read on the display remains as long as the chronothermostat is in manual mode (press the AUT/MAN key to pass to automatic mode).
ON/OFF KEY
The chronothermostat is switched off by pressing the ( ) key (R in Fig.6) for two seconds. The Easy 503 chronothermostat will deactivate the functions relative to the set programmes, which anyway remain memorized, and will alternately visualize the word OFF with the current hour and the detected temperature. To visualize the HOUR instead of the temperature, press the °C/h key.
When the chronothermostat is switched off, the ANTI-FREEZE FUNCTION remains active. If the ambient temperature detected drops below 7°C (7°C – 0.2°C = 6.8°C), the device activates the heating system to keep the water circulating to stop ice forming in the tubes.
RESET FUNCTION

If it becomes necessary to cancel the set programme (E.G., after a programming test), simultaneously press the AUT/MAN and COPY keys (T and H in Fig.6) for approximately two seconds. The Easy 503 chronothermostat restarts the initialization procedure described previously.
- Segment indicating the current day or the programmed day, whilst programming.
- Numerical display indicating the current hour or the ambient temperature alternately made visible by pressing the "E" key. Whilst programming, it indicates the set temperature.
- Flashing segment that indicates the external temperature or, whilst programming, the set temperature.
- Battery cover
- Key that permits the alternate visualisation of the current hour and the ambientemperature. It also permits the user to exit from the setting programme
- Key for scrolling the days whilst programming
- Recessed key for adjusting the HOUR, MINUTES and DAY
- Key for copying the programme of the day visualised to another day of the week
- Temperature scale for functioning in WINTER mode (WIN)
- Temperature scale for functioning in SUMMER mode (SUM)
- M Key for increasing the HOURS whilst programming
- Key for decreasing the HOURS whilst programming
- Key for increasing the temperature whilst programming
- Key for decreasing the temperature whilst programming
- Daily hour scale
- R ON/OFF key
- Key for selecting the WINTER (WIN) programme or SUMMER (SUM) programme
- Key for selecting the automatic (AUT) programme or manual (MAN) programme.

Directive 2012/19/UE (Waste Electrical and Electronic Equipment - WEEE):
Information for users:
The crossed out wheeled bin label that can be found on your product indicates that this product should not be disposed of via the normal household waste stream. To prevent possible harm to the environment or human health please separate this product from other waste streams to ensure that it can be recycled in an environmentallysound manner. For more details on available collection facilities please contact your local government office or the retailer where you purchased this product.
GENERAL CONDITIONS OF WARRANTY THE PRESENT CERTIFICATE IS THE ONLY DOCUMENT TO HAVE THE RIGHT OF REPARATION OF THE PRODUCT IN WARRANTY
- The product is warranted for 24 month from purchase date.
- Any damages caused by tampering and incorrect use or installation will be not covered by warranty.
- The warranty is valid only if is full compiled.
- In case of defects covered by warranty, the producer will repair or replace the free product.
PERFORMANCES OUT OF WARRANTY:
When warranty's terms are spent, the eventual reparations will debited in according to the replaced parts and to the hand costs.
WARRANTY CERTIFICATE TO COMPILE AND SEND IN CASE OF DAMAGE
DEVICE:
![]() Easy 503 White (art. 3.300.1766-CR220)
Easy 503 White (art. 3.300.1766-CR220)![]() Easy 503 Anthracite (art. 3.301.1767-CR221).
Easy 503 Anthracite (art. 3.301.1767-CR221).

Serial number (s.n.):
DEALER
Stamp:
Date of purchase: ________/________/_______
DEALER:
Surname and name:
Address:
n°:
City:
Telephone:
TECHNICAL CHARACTERISTIC
Power supply: two 1.5V AA alkaline batteries.
Battery life: more than 2 years.
Display: backlight display.
Automatic control of the battery discharge with 2 warning levels.
Substitution of the batteries without losing the data.
Winter (INV) setting temperature range from 5°C to 30°C inclusive.
Summer (EST) setting temperature range from 15°C to 35°C inclusive.
Thermal difference scale: ± 0.2°C.
Possibility of programming any inclusive temperature in the setting range every hour of the day, every day of the week.
Contact capacity: 230V AC 5A resistive load.
Installation: wall mounted or directly onto a 503 pattress box.
Available colours: white or anthracite grey.
Dimensions: 119 mm x 83 mm x 24 mm
Weight: 180 grams.
Device for temperature regulation of class 1.
Device temperature control at the efficiency seasonal heating environment: 1% (in accordance with Directive 2010/30 / EC Regulation 811/2013 / EU).


Tecnocontrol Srl
Via Miglioli, n°47 20090 Segrate (MI)
Italy Tel. +39 02 26922890
www.tecnocontrol.it
GECA Srl
Via E. Fermi, n°98 25064 Gussago (BS)
Italy Tel. +39 030 3730218
www.gecasrl.it
The manufacturer firm reserves the right to make any aesthetic or functional modification to the without prior notice at any time.

Documents / Resources
References
Download manual
Here you can download full pdf version of manual, it may contain additional safety instructions, warranty information, FCC rules, etc.
Advertisement


Need help?
Do you have a question about the Easy 503 and is the answer not in the manual?
Questions and answers