IVDT SkidWeigh ED2-AT Series Installation & Calibration
Lift truck on-board check weighing with accumulative load weight total
Hide thumbs
Also See for SkidWeigh ED2-AT Series:
Table of Contents
Advertisement
Quick Links
Advertisement
Table of Contents

Related Manuals for IVDT SkidWeigh ED2-AT Series


Summary of Contents for IVDT SkidWeigh ED2-AT Series
- Page 1 Installation & Calibration ED2-AT Series SkidWeigh System Lift Truck On-board Check Weighing With Accumulative Load Weight Total ED2-AT Series SkidWeigh V.1.1 Integrated Visual Data Technology Inc. 3439 Whilabout Terrace, Oakville, Ontario, Canada L6L 0A7...
-
Page 2: Electromagnetic Compatibility
General Installation Guide This ED2-AT Series SkidWeigh system installation & calibration guide describes how to install, calibrate, test and use your on-board check weighing unit. Following the instructions in this guide will enable you to get your system operating quickly and easily. In the event that you require additional assistance, please contact customer support via e-mail at support@skidweigh.com or visit www.skidweigh.com... -
Page 3: Pressure Transducer Installation
Operational principal The ED2-AT Series SkidWeigh system operational principal is based on the hydraulic pressure transducer mounted in the vehicle lifting hydraulic circuit that will automatically activate the “weighing cycle / specific algorithm ” every time a skid load is lifted just above the ground. The increase in pressure is converted in an electronic signal at the sample rate of 16000 readings which is converted into a load weight reading. -
Page 4: Compact Size
Choose the correct location and make sure that: - Indicator is visible and within reach of the operator - Location so that operator does not hit a head Compact size All of the SkidWeigh systems are compact size, housing dimension of only 120 x 80 x 55 mm. - Page 5 “Quick test to determine if electrical connections are done right” Note: SkidWeigh weighing calibration function is not done yet at this stage. This procedure is only to test if electrical connections of the system installation into the vehicle is done properly! After you have connected electrical power and pressure transducer cable you can “quickly”...
-
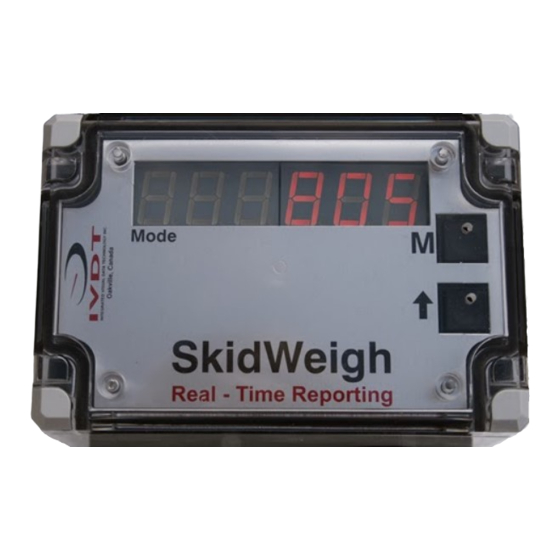
Page 6: Digital Indicator
Important: If you want the system to show load weight in pounds, use the known load weight in pounds and enter that value accordingly. The same would apply if you want the system to show load weight in kilograms. Use the known load weight in kilograms and enter that value into the system accordingly. Digital Indicator (Calibration and two keys description) - Upper right button “M”... - Page 7 Calibration Starting Point For All Of The ED2 Series SkidWeigh Systems --------------------------------------------------------------------------------------- Lower the empty forks to the ground. There should be no hydraulic pressure in lift hydraulic circuit. - Turn ignition switch to on position (electric lift trucks) and start the engine on combustion powered lift trucks - LED display will show software version briefly on the right side and number 8 will be shown in the Mode digit.
- Page 8 Automatic zeroing is done ! 2. Calibration of loaded forks lifted just above the ground At this point drive your vehicle into the skid load with known weight and lower the loaded forks to the ground. (In this example the known load weight is 4000 kg) - Start entering a known load weight into digital indicator by using arrow up button (increments from 0 to 9) with wrap around function.
- Page 9 - With forks on the ground press “M” button to advance to Mode “6” and lift loaded forks just above the ground. Within few seconds display will show the value of the known load weight. Standard ED2-AT SkidWeigh System Weight Calibration Function For Standard ED2-AT Series Is Done OPTIONAL (ED2-AT-SM): Overload Warning Input Value Procedure In order to input the overload value into the system you must lower the loaded forks to the ground.
- Page 10 User’s Manual Lift truck operator copy Standard Weighing Procedure (All ED2-AT Series SkidWeigh & FreightWeigh systems) • Insert the forks into the pallet load. Lower the forks to the ground. With no hydraulic pressure in lifting line the Mode LED display will show number 8. System is ready to weigh product on the forks.
- Page 11 Accumulative Load Weight Function (ED2-AT, ED2-Print and ED2-AT-SM SkidWeigh Series) Right Button (Red) : Accumulative total load weight RESET and PRINT. • Every time LED display shows load weight and left button (Black) is pressed, the load weight will be added into a weighing total counter.
Need help?
Do you have a question about the SkidWeigh ED2-AT Series and is the answer not in the manual?
Questions and answers