Table of Contents
Advertisement
Available languages
Available languages
Quick Links
Advertisement
Chapters
Table of Contents

Subscribe to Our Youtube Channel
Related Manuals for PROEL PLBR8DJ


Summary of Contents for PROEL PLBR8DJ
- Page 1 MINI CENTRALINA PER IL CONTROLLO DMX PLBR8DJ...
-
Page 2: Table Of Contents
INDICE INTRODUZIONE........................3 AVVERTENZE ........................3 SPECIFICHE TECNICHE...................... 4 CARATTERISTICHE PRINCIPALI ..................4 CONNESSIONI DEL PANNELLO POSTERIORE............5 COMANDI DEL PANNELLO FRONTALE ............... 5 MENU............................6 ISTRUZIONI PER IL FUNZIONAMENTO..............14 Tutte le specifiche riportate nel presente manuale sono soggette a variazioni senza preavviso Rev. -
Page 3: Introduzione
Nel continuo sforzo di migliorare la qualità dei suoi prodotti, la Proel SpA può Nel continuo sforzo di migliorare la qualità dei suoi prodotti, la Proel SpA può Nel continuo sforzo di migliorare la qualità dei suoi prodotti, la Proel SpA può... -
Page 4: Specifiche Tecniche
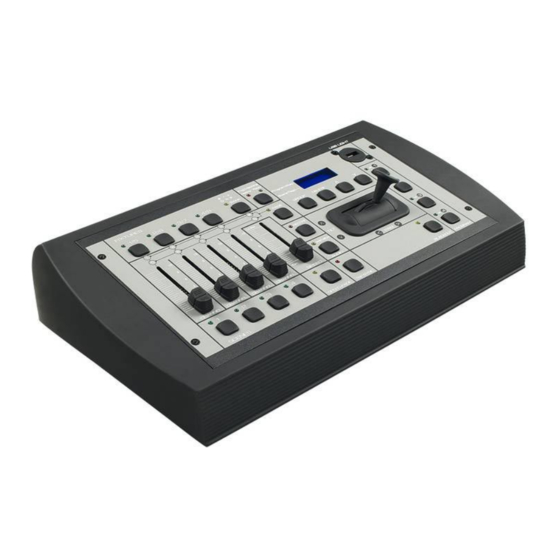
Lampada DJ 5V/1W (non inclusa) CARATTERISTICHE PRINCIPALI La centralina di controllo luci PLBR8DJ a 64 canali DMX gestisce fino a 8 proiettori intelligenti da 8 canali DMX (oltre ai movimenti Pan e Tilt) ognuno. La centralina PLBR8DJ permette di registrare 96 scene e 4 programmi, collegare 8 CANALI DMX per proiettori e di avere accesso alla scheda di memoria CF per il trasferimento di dati e lo scambio di dati tra due unità. -
Page 5: Connessioni Del Pannello Posteriore
CONNESSIONI DEL PANNELLO POSTERIORE Ingresso alimentazione Ingresso alimentazione Ingresso alimentazione Ingresso alimentazione Ingresso per alimentazione esterna da 9V. Necessita di trasformatore con uscita 9VDC a 500ma. Interruttore di alimentazione Interruttore di alimentazione Interruttore di alimentazione Interruttore di alimentazione Ingresso per l’accensione e lo spegnimento della centralina. Uscita DMX 512 Uscita DMX 512 con connettore XLR 3 poli. -
Page 6: Menu
Tasto [Record] Tasto [Record] Tasto [Record] Tasto [Record] Mantenendo premuto questo tasto per 3 secondi si attiva la modalità Record, evidenziata dal LED acceso. Se lo si tiene premuto per altri 3 secondi, la modalità Record viene disabilitata e, di conseguenza, il LED si spegne. Tasto [Audio/Preview] Tasto [Audio/Preview] Tasto [Audio/Preview]... - Page 7 quindi il tasto Record per accedere alla modalità di registrazione, la cui attivazione viene segnalata sul display dalla comparsa della dicitura “rec”. In modalità Record è possibile registrare e cancellare scene, registrare programmi e cancellare passi di un programma o programmi interi. 1.1.
- Page 8 verrà visualizzata la dicitura “st01”. Selezionare il numero di passo utilizzando il ∧ ∧ ∧ ∧ ∨ ∨ ∨ ∨ tasto ; è possibile inserire la scena corrente nel passo selezionato. Ripetere i passaggi da 2 a 4 per registrare nel programma fino ad un massimo di 99 passi.
- Page 9 2.1. Assegnazione 2.1. Assegnazione 2.1. Assegnazione 2.1. Assegnazione ∧ ∧ ∧ ∧ ∨ ∨ ∨ ∨ Nel menu Setup, premere il tasto fino a quando non compare la dicitura “1: ASS”, premere quindi il tasto Record per accedere alla modalità Record. Sul display comparirà...
- Page 10 ∧ ∧ ∧ ∧ ∨ ∨ ∨ ∨ Premere il tasto per selezionare 100 o 255. Tenere premuto per tre secondi il tasto Record per uscire dalla modalità. Il LED Record si spegnerà. Menu Scheda di memoria CF Menu Scheda di memoria CF Menu Scheda di memoria CF Menu Scheda di memoria CF Tenere premuto per tre secondi il tasto Record fino all’accensione del LED.
- Page 11 Un cavo standard RS-232 non è adatto. Collegare la porta RS-232 della PLBR8DJ a una delle porte seriali (COM) del PC. Per la connessione alla PLBR8DJ è necessario che il PC sia dotato di sistema Windows 95/ 98 o superiore.
- Page 12 Chiudere Hyper Terminal, il programma richiederà il salvataggio delle impostazioni. Fare clic su SI per salvare le impostazioni; si genererà un programma denominato “PLBR8DJ.ht”. Se si utilizza spesso la PLBR8DJ con il PC, è consigliabile creare un collegamento sul desktop. Si potrà, in questo modo, semplicemente cliccare sull’icona PLBR8DJ.ht...
- Page 13 N.B.: durante il processo di ricezione non devono esserci interruzioni di potenza. Questa funzione permette inoltre lo scambio di dati tra due PLBR8DJ. Per effettuare lo scambio di dati tra due unità, far riferimento alla seguente procedura: Utilizzare un cavo RS 232 per collegare le due centraline.
-
Page 14: Istruzioni Per Il Funzionamento
Possono essere scambiati soltanto dati aventi la stessa tipologia. Premere il tasto Record della seconda centralina, sui display comparirà il messaggio “SEnd” o “Rece”, a seconda dell’unità in ricezione o in trasmissione. Quando la procedura sarà stata completata con successo, su entrambi i display apparirà... - Page 15 Sequenza di programmi Sequenza di programmi Sequenza di programmi Sequenza di programmi La centralina può memorizzare 4 programmi. Per eseguire un programma, premere il relativo tasto Program. Si attiverà così il programma memorizzato. È possibile selezionare diversi programmi in sequenza. In questo caso, i programmi selezionati verranno eseguiti in ordine di selezione.
- Page 16 CONTENTS CONTENTS CONTENTS CONTENTS INTRODUCTION.........................17 NOTICE INFORMATION....................17 SPECIFICATIONS .......................18 OVERVIEW ...........................18 REAR PANEL CONNECTIONS ..................18 FRONT PANEL CONTROLS.....................19 THE MENU FIELD.......................20 PLAYBACK INSTRUCTIONS....................27 RESET MEMORY.........................28 The specifications related in this manual are subject to modifications without any advance notice Rev. 00 – 25/2008...
-
Page 17: Introduction
Proel SpA reserves the right t this manual Proel SpA reserves the right t this manual Proel SpA reserves the right to change specifications in the course of o change specifications in the course of o change specifications in the course of o change specifications in the course of the product improvement. -
Page 18: Specifications
5V/1W DJ work light (optional) OVERVIEW The PLBR8DJ is a 64 DMX channels intelligent lighting controller in response to up to 8 fixtures of 8 DMX channels (plus Pan/Tilt movement) each. The PLBR8DJ allows you to record 96 scenes and 4 programs, patch 8 DMX channel for the fixture(s), freely have access to CF card for the exchange of data and mutually swap data between two units. -
Page 19: Front Panel Controls
DMX 512 output using a 3 DMX 512 output using a 3 DMX 512 output using a 3 DMX 512 output using a 3- - - - pin XLR connector pin XLR connector pin XLR connector pin XLR connector There is a polarity switch that swaps pins 2 and 3. Some lighting fixtures receive data minus on pin 2 and some on pin 3. -
Page 20: The Menu Field
Tap Sync Button Tap Sync Button Tap Sync Button Tap Sync Button Repeatedly tapping this button establishes the running speed of programs. Fog Machine Button Fog Machine Button Fog Machine Button Fog Machine Button This button is used for Fog Machine operation. Joystick Joystick Joystick... - Page 21 ∧ ∧ ∧ ∧ ∨ ∨ ∨ ∨ 3. Select the destination page using button. 4. Press Record and destination Scene buttons at a time, all LEDs will give a brief flash indicating you’ve created a scene successfully, in the meantime, the relevant Scene LED will be lit.
- Page 22 1.5. Deletion of Programs 1.5. Deletion of Programs 1.5. Deletion of Programs 1.5. Deletion of Programs To delete programs, please follow undermentioned procedures: 1. Be sure you are in Record mode. Select a program out of 4 Program buttons, the Program LED will flash at intervals and the LED Screen will read “...
- Page 23 2.2. Blackout Delay 2.2. Blackout Delay 2.2. Blackout Delay 2.2. Blackout Delay ∧ ∧ ∧ ∧ ∨ ∨ ∨ ∨ In Setup menu, press button to scroll to “2: blt” readout. Press the Record button, the LED Screen will show the current Blackout setting. ∧...
- Page 24 Windows comes with an accessory called Hyper Terminal that can communicate with PLBR8DJ via one of the “ com ” ports on your PC. Determine which of your “ COM ” ports is available. COM 1 is generally used for the mouse so it is always advisable to connect your PLBR8DJ to COM 2 on your PC.
- Page 25 Once the Hyper Terminal Program is getting started, you will be asked to choose a name and an icon. Name it PLBR8DJ then pick any icon then click OK. Go to the next dialog box “Connect to” and choose “Direct to COM 2” . Ignore the telephone number and other settings in this box then click OK.
- Page 26 ∧ ∧ ∧ ∧ ∨ ∨ ∨ ∨ 1. When you have accessed Data Upload, press button to select desired data type you wish to backup on your PC. 2. Repeats steps 1-2 of Paragraph 4.1. 3. Click on the top menu bar and select “Capture Text ”. A dialogue box will appear allowing you to select a folder and name for the data file you will send.
-
Page 27: Playback Instructions
4. Be sure you should process downloading of the first unit before you can send files of another unit, as a result, you can avoid data loss. Please keep in mind that only same data type can be swap between two units. 5. -
Page 28: Reset Memory
Press the Program button to quit from running, the relevant Program LED will go out. Mix Programs Mix Programs Mix Programs Mix Programs Pressing two or more Program buttons at a time allows you to mix programs. The selected programs will run synchronously. Running Programs With Speed Fader (or Tap Sync) Running Programs With Speed Fader (or Tap Sync) Running Programs With Speed Fader (or Tap Sync) - Page 29 NOTE...
Need help?
Do you have a question about the PLBR8DJ and is the answer not in the manual?
Questions and answers