Table of Contents
Advertisement
Advertisement
Table of Contents

Subscribe to Our Youtube Channel
Related Manuals for ATEQ VT37


Summary of Contents for ATEQ VT37
- Page 1 USER GUIDE VT37 www.ateq-tpms.com...
- Page 2 REVISION OF THE USER GUIDE Due to continuing improvements, the information contained in this user manual, the features and design of this device are subject to be changed without prior notice. Edition/ Date Reference Chapters updated Revision (week/year) 81035-techsmart T46000-1-4 Page 1...
-
Page 3: Table Of Contents
Table of contents TABLE OF CONTENTS User Guide VT37 ..........................2 1. SPECIFICATIONS ......................3 2. IMPORTANT SAFETY INSTRUCTIONS ................ 4 3. CAUTION ........................5 4. OVERVIEW ................6 5. FUNCTION KEYS ......................7 6. POWER ON ........................8 7. -
Page 4: User Guide
User Guide VT37 TPMS TOOL 1. SPECIFICATIONS 1. SPECIFICATIONS Battery Type: Rechargeable Lithium-Ion Battery Life: Approximately 300 activations per full charge. Dimensions (Max. L,W,D): 7.9" x 4.7" x 1.6" (20.0 cm x 12.0 cm x 4.0 cm). Case Material: High Impact ABS. -
Page 5: Important Safety Instructions
2. IMPORTANT SAFETY INSTRUCTIONS Do not discard. Retain for future reference. This device complies with: - Part 15 of the FCC Rules (FCC ID: 2ABSJ-VT46) - CE / CEM standards - ROHS standards Operation is subject to the following two conditions: (1) This device will not cause harmful interference, and (2) This device will accept any interference received, including interference that may cause undesired or improper operation. -
Page 6: Caution
3. CAUTION PLEASE READ THESE INSTRUCTIONS BEFORE USE Your Tire Pressure Monitoring (TPM) tool has been designed to be durable, safe, and reliable when properly used. All TPMS TOOLS are intended for use only by qualified and trained automotive technicians or in a light industrial repair shop environment. Please read all instructions below before use. -
Page 7: Overview
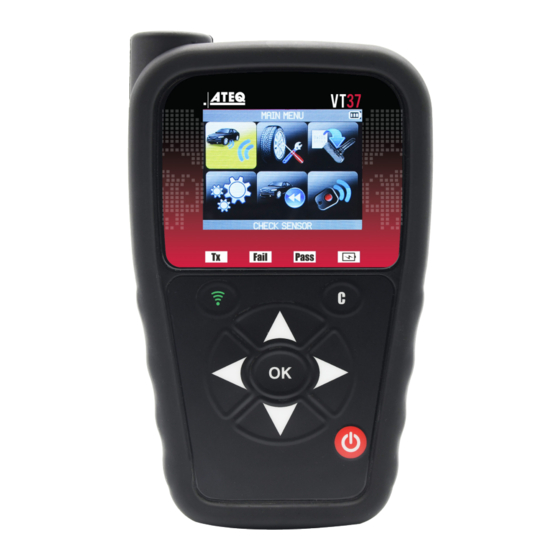
4. VT37 Overview Antenna Display screen Keyboard 4.1. L IGHTS Result light Result light Trigger light Battery status "Fail" "Pass" 4.2. C ONNECTORS USB connector for battery charge and SIDE firmware update. -
Page 8: Function Keys
5. FUNCTION KEYS Power ON/OFF switch Test or trigger sensor. Next, continue or confirm. Cancel, previous step. Navigate to select "up”. Navigate to select “down”. Navigate to select “left”. Navigate to select “right”. Page 6/32 MDMAXTPMS 80621 (12-16) Napa Echlin-92-1541-80983-12-27 81035-techsmart T46000-1-4 Page 7 Page 7... -
Page 9: Power On
6. POWER ON Press turn device, TPMS TOOL Version # and Region will be displayed Fig. 1 as Fig. 1 CS05-O2 -04-18 REGION:AMERICA Fig. 2 The MAIN MENU will then be displayed as Fig. 2... -
Page 10: Operating Instructions
7. OPERATING INSTRUCTIONS 7.1. TPMS TOOL O VERVIEW Read and diagnose sensors, and reset TPMS. Note: With most vehicles, if the vehicle is in “learn mode” the vehicle will also confirm that the TPM sensor has communicated to the ECM with a series of horn beeps. Service Procedure Section 1.0: Check Sensor Before servicing the tires/wheels, using your TPMS TOOL,... - Page 11 DIRECT TIRE PRESSURE MONITORING SYSTEM Rubber or Metal Air Valve Non-replaceable Software Protocol Chip - Lithium Battery PSI, Temp, Mhz, ID#, and Battery Status Tire Pressure Sensor Components Right Front Tire Right Rear Tire Optional Car Computer Spare 4 WHEELS 5 WHEELS OBDII Port...
-
Page 12: Glossary
TIRE PRESSURE MONITORING TECHNICIAN GLOSSARY ACTIVATE-A LOW FREQUENCY (LF) WIRELESS SIGNAL IS SENT Through TOOL ANTENNA TO THE SENSOR INSIDE THE TIRE. THIS ALLOWS TECHNICIAN TO READ TIRE PRESSURE, ID NUMBER, TEMP AND BATTERY STATUS WITHOUT DRIVING THE VEHICLE. AFTERMARKET SENSOR-REPLACEMENT SENSORS SUPPLIED BY LOCAL AUTO PARTS STORES OR TIRE SUPPLIERS. THE SENSOR MAY NOT PHYSICALLY LOOK LIKE THE OE SENSOR. - Page 13 TIRE PRESSURE MONITORING TECHNICIAN GLOSSARY MALFUNCTION INDICATOR LAMP (MIL)- A LIGHT THAT ILLUMINATES ON THE VEHICLE’S DASH WHEN THE TPM SYSTEM IS SEEING AN ISSUE. SOLID LIGHT INDICATES PRESSURE LOWER THAN THE OE VEHICLE MANUFACTURER RECOMMENDS. A RELEARN OR RESET IS REQUIRED TO TURN THE LIGHT OFF. FLASHING LIGHT INDICATE COMPONENT ISSUES.
- Page 14 VT37 TPMS TOOL IMPORTANT: Vehicle specific information in this manual is used as an example and may not represent specific instructions each make and model may require. When performing various functions with the tool, it is important to refer to the on-screen prompts and/or repair manual information.
-
Page 15: Check Sensor
Check Sensor 1.3. S ELECT YEAR LEXUS 2014 = continue = Previous 1.4. S ELECT WHEEL NUMBER LEXUS This option does not appear for all vehicles. 4 WHEELS 5 WHEELS = continue = Previous 1.5. T EST SENSORS TRIGGER LEXUS ES SERIES 11ACE57 31.4 PSI... -
Page 16: Service Tpms
NORMAL CHECK SENSOR 1.6. To change tire The tool is triggering the sensor. RIGHT FRONT LEXUS ES SERIES RIGHT REAR LEFT REAR Trigger all wheels. = Continue = Previous and erase results LEXUS ES SERIES NO SENSOR DETECTED The tool does not detect a sensor Possible Reasons 1. - Page 17 2.1 SERVICE TPMS-P/N LOOK-UP PART# LOOKUP Use Sensor Part # XXXXX OK NEXT s l i = continue = Previous Select "SERVICE TPMS" menu. Select car manufacturer. Select car model. Select year. 2.2 AUTO RELEARN SYSTEMS (Acura, Select Hondas, Jaguar, Land Rover, Volvo, Chrysler, Dodge and Jeep Brands) Check tire pressure with TPMS Tool VS door placard and drive the vehicle.
- Page 18 2.3 SERVICE TPMS MANUAL OR STATIONARY RELEARN SYSTEMS (General Motors, Ford, BMW, ,Mini, and Porsche) Use Tool and follow instructions on the screen. CHEVROLET/CAMERO 2010 2011 2012 Clamp-In 2012 Snap-In 2013 Clamp-In 2013 Snap-In 2014 Clamp-In 2014 Snap-In 2015 Clamp-In 2015 Snap-In 2016 RELEARN PROCEDURE...
-
Page 19: Program Sensor
3. PROGRAM SENSOR This section is to recover a sensor ID in order to enter it in the spare blank sensor. If the "old" sensor can be read, use the "COPY ORIGINAL SENSOR" section to recover the ID. If it cannot be read, use the "CREATE NEW SENSOR" section to create a randomized ID. This section details how to relearn the sensor to the ECU with the OBD-II port or to have the part # lookup for all the sensors available for the vehicle. - Page 20 3.2. "C " OPY ORIGINAL SENSOR SECTION = continue = Previous To trigger the original sensor Wait a few seconds. = continue ID of the old sensor is displayed. = Previous MDMAXTPMS 80621 (12-16) Napa Echlin-92-1541-80983-12-27 81035-techsmart T46000-1-4 Page 23 Page 23 Page 23...
- Page 21 Hold the new programmable sensor To upload data near the device antenna. to the blank sensor. Wait a few seconds. The data is successfully uploaded to the sensor. = continue Example of Sensor ID # on body ID# F9199D 696C1E1 Lexus, Nissan, Pontiac, Scion, Toyota...
- Page 22 Matco Tools MT46 TPMS TOOL - User Guide 3.3. "C REATE NEW SENSOR SECTION COPY ID CREATE SENSOR = continue = Previous Hold the new programmable sensor To upload data near the device antenna. to the blank sensor. Wait a few seconds. The data is successfully uploaded to the sensor.
- Page 23 Matco Tools MT46 TPMS TOOL - User Guide KEYFOB 1. ENTER KEYFOB MENU = continue = Previous Select "KEYFOB " menu. Select car manufacturer. Select Fob Frequency. Press the trigger button = Trigger to test for Keyfob signal strength and battery status.
- Page 24 1.1. C HANGE EGION SETTINGS = Confirm Scroll up and down = Previous to select the zone menu. = Confirm Scroll up and down = Previous to select a zone. The tool will load the new database for the selected zone. 1.2.
- Page 25 Matco Tools MT46 TPMS TOOL - User Guide 1.3. C HANGE ORMAT SETTINGS = continue Scroll up and down to = Previous select function or settings. = continue Scroll up and down to = Previous select the format. AUTO: display sensor ID format in the way sensor is transmitting. DECIMAL: force to display sensor ID in decimal (0 to 9).
-
Page 26: Settings
Matco Tools MT46 TPMS TOOL - User Guide 1.5. C HANGE ETTINGS = continue Scroll up and down to = Previous select function or settings. The selection turns red. = continue = Previous Scroll up and down to set the time. Change by 60 min (maximum) to DISABLED (never). - Page 27 MISCELLANEOUS 1. CHARGE Low Battery Indication Battery indicator status: Your TPMS TOOL incorporates a low battery detection circuit. Battery life is an average of 300 sensor tests per 100% battery charge (approximately 60 to 80 When 0% is flashing, the tool will turn off after vehicles) this may change depending on 10 seconds.
-
Page 28: Enter Settings Menu
SETTINGS 1. ENTER SETTINGS MENU = continue = Previous Select SETTINGS = continue Scroll up and down to = Previous select function or settings. Key functional descriptions: REGION: to select the area of work, select REGION . Be careful, when you change the zone, a WebVT download or SD card is required to get the zone data. -
Page 29: Miscellaneous
MISCELLANEOUS 1. CHARGE Low Battery Indication Battery indicator status: Your TPMS TOOL incorporates a low battery detection circuit. Battery life is an average of 300 sensor tests per battery 100% charge (approximately 60 to 80 vehicles) When 0% is flashing, the tool will turn off after 10 this may change depending on the seconds. - Page 30 Install WebVT PC Suite 1) Connect the TPMS tool to the USB port and power the tool ON. 2) Go to www.webvt.ateq-tpms.com to download the pc software . 3) Click on the WebVT icon to start the program. 4) A screen will appear that says, “Welcome to the Install Shield Wizard for WebVT.”...
- Page 31 3. LIMITED HARDWARE WARRANTY product related questions should be addressed ATEQ directly . The ATEQ Limited addresses and customer service contact ATEQ Hardware Warranty information for be found in the documentation accompanying ATEQ warrants to the your product ATEQ original purchaser that your http://www.sensorcompany.com/...
-
Page 32: Safety Battery And Charge Information
Lithium-polymer batteries. Use a specified charger approved by the ATEQ manufacturer and Operating environment supplied with the device. Remember to follow any special current The tool must be returned to the factory for regulations any area, and always switch off battery replacement. - Page 33 Rules. Operation is subject to the following two cause serious personal injury and damage to conditions: (1) This device may not cause property. You may even cause a fire! harmful interference, and (2) this device must ATEQ accept any interference received, including Company interference that...
- Page 34 Assessment of the compliance of low power electronic and electrical equipment with the basic restrictions related human exposure electromagnetic fields (10 MHz to 300 GHz). 6. RECYCLING Do not dispose of the rechargeable Lithium-polymer battery or the tool and/or its accessories in the general waste. These components must be collected and recycled.
Need help?
Do you have a question about the VT37 and is the answer not in the manual?
Questions and answers