Elvaco CMi6110 Quick Start Manual
Wzu-nb-iot-ext integrated mcm for landis+gyr uh50/uc50, nb-iot
Hide thumbs
Also See for CMi6110:
- User manual (42 pages) ,
- Quick start manual (4 pages) ,
- Quick start manual (2 pages)
Advertisement
Quick Links
CMi6110
Integrated MCM for Landis+Gyr UH50/UC50, NB-IoT
INTRODUCTION
CMi6110 is an integrated meter connectivity module mounted inside
a Landis+Gyr UH50 heat meter/UC50 heat calculator to deliver
meter data to a receiving system via a NB-IoT network. For a complete
description of the product, or for information in other languages, please
visit the Elvaco AB website, https:/ /www.elvaco.com.
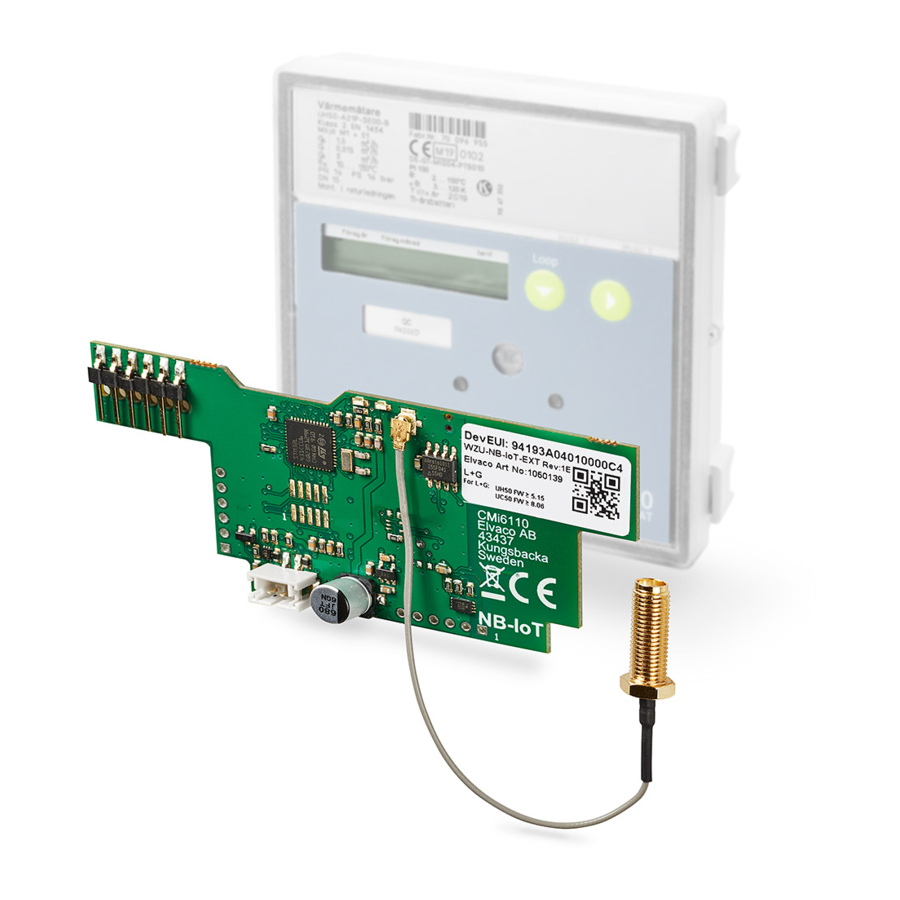
MODULE SPECIFICATION
5.
Power connector
6.
Antenna connector
7.
Push button
8.
SIM card holder
MOUNTING
Before mounting the module in the meter, make sure that a SIM card is
installed in the SIM card slot (8) as illustrated below. CMi6110 is mounted
in module slot 2 of a Landis+Gyr UH50/UC50 with software version
5-15/8.06 or higher. Grab the device by the outer edges and gently
press it into position.
Make sure to connect the (longer) 2-wire cord from the meter power
supply unit (110/230V) to the power connector (5).
NOTE
•
Electrostatic-sensitive devices. Please
observe the necessary ESD protective
measures when installing the device.
ANTENNA CONNECTION
Make sure to connect an external antenna to the module SMA
connector (5). Use the included nut and washer to mount the SMA
connector in the UH50/UC50. The image below illustrates how.
The antenna should be mounted at least 0.5 meter away from the meter
to avoid interference.
1.
SMA antenna
2.
Antenna connector nut
3.
Plate 1 (outside meter)
4.
Plate 2 (inside meter)
5.
SMA connector
WZU-NB-IoT-EXT
1.
Meter interface
2.
Red LED
3.
Green LED
4.
NFC antenna
ACTIVATION
Upon delivery, CMi6110 is set to passive mode, which means no
messages will be transmitted from the device. There are two ways to
activate the product:
1.
Press and hold down the push button (7) for at least 5 seconds until
the green LED (3) lights up.
2.
Via the Elvaco mobile application. Go to the Apply tab, set the
Power mode to "Active", push "Apply" and place the phone on the
right side of the meter, next to the module. Make sure to hold the
phone still until the phone vibrates.
Upon start-up, the module will attempt to connect to the mobile
network. The phase is indicated by short flashes on the green LED.
After successfully connecting to the mobile network, the green LED will
lighten up for 8 seconds, as indicated by the figure below.
DEVICE CONFIGURATION
Make sure to apply the correct configuration by using the Elvaco OTC
(One touch commissioning) App, downloadable in Google Play store.
Settings can be applied via a configuration profile or manually and are
transferred to the module via NFC.
Power mode - Sets whether the module is active or passive. As soon as
the module is activated, it will attempt to connect to the mobile network.
Transmit interval - The transmit interval meter determines the number
of minutes between every meter readout/data transmission. For
example, if setting the transmit interval to "10", the module will read the
meter and send a telegram every 10th minute.
APN mode - Sets how APN settings is implemented in the module.
(Automatic or manual.) Note that when the manual APN mode is used,
the APN and the PLMN of the network need to be set in the module.
Server IP - Specifies the IP address to the CoAP server where data will
be delivered. CMi6110 will by default send the data to the receiving
server.
Server port - Specifies what port to use when communicating with the
receiving server.
Configuration lock - CMi6110 has a configuration lock feature which
can be used to prevent unauthorized users to access the module. When
configuration lock has been enabled, a user needs the device-specific
Product Access Key in order to access the device. Keys are managed in a
secure way using Elvaco's OTC solution.
Synchronize meter date/time - Use this setting to synchronize the date
and time of the meter using the current settings of the phone.
After you have set all configuration parameters, push Apply and place
the phone on the right side of the meter (next to the CMi6110 device).
Hold the phone still until it vibrates, new settings will successfully be
transferred to the device via NFC.
Advertisement

Related Manuals for Elvaco CMi6110


Summary of Contents for Elvaco CMi6110
- Page 1 After you have set all configuration parameters, push Apply and place the phone on the right side of the meter (next to the CMi6110 device). Hold the phone still until it vibrates, new settings will successfully be transferred to the device via NFC.
- Page 2 Approvals EN 301489-1, EN 301 489-52 © 2020, Elvaco AB. All rights reserved. The documentation and product are provided on an “as is” basis only and may contain deficiencies or in- CMi6110 Quick manual English adequacies. Elvaco AB takes no responsibility for damages, liabilities or other losses by using this product. No part of the contents of this manual Version: 1.1...
Need help?
Do you have a question about the CMi6110 and is the answer not in the manual?
Questions and answers