Table of Contents
Advertisement
Quick Links
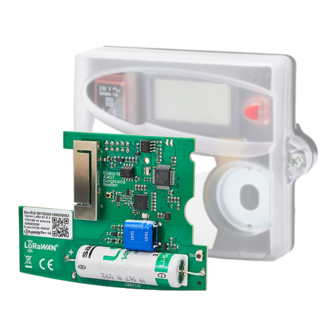
CMi4130
Integrated MCM for Itron CF ECHO II/51/55, LoRaWAN
INTRODUCTION
CMi4130 is an integrated meter connectivity module that is mounted
inside an Itron CF ECHO II or CF 51/55 calculator to deliver meter data
via a LoRaWAN network. For a complete description of the product or
for information in other languages, visit the Elvaco AB website,
https:/ /www.elvaco.com.
MOUNTING
CMi4130 is mounted in the module slot of an Itron CF ECHO II or a
CF 51/55. Grab the device by the outer edges and gently press it into
position.
NOTE
Electrostatic-sensitive device. Please observe
the necessary ESD protective measures when
installing the module.
ANTENNA
CMi4130 is available in two different versions. CMi4130Int uses an
internal PCB antenna. CMi4130Ext is equipped with a pigtail to connect
an external antenna.
Installing external antenna:
1. Gently push the antenna connector through the upper right hole (seen
from the back) on the CF ECHO II meter.
2. Place the included washer on the outside and tighten the nut
according to picture below. Make sure the antenna cable is not rotating
while tightening as this can easily damage the cable and affect future
antenna performance.
3. Connect antenna to connector.
NOTE
Make sure to mount the antenna at least 0.5 meters away from the
meter.
ACTIVATION
Upon delivery, CMi4130 is set to passive mode, which means no
messages will be transmitted from the module. The module can be
activated in one of the following ways:
By using the module push button: Press down the push button of the
module for at least five seconds until the green LED lights up.
By using the Elvaco OTC App: Open the Elvaco OTC app and scan the
module (make sure NFC is activated on the phone). Remove the front
enclosure of the meter if needed. Go to Apply mode, set the Power
mode to "active" and click Apply settings. Place the phone next to the
module. New settings are applied via NFC.
1.
NFC antenna
2.
LoRa antenna
3.
Green LED
4.
Red LED
5.
Battery
6.
Push button
When activated, CMi4130 will attempt to join the LoRaWAN network.
This is indicated by a short flash on red LED, then green and red LED
lights up for 1 second, followed by short flashes on the green LED
until the module has joined the LoRaWAN network. When CMi4130
succeeds in joining the LoRaWAN network, the green LED will light up
for 8 seconds.
If the module fails to join the LoRaWAN network, it will perform retries
until it succeeds. The time between each attempt will increase for every
attempt until it is performed once every day.
A new join attempt cycle can be manually started anytime by using the
push button to reboot the module (Press and hold the push button (2)
for 5-15 seconds to reboot the module. Release the button when the
green LED is lit.) or by deactivating and activating the module using the
Elvaco OTC App.
INITIAL DATA RATE CALIBRATION
When activated, CMi4130 will initially transmit messages every minute in
order to let the LoRaWAN network adjust to an optimal data rate. After
three minutes, the module will start using its normal settings where the
message transmit interval is determined by the device configuration.
DEVICE CONFIGURATION
Before activating the module, you should make sure to apply the correct
configuration profile by using the Elvaco mobile application. Settings are
transferred to the device using NFC.
Join EUI - The Join EUI sets the identification number of the application
server where data from the module will be delivered. The JoinEUI is by
default set to 94193A0309000001 in all CMi4130 modules with internal
antenna and to 94193A030A000001 in CMi4130 devices with external
antenna.
Activation type - There are two different activation types for LoRaWAN
- Over-the-air activation (OTAA) and Activation by personalization
(ABP). Elvaco strongly recommends using OTAA, where all network keys
are generated each time the module joins the LoRaWAN network. In
contrast, for ABP, all keys are set manually and stay constant over time.
Application key - The application key of each CMi4130 device is
generated by Elvaco and used in OTAA mode to generate network keys
when the module joins the LoRaWAN network. Keys are managed in a
secure way using Elvaco's OTC (One Touch Commissioning) solution
which includes the mobile application for configuration.
Message format - CMi4130 supports five different message types:
Standard, Compact, JSON, Scheduled-daily redundant and Combined
heat/cooling. Please refer to the CMi4130 user's manual for more
information about the structure and payload of each message format.
Transmit interval - The transmit interval parameter is used to set the
module transmits messages.
EcoMode - EcoMode can be enabled to guarantee a battery-life of
11 years. The EcoMode table is then used to determine how often the
module is allowed to transmit data for each data rate. If the transmit
interval exceeds the limit in the EcoMode table, it will be lowered
accordingly.
Advertisement
Table of Contents

Related Manuals for Elvaco CMi4130


Summary of Contents for Elvaco CMi4130
- Page 1 MOUNTING When activated, CMi4130 will initially transmit messages every minute in CMi4130 is mounted in the module slot of an Itron CF ECHO II or a order to let the LoRaWAN network adjust to an optimal data rate. After CF 51/55. Grab the device by the outer edges and gently press it into three minutes, the module will start using its normal settings where the position.
- Page 2 Online: www.elvaco.com CMi4130 Quick manual English © 2023, Elvaco AB. All rights reserved. The documentation and product are provided on an “as is” basis only and may contain deficiencies or in- Document ID: 1090131 adequacies. Elvaco AB takes no responsibility for damages, liabilities or other losses by using this product. No part of the contents of this manual Version: 1.3...
Need help?
Do you have a question about the CMi4130 and is the answer not in the manual?
Questions and answers