
Related Manuals for Wheatstone Corporation Talent Station TS-22


Summary of Contents for Wheatstone Corporation Talent Station TS-22
- Page 1 TS-22 alenT TaTion echnical anual 600 Industrial Drive, New Bern, N.C. 28562 (tel 252-638-7000 / fax 252-637-1285...
-
Page 2: Technical Manual
TS-22 alenT TaTion echnical anual Wheatstone Corporation August 2013... - Page 3 TS-22 Talent Station Technical Manual ©2013 Wheatstone Corporation 600 Industrial Drive New Bern, North Carolina 28562 tel 252-638-7000 / fax 252-637-1285...
- Page 4 Attention! Federal Communications Commission (FCC) Compliance Notice: Radio Frequency Notice NOTE: This equipment has been tested and found to comply with the limits for a Class A digital device, pursuant to Part 15 of the FCC rules. These limits are designed to provide reasonable protection against harmful inter- ference when the equipment is operated in a commercial environment.
- Page 5 Adding The TS-22 To The Peripheral Devices* Tab In order to utilize all the features of the TS-22 Talent Station the device must be added to the System Peripheral Devices tab in the Wheatstone WheatNet-IP Navigator program (aka the Navigator GUI).
-
Page 6: Table Of Contents
C O N T E N T S TS-22 Technical Manual Table of Contents Chapter 1 - General Information Introduction ..................1-2 TS-22 Placement ................1-3 TS-22 Desk Turret Chassis Full Size Template ............1-4 TS-22 Desk Panel Full Size Template .................1-5 Power Supply and Ethernet Connection ........ - Page 7 C O N T E N T S Chapter 3 - Setup GUI Operation Installing The Talent Station Setup Tool ........3-2 File Menu ..................3-2 View Menu ..................3-3 WheatNet-IP System Menu ............3-3 Hardware Menu ................3-3 Build Menu ..................3-5 Help Menu ..................
- Page 8 C O N T E N T S Speaker Control ......................4-18 None ........................4-18 Local ........................4-18 Remote Surface ......................4-18 Surface ........................4-18 Studio Channel .......................4-18 Mic In Use Tallies .......................4-18 Visibilities ..................4-19 Channel ........................4-19 Global Alpha Sort ......................4-19 Allow No Source ......................4-19 Signal Tree .........................4-19 Script Compile &...
- Page 9 GENERAL INFORMATION General Information Contents Introduction ..................1-2 TS-22 Placement ................1-3 TS-22 Desk Turret Chassis Full Size Template ............1-4 TS-22 Desk Panel Full Size Template .................1-5 Power Supply and Ethernet Connection ........1-6 Connect To Network ..............1-7 page 1 - 1 TS-22 / Aug 2013...
-
Page 10: Chapter 1 - General Information
No outboard equipment required and no wiring it all together. It’s all right here in one IP-accessed turret, including power-over-Ethernet. The Talent Station TS-22 is available in two designs: • desk turret for countertop placement •... -
Page 11: Ts-22 Placement
GENERAL INFORMATION TS-22 Placement The TS-22 Talent Station desk turret has predrilled holes (3/16” D) on the bottom part of the frame that are used for countertop mounting. Drill holes in the contertop by using the supplied chassis full size template. Then place the TS-22 on the counter and secure it with #8 screws. -
Page 12: Ts-22 Desk Turret Chassis Full Size Template
4 Drill Center Marks for #8 Screws 3/16" bit REAR 1-3/8" Wire Passage 0.65"x0.90" 1-5/8" 1-3/8" 1/2" 1-1/16" FRONT 1-3/4" 6-15/16" 1-11/16" 1-11/16" TS-22 Desk Turret Chassis Full Size Template page 1 - 4 TS-22 / Aug 2013... -
Page 13: Ts-22 Desk Panel Full Size Template
8-15/16" 8-3/8" 8 -1/8" 4 Drill Center Marks 3-1/16" for #4 Screws 1/16" bit 3-5/32" 3-21/32" FRONT COUNTER CUTOUT DIMENSIONS – 8-1/8" x 3-5/32" FRONT PANEL FACE RECESS DIMENSIONS - 8-15/16" x 3-21/32" x 3/32" TS-22 Desk Panel Full Size Template page 1 - 5 TS-22 / Aug 2013... -
Page 14: Power Supply And Ethernet Connection
GENERAL INFORMATION Power Supply and Ethernet Connection The Talent Station is powered by a factory supplied 12V/1.25 A power adapter with 100-240V/50-60Hz input. To make power and Ethernet connections for Talent Station desk turret unscrew the turret’s front panel. Pass the power adapter cord and the CAT5 cable through the opening on the bottom of the turret and plug into the power connector and the RJ-45 connector located on the RZR-TSL board. -
Page 15: Connect To Network
GENERAL INFORMATION Connect To Network The Talent Station must be connected on a network with at least one Wheatstone BLADE in order to function. The unit has been programmed at the factory with a device Name and an IP Address. This information is displayed on a label on the device. Please make sure you know what name and IP address are programmed for the device as you follow these steps. - Page 16 T S - 2 2 O P E R A T I O N TS-22 Operation Contents Soft Buttons ................... 2-2 Source Buttons ................2-2 Programming a Source Button ...................2-2 Using a Source Button ....................2-3 Timer Buttons ................2-3 Buttons Description ....................2-3 Count-Up Timer ......................2-4 Count-Down Timer .....................2-4 Timer Groups ......................2-4...
-
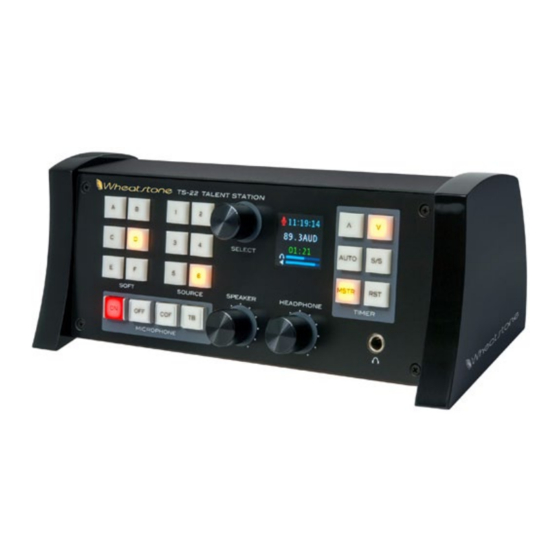
Page 17: Soft Buttons
TS-22 Operation Soft Buttons The Talent Station TS-22 has six SOFT buttons labeled A through F that can be programmed with a user-written script. The script is written in the GUI and compiled on a PC and then stored and executed in the Talent Station. The script determines what happens when buttons are pressed and which button LEDs are lit. -
Page 18: Using A Source Button
Display for a short time. If more than one Source button is programmed to the same signal, then multiple buttons light when that source is connected to the headphone. Timer Buttons The Talent Station TS-22 has timer capabilities that enable: • Count-up timer •... -
Page 19: Count-Up Timer
T S - 2 2 O P E R A T I O N START/STOP – The S/S button is lit when the timer is running. Pressing the S/S button starts the timer if the timer is not already running. Pressing the S/S button stops the timer if the timer is already running. -
Page 20: Microphone Buttons
T S - 2 2 O P E R A T I O N or Down arrow but the slaves cannot change the mode. The slaves display the running time of a timer but they cannot start, stop, or reset a timer. Any device can become the master by holding down the MSTR button until the MSTR button is lit. -
Page 21: Studio Tally Lios
T S - 2 2 O P E R A T I O N Within Navigator, the LIOs appear in the LIO Info tab of the BLADE that the TS-22 was added to as a 3rd Party device, as well as when adding LIOs to signals. The LIOs are defined so they can be included in a Source signal, which could be connected to a Destination signal on a surface, which in turn supports the microphone LIOs. -
Page 22: Volume Controls
T S - 2 2 O P E R A T I O N Volume Controls The TS-22 has two knobs that can be used to control volume. The HEADPHONE knob controls the volume of the headphone plugged into the Talent Station. The SPEAKER knob either controls a Studio speaker or a local speaker, or no speaker at all. -
Page 23: Display
T S - 2 2 O P E R A T I O N Display The TS-22 contains an OLED display which displays several pieces of information. Microphone Icon In the upper left corner, a microphone icon can be seen. The purpose of this icon is to indicate whether there are any live microphones in the studio. -
Page 24: Front Panel Menus
T S - 2 2 O P E R A T I O N the speaker volume is controlling a studio speaker on a surface, there may be a red vertical bar in addition to the blue portions. Similar to how the volume is shown on the surface when being remotely controlled, the red bar indicates what the actual vol- ume level is on the surface. -
Page 25: Surfaces
T S - 2 2 O P E R A T I O N • Blade 2 IP – this item allows you to view the IP address of the second BLADE the TS-22 can communicate with – dobby the SELECT knob and you can edit this address • Blade 3 IP –... -
Page 26: Audio Procs
T S - 2 2 O P E R A T I O N Audio Procs... Turning the SELECT knob until Audio Procs... is highlighted and dobbying the SELECT knob enters the Audio Procs... sub-menu, which provides the following choices: • AudioProc 1 IP –... -
Page 27: Versions
T S - 2 2 O P E R A T I O N Versions... Turning the SELECT knob until Versions... is highlighted and dobbying the SELECT knob enters the Versions... sub-menu, which provides the following choices: • Station Type – this item will display Talent Station-22 • FPGA Version –... - Page 28 S E T U P G U I O P E R A T I O N Setup GUI Operation Contents Installing The Talent Station Setup Tool ........3-2 File Menu ..................3-2 View Menu ..................3-3 WheatNet-IP System Menu ............3-3 Hardware Menu ................
-
Page 29: Installing The Talent Station Setup Tool
S E T U P G U I O P E R A T I O N Setup GUI Operation Installing The Talent Station Setup Tool You begin Talent Station setup by running the WheatNet‑IP Talent Station‑22 Setup Tool program that shipped either with the system or with the TS‑22. If you haven’t already done so, install the program by running the provided Talent Station GUI installer file –... -
Page 30: View Menu
S E T U P G U I O P E R A T I O N View Menu The view menu allows you to select what dockable win- dows are currently shown in the GUI. • Devices – this menu item displays the Devices panel. • Output –... - Page 31 S E T U P G U I O P E R A T I O N for commands from the GUI (i.e. proper- ties, script compile and download). • Add New Device... – this menu item opens the Add Device dialog box. You may add devices to your GUI using this dialog box.
-
Page 32: Build Menu
S E T U P G U I O P E R A T I O N Build Menu The build menu allows you to compile your script into virtual machine byte code, download the compiled byte code to the TS-22, and restart the script in the device. - Page 33 D E V I C E S E T U P Device Setup Contents Device Definition ................4-3 Device List Window ....................4-3 Add, Edit, or Remove Devices in List .................4-3 Add New Device ......................4-3 Edit “Selected Device” ....................4-3 Remove “Selected Device” ..................4-3 Online Check Box ....................4-4 Add / Edit Device Dialog ....................4-4 Mapped BLADE Configuration .............
- Page 34 D E V I C E S E T U P Visibilities ..................4-19 Channel ........................4-19 Global Alpha Sort ......................4-19 Allow No Source ......................4-19 Signal Tree .........................4-19 Script Compile & Download ............4-20 Script Compiling ......................4-20 Script Download ......................4-20 page 4 - 2 TS-22 / Aug 2013...
-
Page 35: Device Definition
D E V I C E S E T U P Device Setup Device Definition You will need to setup your GUI with a list of each TS-22 device in your system. The setup steps only need to be performed once since the setup information will be stored on your PC. -
Page 36: Online Check Box
D E V I C E S E T U P Online Check Box The online check box allows you to set your GUI offline when you are not con- nected to a device. If the online check box is checked, the GUI will be trying to estab- lish a TCP connection to the device which is selected in the device list. - Page 37 D E V I C E S E T U P The Blade n: fields allow you to specify the desired IP address for each BLADE (up to eight) that a device can access. You must specify one BLADE IP addresses as the panel’s Host Blade. As labeled the top IP address corresponds to the Host Blade.
-
Page 38: Mapped Surface Setup
D E V I C E S E T U P Mapped Surface Setup If you are using your TS‑22 to interface with a Wheat- stone mixer console (control surface), you will need to setup your device with a list of each surface to which it will communicate. -
Page 39: Mapped Lio Setup
D E V I C E S E T U P reflect the properties of your device, if the device has been more recently configured from another PC. The AP n: field allows you to specify the desired IP for each audio processor that a panel can access. -
Page 40: Input Lios
D E V I C E S E T U P Input LIOs Input LIOs correspond to Logic I/O values which are fed IN to the WheatNet- IP crosspoint grid. Typical types of input LIOs would be cough, talkback, remote on, and remote off logic signals associated with a microphone source. -
Page 41: Lio Configuration Example
D E V I C E S E T U P LIO Configuration Example This example is here to show how you could configure the TS‑22 to work with a microphone source signal and provide some common microphone type controls. For the sake of this example, let’s assume that we have a microphone source named “JOES MIC”... - Page 42 D E V I C E S E T U P of your BLADE. Instead it drives and monitors any of these virtual soft LIO pins. Most BLADEs have 64 soft LIO pins available inside them. A soft LIO pin can then be as- signed to a WheatNet-IP signal just as you would assign a physical pin from the rear panel of a BLADE.
-
Page 43: Configure The Ts-22 Lios
D E V I C E S E T U P Configure The TS-22 LIOs Let’s assume that we want to use the first four soft buttons on our TS‑22 to perform these functions. Button Function Details The Remote ON LIO will be triggered when the button is pressed, the button LED will light to indicate that the channel is on air. -
Page 44: Create A Script Using The Scrip Wizard
D E V I C E S E T U P Define the first two output LIOs to match the On Tally and Off Tally LIOs for the “JOES MIC” signal. Take note that these are configured as “Output” LIOs in the TS‑22 since we are reading this logic out of the crosspoint matrix. -
Page 45: Button 3
D E V I C E S E T U P Button 3 Configure the third button to be Momentary LIO with Inter- nal LED drive. The Momentary LIO function choice gives us the functionality we desire in that the input soft LIO mapped to this button will be asserted when the button is pressed and de-asserted when the button is released. -
Page 46: Generated Script
D E V I C E S E T U P Generated Script The auto‑generated script code for the first two buttons will assert the input LIO while the button is pressed and de-assert the input LIO when the button is released. The button LED will light to indicate that the corresponding output LIO is active. - Page 47 D E V I C E S E T U P action: BTN_2_PRESS lio_set (2,1) action: BTN_2_RELEASE lio_set (2,0) action: BTN_3_PRESS btn_led (3,1) lio_set (3,1) action: BTN_3_RELEASE btn_led (3,0) lio_set (3,0) action: BTN_4_PRESS // Make sure variable is a 1 or zero then toggle it. AGB_toggle_4 = (AGB_toggle_4 &...
-
Page 48: Miscellaneous Setup
D E V I C E S E T U P Miscellaneous Setup The Miscellaneous Tab is used to specify a number of parameters for the TS‑22 Talent Station. The setup steps only need to be performed once since the setup information will be stored in the TS‑22 Flash memory and on your PC. -
Page 49: Group Timer Id
D E V I C E S E T U P Group Timer ID The TS‑22 uses the concept of a Group Timer. The group consists of one or more Tal- ent Stations surfaces. The Group has a Master which controls the timer (direction, start/stop, reset, etc.). -
Page 50: Speaker Control
D E V I C E S E T U P Speaker Control The TS-22 has a Speaker encoder that can be used to either control a speaker attached to the Talent Station or a speaker on a Surface. There are three speaker modes that can be se- lected. -
Page 51: Visibilities
D E V I C E S E T U P Visibilities The Visibilities tab is used to con- figure the set of Source signals that is shown when programming a Source button or when doing a Source selec- tion for the Talent Station headphone. (If a local speaker is attached, then the speaker is connected to the same source as selected for the headphone.) -
Page 52: Script Compile & Download
D E V I C E S E T U P Script Compile & Download Script Compiling Once you have created a script using the script wizard or the script editor you must compile and download the script to the TS‑22. You can compile the script without actually downloading it to the programmable panel device by clicking on Compile under the Build menu, or by pressing the <F7>...
Need help?
Do you have a question about the Talent Station TS-22 and is the answer not in the manual?
Questions and answers