Table of Contents
Advertisement
Advertisement
Table of Contents

Related Manuals for SEM 200

Summary of Contents for SEM 200
- Page 1 Operation and Maintenance Manual SEM Model 200 and DS-200 MAN-005 Rev 3 | Created: 7/30/2020 | ECN: 00531 For service, parts, and customer support, contact us: SECURITY ENGINEERED MACHINERY 5 Walkup Drive • Westborough, MA 01581 service@semshred.com 1-508-366-1488 www.semshred.com...
-
Page 2: Table Of Contents
Table of Contents 1.) Safety Procedures ......................3 2.) General Assembly Drawings ....................4 3.) Installation Instructions ..................... 6 3.1 Location ..........................6 3.2 Electrical Wiring ........................7 3.3 Electrical Installation Options and Power ................7 4.) Operating and Troubleshooting ..................8 4.1 To Clear a Jammed or Locked Rotor .................. -
Page 3: Safety Procedures
1.) Safety Procedures Your new SEM disintegrator incorporates powerful, heavy duty cutting mechanisms. Serious injury may result if proper precautions are not followed. • This equipment should never be operated by children or individuals that are incapable of understanding these safety precautions. -
Page 4: General Assembly Drawings
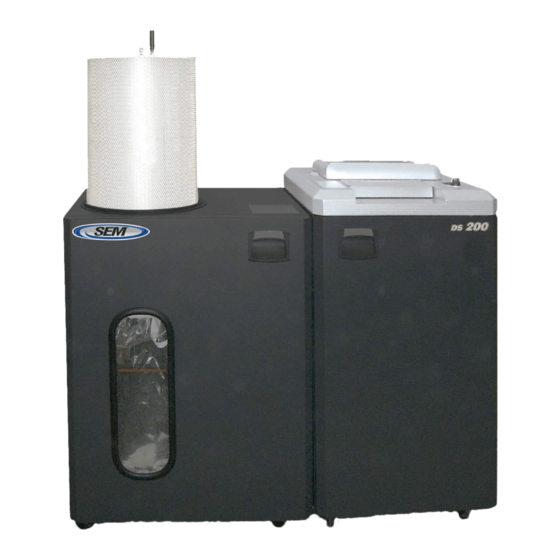
2.) General Assembly Drawings On-off selector Cartridge filter switch with timed Feed door shutdown Disintegrator Model 200 Vacuum cabinet cabinet semshred.com | 508.366.1488... - Page 5 Cartridge filter Feed door to bypass shredder On-off selector switch with timed shutdown Pre-shredder Disintegrator Model DS-200 Vacuum cabinet cabinet semshred.com | 508.366.1488...
-
Page 6: Installation Instructions
Transition Vacuum cabinet Disintegrator cabinet 2) Plug vacuum cabinet into the back of the disintegrator cabinet. For the DS-200, the shredder will be plugged in when received. Blank plug Vacuum plug Shredder plug for DS-200 ONLY... -
Page 7: Electrical Wiring
If voltage change is required in the field, contact factory for proper instructions. All electrical schematics and diagrams are available as a PDF upon request. Contact SEM for more details. 3.3 Electrical Installation Options and Power •... -
Page 8: Operating And Troubleshooting
4.) Operating and Troubleshooting Please read this section carefully. Most problems occur during the first hours of operation. Most problems can be eliminated by careful review of the operating, maintenance, and recommended service instructions. • The disintegrator has been shipped complete, tested, and is operational when received. •... -
Page 9: To Clear A Jammed Or Locked Rotor
4.1 To Clear a Jammed or Locked Rotor 1. Make sure selector switch is in OFF position. 2. Unplug power cord. 3. Open front door of disintegrator cabinet. 4. Remove plate on front hopper to access the cutting area using a flathead screwdriver. 5. -
Page 10: Important Feeding Information
Products that can be destroyed include products with light metals, plastics, and paper. Listed below are products tested. If you are trying to destroy anything that is not listed below and would like to verify that it is acceptable, contact SEM customer service at 1-800-225-9293 before use. -
Page 11: Maintenance
6.) Maintenance Important / Caution: Before performing any service or maintenance on this machine, make certain to unplug the power cord from the receptacle. 6.1 Changing the Waste Collection Bag Ensure that the power is off before attempting to change the waste collection bag located in the left cabinet. - Page 12 12 Bolts securing hopper to cutting chamber Hopper Cutting chamber Figure 6.2: Removing top cover and hopper 3. Remove the hopper. 4. Loosen the four bolts securing the base of the motor. 5. Use the two adjusting bolts to evenly adjust the motor (see below). 6.
-
Page 13: Removing Or Changing The Screen
6.3 Removing or Changing the Screen Tools and PPE (Personal Protective Equipment) Required: • Cut resistant gloves, safety eyewear, and a mask. • 1/2” deep socket with 6” or longer extension. • 9/16” socket. Removing the Screen: • Remove the four bolts in the corners underneath the cutting chamber that hold the transition in place with a 9/16”... -
Page 14: Changing Knives
25 hours of usage to avoid excess dust, noise, and potential jams. Note: SEM highly recommends that this work be completed by SEM trained technicians. Damage to equipment and harm to personnel may occur if work is not performed correctly. - Page 15 .001” feeler gauge Spare Knives and Sharpening: To avoid downtime, it is always best to have a spare set of sharp knives on hand. SEM offers spare knives and sharpening services. Contact SEM customer service at 1-800-225- 9293. Screen: It is recommended, but not required, to remove the screen from the chamber while changing the knives semshred.com | 508.366.1488...
- Page 16 Bolts to 1.) Remove front and rear deflectors. Requires 1/2” wrench remove (Both sides) Front deflector Rear deflector Figure 6.9 Figure 6.8 2.) Remove bolts from rotor knives and remove knives noting the edge orientation. • CAUTION – Knives are sharp. •...
- Page 17 Rear bed knife Front bed knife clamp clamp Bed knife Bed knife Bed knife seat Bed knife seat Figure 6.11: Bed knives and clamp as seen from drive plate 6.) Install bed knife bolts with six 3/8-16” x 1-1/2" socket head cap screw and six 3/8” thick washer through top of clamp –...
- Page 18 9.) Torque rotor knives to 50-55ft./lbs. Requires torque wrench and 5/16” Allen drive socket bit. Rotor knife bolt Figure 6.13 10.) Set clearance between rotor and bed knives to .001” using adjustment screws and a feeler gauge, rotating the knives in reverse (clockwise) so “flat to flat” contact will not cut feeler gauge. •...
- Page 19 Requires torque wrench and 5/16” Allen drive socket bit. • Torque wrench should not be used as a socket wrench and should be calibrated to ensure proper tightening to avoid damage. SEM offers a complete toolkit for this system. •...
-
Page 20: Electrical Panel
Re-sharpening: Knives can be re-sharpened 2-3 times provided they are not significantly damaged or worn. Knives must be sharpened as a complete set (2 bed knives, 3 rotor knives). Contact SEM customer service at 1-800-225-9293 for details or for replacement knives. -
Page 21: Electrical Panel
7.) Electrical Panel Item Qty. Description Contactor Main Circuit Breaker Terminal Blocks Timer Relay Disintegrator Overload Vacuum Overload Shredder Overload (DS-200 only) semshred.com | 508.366.1488... -
Page 22: Options And Spare Parts
8.) Options and Spare Parts Spare Parts • Standard Knives 391200K/3 3 Rotor / 2 Bed • Perforated Security Screens 341201332 1/8" particle size • 138A BAGS P/N 638SB138A Services • Knife Sharpening • Preventative Maintenance Contracts semshred.com | 508.366.1488... - Page 23 For service, parts, and customer support, contact us: SECURITY ENGINEERED MACHINERY 5 Walkup Drive • Westborough, MA 01581 service@semshred.com 1-508-366-1488 www.semshred.com Follow us on social media: Facebook: https://www.facebook.com/semshred Twitter: https://twitter.com/semsecure Linkedin: https://www.linkedin.com/company/security-engineered-machinery Youtube: https://www.youtube.com/user/datadestruction semshred.com | 508.366.1488...
Need help?
Do you have a question about the 200 and is the answer not in the manual?
Questions and answers