Table of Contents
Advertisement
Quick Links
Advertisement
Table of Contents

Related Manuals for Amate Audio LMS206


Summary of Contents for Amate Audio LMS206
- Page 1 LMS206 Loudspeaker Management System User’s manual May 2019...
- Page 2 LMS206 May2019 Amate Audio...
- Page 3 LMS206 May2019 Safety Instructions 1. All safety instructions must be read before using this device. 2. Keep and follow these instructions 3. Heed all warnings 4. The exclamation mark in the triangle indicates internal components which if replaced can affect safety.
-
Page 4: Table Of Contents
LMS206 May2019 1 INTRODUCTION 2 FEATURES 3 MAIN CONTROLS AND CONNECTIONS 3.1 T HE FRONT PANEL 3.2 T HE REAR PANEL 4 QUICK INSTALLATION 4.1 B EFORE YOU START 4.2 P OWER 4.3 1 C ONTROL OFTWARE 4.4 C ONNECTING THE DEVICE TO A COMPUTER 4.5 S... - Page 5 LMS206 May2019 7.2.1 M AIN WINDOW 7.2.2 X- OVER WINDOW 7.2.3 I NPUT UTPUT WINDOW 7.2.4 F 7.2.5 H ARDWARE 8 QUICK REFERENCE 9 TROUBLESHOOTING 9.1 H OW TO PERFORM A FIRMWARE UPGRADE 9.2 P ASSWORD RECOVERY 10 SPECIFICATIONS 11 ANNEX...
-
Page 6: Introduction
Inputs and outputs can be routed in multiple configurations to meet any requirements. The LMS206 can be controlled or configured in real time on the front panel or with the intuitive PC/Mac GUI accessed via the USB interface. Software upgrade for CPU and DSP via PC keeps the device current with newly developed algorithms and functions once available. -
Page 7: Main Controls And Connections
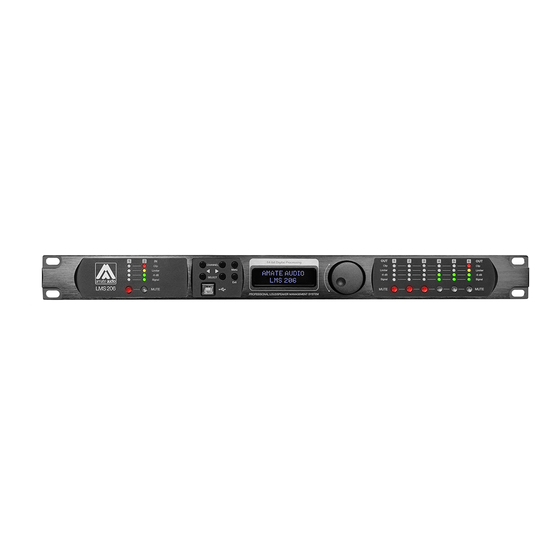
LMS206 May2019 3 MAIN CONTROLS AND CONNECTIONS 3.1 The front panel A) Mute keys – Press for Mute/Unmute input and output channels. When a channel is muted, this key will light up in red for indication. B) Input signal LEDs - Show the current level of the Signal: Signal (-48dBu), -6dBu, Limit (orange), Clip (red). -
Page 8: The Rear Panel
Do not connect the unit to your computer before installing the software and the USB Driver. Please refer to installation instructions in this manual. When connecting the LMS206 to the amplifiers, mute the DSP outputs (or turn down the amplifier’s volume knobs) until you configure your processing. Loudspeakers may be damaged due to a wrong setup. -
Page 9: Control Software
LMS206 May2019 Now the LMS206 unit is ready to operate. The screen shows the name of the unit (above line) and the program name currently active (below line). The program assigned is always the last program the user recalled or stored before powering down the unit. -
Page 10: System Optimization
LMS206 May2019 for the driver. Choose the option “do not look for updates and to automatically select the best driver”. Run DSPLink and the unit will be automatically detected. Click on the arrow next to the detected unit to open the window for parameter edition. - Page 11 May2019 4.6 Diagram of a typical setup With illustrative purposes, a diagram of a LMS206 working as audio manager in a typical setup is shown above. The audio processor is used for splitting the stereo signal coming from a mixer in two zones for different public. In fixed setups, is common that these two zones have different acoustical properties so different audio gear is expected.
-
Page 12: Operating The Device
LMS206 May2019 5 OPERATING THE DEVICE 5.1 Input Menus To access the Input Menus press the <Channel or Channel> key. Press Exit to finish editing or again <Channel or Channel> to edit other channels. The following menus are available for each input channel. Please note that by default the inputs and outputs channels are linked in groups of two. -
Page 13: Parametric Eq
• Q - EQ Bandwidth. For shelving filters the Q sets the transition in dB/Oct. See Annex for further information about the Q factor implementation in the LMS206. • Type - Shape of EQ. The available types are: Bell: Modifies the gain of a certain frequency range, with bell shape Notch: Eliminates a range around a center frequency Low-Shelf: Modifies the gain of all the range below a selected frequency. -
Page 14: Limiter
LMS206 May2019 • Rel. - Release time. Time the compressor uses to return to unity gain after the signal is below the threshold. In 12 Compr.: In 12 Compr.: Rel.: 200ms Hold: 10ms • Ratio - The compressor ratio determines the slope in which the signal is compressed. -
Page 15: Input Gain
LMS206 May2019 5.2.1 Input Gain Adjust the gain of each output, using the rotary knob. Out12 Gain 0.50dB 5.2.2 Mixer Select the level to be routed from each input by turning the rotary knob. Select 0dB for maximum level of an input. To disable one input, turn the rotary knob counter- clockwise until “Off”... -
Page 16: Parametric Eq
• Q - EQ Bandwidth. For shelving filters the Q sets the transition in dB/Oct. See Annex for further information about the Q factor implementation in the LMS206. • Type - Shape of EQ. The available types are: Bell: Modifies the gain of a certain frequency range, with bell shape Notch: Eliminates a range around a center frequency Low-Shelf: Modifies the gain of all the range below a selected frequency. -
Page 17: Limiter
Thr: 12.00dBu For Amate Audio passive cabinets, there is a tool that easily computes the correct value of the limiter threshold for each output. These values are the result of a deep study made in out R+D facilities, thus its use guarantee protection without compromising the performance of the system. -
Page 18: System Menu
Menu key on the front panel. The available options are: 5.3.1 Load - Program Recall The LMS206 unit has a built-in non-volatile memory that can store different program setups. A program can be recalled using this menu. Use the rotary knob to browse... -
Page 19: Version Info
LMS206 May2019 To lock the system, turn the rotary knob until the word “Locked” is displayed. The system will prompt for a password. Access Level: **** Locked **** Confirm Password Set Password: MyPass MyPass The password may be up to 8 characters long. When entering shorter passwords, use the Menu key to finish and confirm. -
Page 20: Presets
May2019 6 PRESETS The LMS206 is shipped with several presets pre-loaded in the unit that help in the set-up of the sound system. These presets have been designed and selected for deliver an active loudspeaker response (with internal amplification) when using them with our passive cabinets, as well for positive interfering in low frequency range and for protecting the sound system in over-voltage case. -
Page 21: Operating The Software
LMS206 May2019 7 OPERATING THE SOFTWARE 7.1 Device List Once the software DSPLink is started, a window with the list of connected devices is shown. The main controls are as following: MUTE: The device will be completely muted when this button is clicked. Click it again to unmute. -
Page 22: Device Options
LMS206 May2019 7.2 Device Options 7.2.1 Main window In this window the Preset options, the device name, and the input and output levels and VUMeters, as well as the link and mute settings are displayed. 7.2.2 X-over window In this window all the crossover settings for each output are displayed and can be set. -
Page 23: File Menu
LMS206 May2019 7.2.4 File Menu Open: Load a preset from a previously stored file. Save: Save current preset to a file in the hard disk. Restore Presets: Load a set of presets from a previously stored file. - Page 24 LMS206 May2019 old password. NOTE: The factory default password is “Password” (case sensitive) o Power On Preset: Set here the preset that will be selected at startup. The default setting is “last setting”. o Global Access Rights: select which controls will be unlocked even the “Lock Unit”...
-
Page 25: Quick Reference
LMS206 May2019 8 QUICK REFERENCE Menu Parame Channel Value Units Function Gain I / O Gain -48 to +12; Step: 0.25 Input Mixer Outputs -48 to 0; Step: 0.25 1/2/3/4 Delay I / O Delay 0 to 2000; Step depends on range Freq. -
Page 26: Troubleshooting
LMS206 May2019 9 TROUBLESHOOTING 9.1 How to perform a firmware upgrade To perform a firmware upgrade, proceed as following: WARNING: In the Firmware Upgrade Process all your presets will be erased. Please make a backup of them before upgrading the unit. During the upgrade process you will be asked to perform this backup. -
Page 27: Specifications
LMS206 May2019 10 SPECIFICATIONS DSP206 Analog Inputs Number Input Impedance >10 kOhms Maximum Level +23 dBu Type Electronically balanced Analog Outputs Number Maximum Level +12 dBu Type Impedance Matched Audio Performance Frequency Response 20Hz to 20kHz (+/- 0.5dB) Input Dynamic Range... -
Page 28: Annex
LMS206 May2019 11 ANNEX For bell parametric filters (PEQ), the bandwidth definition differs among the different DSP manufacturers. For this reason, it is difficult to successfully copy filter settings between different processors. The frequency span of the filter is defined by either the bandwidth or the Q factor. - Page 29 The dB/2 method always sets the bandwidth as one-half of the peak gain, so the definition works no matter what the peak gain is. Amate Audio LMS206 uses the dB/2 method, because it keeps the bell shape independent from the peak gain.
- Page 30 DECLARATION OF CONFORMITY In accordance with EN 45014:1998 Manufacturer’s Name: “AMATE AUDIO S.L.” Manufacturer’s Address: C/ Perpinyà 25, Polígon Industrial Nord 08226 Terrassa, (Barcelona), SPAIN “AMATE AUDIO” Brand: We declare under our own responsibility that: Product: Audio signal processor. Audio apparatus for professional use...
- Page 32 Perpinyà, 25 · Polígon Industrial Nord · 08226 Terrassa T. +34 93 735 65 65 – F. +34 93 735 60 48 – info@amateaudio.com R&D and FACTORY: Violinista Vellsolà, 18 · 08222 Terrassa Barcelona – SPAIN www.amateaudio.com © Copyright 2019 by Amate Audio S.L.
Need help?
Do you have a question about the LMS206 and is the answer not in the manual?
Questions and answers