Table of Contents
Advertisement
Quick Links
About SunFounder
SunFounder is a technology company focused on Raspberry Pi and Arduino open
source community development. Committed to the promotion of open source culture,
we strive to bring the fun of electronics making to people all around the world and
enable everyone to be a maker. Our products include learning kits, development
boards, robots, sensor modules and development tools. In addition to high quality
products, SunFounder also offers video tutorials to help you build your own project. If
you have interest in open source or making something cool, welcome to join us! Visit
www.sunfounder.com
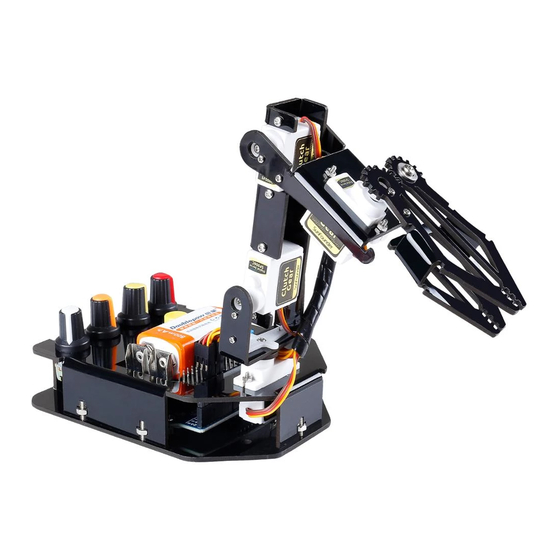
About This Kit
The Rollarm Kit for Arduino is designed for mass hobbyists to learn robot arm control.
With the open source MCU Arduino UNO and a servo expansion board, the robot arm
is easy to use and full of fun. You can control its four axes by the 4 potentiometer on
the handle, as well as make them move by operating on your computer. In addition, it
can memorize the movements it's made and repeat again and again, making it a great
tool for repeated tasks.
In this book, you can learn the basics of how a mechanical arm works and how to make
one
piece
by
piece.
www.sunfounder.com
tutorials about the assembly and playing are provided under VIDEO -> Robot Kit ->
Rollarm V2.0.
Free Support
If you have any TECHNICAL questions, add a topic under
website and we'll reply as soon as possible.
For NON-TECH questions like order and shipment issues, please
service@sunfounder.com.
FORUM.
Preface
for more!
For
more
information,
and find the tutorial under
You're also welcomed to share your projects on
please
go
to
LEARN
Get
tutorials.
->
FORUM
our
website
Also video
section on our
send an email to
Reprint 2.0
Advertisement
Table of Contents

Related Manuals for SunFounder Rollarm Kit


Summary of Contents for SunFounder Rollarm Kit
- Page 1 About This Kit The Rollarm Kit for Arduino is designed for mass hobbyists to learn robot arm control. With the open source MCU Arduino UNO and a servo expansion board, the robot arm is easy to use and full of fun. You can control its four axes by the 4 potentiometer on the handle, as well as make them move by operating on your computer.
-
Page 2: Table Of Contents
Contents Introduction ..........................1 Components List ......................... 2 Structural Plate ........................2 Mechanical Fasteners ......................3 Electronic Components ....................5 Tools ............................6 Self-Provided Components ..................... 6 How to control ..........................7 Getting Started with Software ....................8 Downloading Codes ......................8 Install Arduino IDE ...................... -
Page 3: Introduction
Introduction The Rollarm Kit is an interesting and useful learning tool for Arduino and robot hobbyists. With the structural plate and code based on Arduino, it enables users to learn programming from easy to difficult, control the mechanical arm freely and perform various fun operations! This fun mechanical arm consists of 4 axes, each controlled by a servo. -
Page 4: Components List
Components List Structural Plate... -
Page 5: Mechanical Fasteners
Mechanical Fasteners Name Parts Qty. M1.5*5 Self-tapping Screw M2*8 Screw M2 Nut M2 Self-locking Nut M3*6 Screw M3*10 Screw M3*12 Screw M3 Nut... - Page 6 M3 Self-locking Nut M7 Thin Nut 3*10*1Washer M3*12 Aluminum Tube φ3*φ8*2.5 Band Edge Bearing...
-
Page 7: Electronic Components
Electronic Components Name Parts Qty. SF006C Servo Potentiometer Button Button SunFounder UNO Board Expansion Board... -
Page 8: Tools
USB Type-B Cable 3M Non-skid pad Cable Spiral Wrap Cable Clip Tools Phillips Screw Driver Cross Socket Wrench Self-Provided Components 9V battery... -
Page 9: How To Control
How to control 1. Install Arduino IDE configure the servos 2. Assemble the Rollarm (Remember to before assembly. Pay attention to the detailed operations) Control with handle: download the Rollarm package and run the program (Indispensable step before operating the Rollarm) download Control with Labview: the Labview to your PC and install for control... -
Page 10: Getting Started With Software
Getting Started with Software Downloading Codes Go to LEARN->Get tutorials->Robot Kit-> DIY Control Robot Arm kit for Arduino-Rollarm and download the package... -
Page 11: Install Arduino Ide
Install Arduino IDE Arduino is an open source platform that applies simple software and hardware. You can get it in a short even when you know little of it. It provides an integrated development environment (IDE) for code editing and compiling, compatible with multiple control boards. - Page 12 Step 2: Double click the exe. file and the following window will show up. Click I Agree. The following interface will show up. Choose Next.
- Page 13 Click Browse to choose the installation path or enter a directory at the Destination Folder. Click Install. The following interface will show up. Note: After the installing progress bar goes to the end, the Close button may be enabled for some PC. Just click it to complete the installation.
- Page 14 Then a prompt appears. Select Always trust software for "Adafruit Industries" and click Install. Select “Always trust software for Arduino srl" and click Install. After the installation is done, click Close. Then an Arduino icon will appear on the desktop:...
-
Page 15: Assembly
Assembly Base Bottom + Circuit Board Align the hole position of the UNO The effect is as follows: board with the four hole positions of the plate ① and place it up. Use four M3x12 screws to pass through the four holes, then use a screw driver to tighten the nut to the other side. -
Page 16: Base Upper Plate + Servo
Base Upper Plate + Servo Align the servo with the slot of the Insert the servo into the slot. plate ② with the rotating axis close to the middle line of the plate ②. 3) Place two M2 self-locking nuts above 4) Tighten with sleeve and screw driver the hole of the servo and insert two as follows. -
Page 17: Base Fixing Plate + Base Upper Plate
Base Fixing Plate + Base Upper Plate Align the hole of the plate ① with 2) Insert the bulges into the holes. the bulges of the plate ②. Place the M3 nuts in the hole in the Fix the other screws in the same way. plate ②. -
Page 18: Installing Servo Rocker Arm
Installing Servo Rocker Arm Align the 2-arm rocker arm with the The effect is as follows: hole of the plate ③. Insert two M1.5*5 self-tapping screws into the hole of the plate through the rocker arm, fasten them with the screw driver. plate ⑦. -
Page 19: Base + Joint 1 Connecting Plate
Base + Joint 1 Connecting Plate Before installing the rocker arms for each servo, you need to adjust the servo. If you skip this step and finish assembling and power the product, the servo may appear to block or be damaged, you may even need to disassemble the robot from this step to reassemble it! Step 1: Insert the servo wires into D4, connect the Servo Control Board to the PC via the USB cable, and the PC will automatically install the driver. - Page 20 Step 3: Go to the folder DIY Control Robot Arm kit for Arduino-Rollarm/Arduino Code/Servo and open the file Servo.ino. Step 4: Select the Board. And Port...
- Page 21 Step 5: Click Upload. After the upload is completed successfully, keep the USB cable connecting. You may hear the sound of gear moving (or may not, if the servo shaft happens to be at 90 degrees at the beginning; but you GENTLY spin the rocker arm and you'll find it's unmovable).
-
Page 22: Joint 1 + Joint 2 + Joint 3
Joint 1 + Joint 2 + Joint 3 Fix the plate ③, plate ④ plate ⑤ 2) Fix two 1-arm rocker arm respectively with an M3 x 10 screw and an M3 to the plate ③ ④ with four M1.5 x self-locking nut. - Page 23 Keep the USB cable connecting Insert the servo shaft into the rocker connect the 3 more servos to D5, D6, and arm, fasten them with the matching D7 of the expansion board. At this time, smallest screws. servos adjusted Note: In case the servos need to be corresponding angle.
- Page 24 Align the servo rocker arm with the Fix the M3 x 12 aluminum column to shaft and keep the gripper edge of the plate ④ with M3 x 6 screws, and plate ⑦ parallel to the side of the plate insert the hole of 3*10*1 washers, plate ④...
- Page 25 11) Fix four potentiometers and scale 12) Rotate the potentiometer clockwise paper with four M7 thin nuts. to the end, and put the button onto the potentiometer and press to tighten them. Note: align the bulged part of button with the 0° position. 13) Install the other three pot buttons in 14) Install the button.
- Page 26 15) Install 9V battery on the expansion board.
-
Page 27: Control The Rollarm
Control the Rollarm There are two ways to control the Rollarm: manual control (by handle), or PC control (by Labview). The detailed operations for two ways are as follows. Manual Control Step 1: Run the Rollarm.ino code under the path DIY Control Robot Arm kit for Arduino-Rollarm\Arduino Code\Rollarm . - Page 28 White potentiometer to control the Servo 4, the yellow to control Servo 3, the orange to control Servo 2, and the red one to control Servo 1.
-
Page 29: Record Behavior
Record behavior With the handle, the Rollarm can record its behaviors: Rotate one potentiometer to control one servo to the desired position, and press the yellow button shortly to let the control board record this step. Record the rest steps in this way. -
Page 30: Code Explanation
Code Explanation The program includes three parts: rotating the potentiometers to control the Rollarm, pressing the button slightly for less than one second to record Rollarm’s behaviors and pressing the button for a relatively longer time to make Rollarm repeat the recorded steps. - Page 31 After compiling the program, we need to make Rollarm remember the steps, which is done through pressing the button. //Calculate the time the button pressed void Button() (digitalRead(3) == 0) delay(10); (digitalRead(3) == 0) KeyValue = 0; while (!digitalRead(3)) KeyValue++; delay(100);...
- Page 32 ReadPot(); Mapping0(); Next, we are going to call the function to write the value of the servo rotating angle. However, it is not merely about writing the values directly; the difference between two adjacent rotating values will also be written into the servos. Here we take a servo program for example.
-
Page 33: Pc Control (Labview)
For this kit, we use the Labview software for control on PC. If you have other better options, welcome to share by post under on our website FORUM www.sunfounder.com. Download the Labview package in the link below: https://s3.amazonaws.com/sunfounder/Arduino/Labview.zip After downloading, open it and you will see the folder Rollarm's Installer . Then find the setup file as shown below: After the installation is done, in Start Menu, find Rollarm to open the Rollarm software. -
Page 34: Upload The Code
Upload the Code Before using the Rollarm Labview software, flash the control codes into the Rollarm robot, and the steps are as follows. Step 1: In order to avoid the incompatibility, please download Arduino IDE 1.0.5 on Arduino official website: https://www.arduino.cc/en/Main/OldSoftwareReleases#previous You are suggested to download zip version because zip version does not need installation and you can use it directly. - Page 35 Step 4: Choose the proper Board and Port, and upload the codes to the control board. DO NOT unplug the USB cable at the moment.
-
Page 36: Using The Software
Using the Software Back to the Rollarm Labview software, which includes two parts: Manual Mode and Automatic Mode. 1) Manual Mode Step1: See the interface of manual control below. After the Labview is installed and run, this mode is enabled by default. Step2: Click the inverted triangle icon for Serial Port, select the port according to you COM port. - Page 37 Step 4: There are three small icons at the top left. Click the middle on to run the software. Step5: Click Start, and the button will change from dark to light green. Note: Sometimes you can see the mistakes like 5005 or 5002 that are as results of the software recognition failure of Arduino control board.
- Page 38 Step 6: M1-M4 correspond to Servo1-Servo4, you can move the slider control the 4 servo on the Rollarm.
- Page 39 2) Automatic Mode You can also switch to Auto Mode. Fill the value of the rotating angle of the servos into the table under Auto Mode one by one. After filling the figures, click the Start button, then Rollarm will then perform as you just set. M1-M4: Servo1-Servo4.
- Page 40 About the Assembly: After assembly and program download, the Rollarm ’ s four axes are in wired position, some maybe out of control. What should I do? Remember to power on and calibrate each servo before assembly. About the Arduino code control: When I open a program, it prompts me that a new folder should be created.
- Page 41 Then you can see the subprograms have been opened too: About the Labview software control: After powering on the Rollarm, why do the servos shake a little when there’s no movement at all? There may be something wrong with the Serial Port. For instance, the following condition may appear: Turn off the Rollarm, power it on again, and reconnect the serial port to try.
- Page 42 All contents including but not limited to texts, images, and code in this manual are owned by the SunFounder Company. You should only use it for personal study, investigation, enjoyment, or other non-commercial or nonprofit purposes, under the related regulations and copyrights laws, without infringing the legal rights of the author and relevant right holders.
Need help?
Do you have a question about the Rollarm Kit and is the answer not in the manual?
Questions and answers