Table of Contents
Advertisement
Advertisement
Table of Contents

Related Manuals for SunFounder PiDog


Summary of Contents for SunFounder PiDog
- Page 1 SunFounder PiDog Kit Release 1.0 sunfounder Feb 02, 2024...
-
Page 3: Table Of Contents
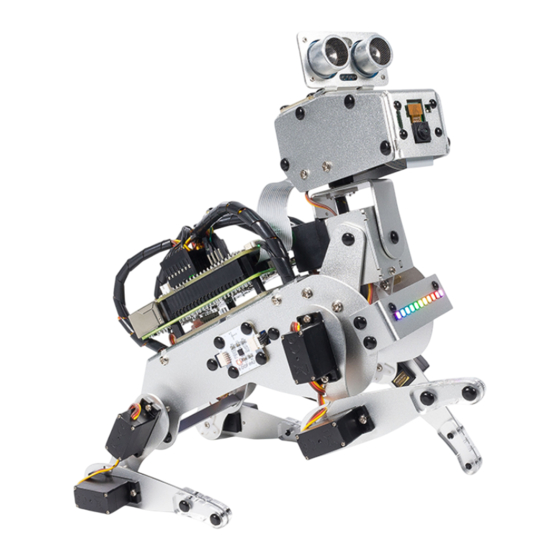
........2. Calibrate the PiDog . - Page 5 Please click on the respective links to access the document in your preferred language. PiDog is a Raspberry Pi pet robot with aluminum alloy structure. It can act as a mechanical pet, show cuteness to you, and interact with you.
- Page 6 SunFounder PiDog Kit, Release 1.0 CONTENTS...
-
Page 7: Assemble Videos
Raspberry Pi OS, then install the required modules, and then run a script (set the angle of all PWM pins to 0). After that, plug in the servo wire to zero the servo. The assembly process for Pidog is quite long, so we have divided it into two videos. The first video covers assembling Pidog’s body and four legs. - Page 8 SunFounder PiDog Kit, Release 1.0 Chapter 1. Assemble Videos...
-
Page 9: Play With Python
CHAPTER PLAY WITH PYTHON If you want to program in python, then you will need to learn some basic Python programming skills and basic knowl- edge of Raspberry Pi, please configure the Raspberry Pi first according to 1. Quick Guide on Python. - Page 10 SunFounder PiDog Kit, Release 1.0 Power Adapter To connect to a power socket, the Raspberry Pi has a micro USB port (the same found on many mobile phones). You will need a power supply which provides at least 2.5 amps.
- Page 11 SunFounder PiDog Kit, Release 1.0 2.1.2 2. Installing the OS Required Components • Raspberry Pi 5B • A Personal Computer • A Micro SD card Installation Steps 1. Visit the Raspberry Pi software download page at Raspberry Pi Imager. Choose the Imager version compatible with your operating system.
- Page 12 SunFounder PiDog Kit, Release 1.0 5. Click CHOOSE DEVICE and select your specific Raspberry Pi model from the list (Note: Raspberry Pi 5 is not applicable). 6. Select CHOOSE OS and then choose Raspberry Pi OS (Legacy). Chapter 2. Play with Python...
- Page 13 SunFounder PiDog Kit, Release 1.0 Warning: • Please do not install the Bookworm version as the speaker will not work. • You need to install the Raspberry Pi OS (Legacy) version - Debian Bullseye. 7. Click Choose Storage and select the appropriate storage device for the installation.
- Page 14 SunFounder PiDog Kit, Release 1.0 8. Click NEXT and then EDIT SETTINGS to tailor your OS settings. If you have a monitor for your Raspberry Pi, you can skip the next steps and click ‘Yes’ to begin the installation. Adjust other settings later on the monitor.
- Page 15 SunFounder PiDog Kit, Release 1.0 The hostname is your Raspberry Pi’s network identifier. You can access your Pi using Note: <hostname>.local or <hostname>.lan. 10. Create a Username and Password for the Raspberry Pi’s administrator account. Note: Establishing a unique username and password is vital for securing your Raspberry Pi, which lacks a default password.
- Page 16 SunFounder PiDog Kit, Release 1.0 12. Click SERVICES and activate SSH for secure, password-based remote access. Remember to save your settings. Chapter 2. Play with Python...
- Page 17 SunFounder PiDog Kit, Release 1.0 13. Confirm your selected settings by clicking Yes. 2.1. 1. Quick Guide on Python...
- Page 18 SunFounder PiDog Kit, Release 1.0 14. If the SD card contains existing data, ensure you back it up to prevent data loss. Proceed by clicking Yes if no backup is needed. 15. The OS installation process will commence on the SD card. A confirmation dialog will appear upon completion.
- Page 19 SunFounder PiDog Kit, Release 1.0 16. Insert the SD card set up with Raspberry Pi OS into the microSD card slot located on the underside of the Raspberry Pi. 2.1. 1. Quick Guide on Python...
- Page 20 SunFounder PiDog Kit, Release 1.0 2.1.3 3. Power Supply for Raspberry Pi (Important) Charge Insert the battery cable. Next, insert the USB-C cable to charge the battery. You will need to provide your own charger; we recommend a 5V 3A charger, or your commonly used smartphone charger will suffice.
- Page 21 SunFounder PiDog Kit, Release 1.0 Power ON Turn on the power switch. The Power indicator light and the battery level indicator light will illuminate. Wait for a few seconds, and you will hear a slight beep, indicating that the Raspberry Pi has successfully booted.
- Page 22 • GND: Negative battery terminal. This is a custom battery pack made by SunFounder consisting of two 18650 batteries with a capacity of 2000mAh. The connector is XH2.54 3P, which can be charged directly after being inserted into the shield.
- Page 23 SunFounder PiDog Kit, Release 1.0 • Connector:XH2.54 3P 2.1.4 4. Setting Up Your Raspberry Pi Setting Up with a Screen Having a screen simplifies the process of working with your Raspberry Pi. Required Components • Raspberry Pi 5 Model B •...
- Page 24 SunFounder PiDog Kit, Release 1.0 Setting Up Without a Screen If you don’t have a monitor, remote login is a viable option. Required Components • Raspberry Pi 5 Model B • Power Adapter • Micro SD card Using SSH, you can access the Raspberry Pi’s Bash shell, which is the default Linux shell. Bash offers a command-line interface for performing various tasks.
- Page 25 SunFounder PiDog Kit, Release 1.0 For Mac OS X Users For Mac OS X users, SSH (Secure Shell) offers a secure and convenient method to remotely access and control a Raspberry Pi. This is particularly handy for working with the Raspberry Pi remotely or when it’s not connected to a monitor.
- Page 26 SunFounder PiDog Kit, Release 1.0 (continued from previous page) Last login: Thu Sep 22 12:18:22 2022 pi@raspberrypi:~ $ For Windows Users For Windows 10 or higher users, remote login to a Raspberry Pi can be achieved through the following steps: 1.
- Page 27 SunFounder PiDog Kit, Release 1.0 Warning: If an error appears stating The term ssh is not recognized as the name of a cmdlet..., your system may not have SSH tools pre-installed. In this case, you need to manually install OpenSSH following...
- Page 28 SunFounder PiDog Kit, Release 1.0 ssh pi@raspberrypi.local 4. On your first login, you’ll encounter a security message. Type yes to proceed. The authenticity of host raspberrypi.local␣ (2400:2410:2101:5800:635b:f0b6:2662:8cba) can t be established. ED25519 key fingerprint is SHA256:oo7x3ZSgAo032wD1tE8eW0fFM/ kmewIvRwkBys6XRwg. Are you sure you want to continue connecting (yes/no/[fingerprint])? 5.
- Page 29 SunFounder PiDog Kit, Release 1.0 4. Use the arrow keys to choose <Yes> -> <OK> -> <Finish> and finalize the VNC service activation. Logging in via VNC Viewer 1. Download and install VNC Viewer on your personal computer. 2. Once installed, launch VNC Viewer. Enter the hostname or IP address of your Raspberry Pi and press Enter.
- Page 30 SunFounder PiDog Kit, Release 1.0 3. When prompted, enter your Raspberry Pi’s username and password, then click OK. 4. You’ll now have access to your Raspberry Pi’s desktop interface. Chapter 2. Play with Python...
- Page 31 SunFounder PiDog Kit, Release 1.0 2.1.5 5. Install All the Modules(Important) 1. Update your system. Make sure you are connected to the Internet and update your system: sudo apt update sudo apt upgrade Note: Python3 related packages must be installed if you are installing the Lite version OS.
- Page 32 SunFounder PiDog Kit, Release 1.0 4. Download the code. git clone https://github.com/sunfounder/pidog.git 5. Install pidog module. cd pidog sudo python3 setup.py install This step will take a little time, so please be patient. 6. Run the script i2samp.sh. Finally, you need to run the script i2samp.sh to install the components required by the i2s amplifier, otherwise the robot will have no sound.
- Page 33 SunFounder PiDog Kit, Release 1.0 Type y and press Enter to run /dev/zero in the background. Type y and press Enter to restart the machine. Note: If there is no sound after restarting, you may need to run the i2samp.sh script multiple times.
- Page 34 SunFounder PiDog Kit, Release 1.0 2.1.6 6. Check I2C and SPI Interface We will be using Raspberry Pi’s I2C and SPI interfaces. These interfaces should have been enabled when installing the robot-hat module earlier. To ensure everything is in order, let’s check if they are indeed enabled.
- Page 35 SunFounder PiDog Kit, Release 1.0 5. Go to Interfacing Options again and select SPI. 6. Use the arrow keys on the keyboard to select <Yes> -> <OK> to complete the setup of the SPI. 2.1. 1. Quick Guide on Python...
- Page 36 SunFounder PiDog Kit, Release 1.0 2.1.7 7. Servo Adjust(Importtant) The angle range of the servo is -90~90, but the angle set at the factory is random, maybe 0°, maybe 45°; if we assemble it with such an angle directly, it will lead to a chaotic state after the robot runs the code, or worse, it will cause the servo to block and burn out.
- Page 37 In our assembly video from 3:40 to 7:23, there is also a detailed tutorial for this chapter. You can follow the video instructions directly. As soon as the assembly is completed, you need to calibrate the PiDog to prevent it from damaging the servo if there 2.1. 1. Quick Guide on Python...
-
Page 38: Calibrate The Pidog
2.2 2. Calibrate the PiDog Introduction Calibrating your PiDog is an essential step to ensure its stable and efficient operation. This process helps correct any imbalances or inaccuracies that might have arisen during assembly or from structural issues. Follow these steps carefully to ensure your PiDog walks steadily and performs as expected. - Page 39 SunFounder PiDog Kit, Release 1.0 cd ~/pidog/examples sudo python3 0_calibration.py Upon running the script, a user interface will appear in your terminal. 3. Position the Calibration Ruler (Acrylic C) as shown in the provided image. In the terminal, press 1, followed by w and s keys to align the edges as indicated in the image.
- Page 40 SunFounder PiDog Kit, Release 1.0 4. Reposition the Calibration Ruler (Acrylic C) as illustrated in the next image. Press 2 in the terminal, then use w and s to align the edges as shown. Chapter 2. Play with Python...
-
Page 41: Fun Python Projects
SunFounder PiDog Kit, Release 1.0 5. Repeat the calibration process for the remaining servos (3 to 8). Ensure all four legs of the PiDog are calibrated. You can also have PiDog achieve the following project effects. 2.3 3. Fun Python Projects Here, we delve into an exciting assortment of projects that showcase the versatility and capabilities of the PiDog. - Page 42 Stretch, twist, sit, wag its tail, pant. Code Note: You can Modify/Reset/Copy/Run/Stop the code below. But before that, you need to go to source code path like pidog\examples. After modifying the code, you can run it directly to see the effect. #!/usr/bin/env python3 from...
- Page 43 Run the Code cd ~/pidog/examples sudo python3 2_function_demonstration.py After running this example, you input 1 and press ENTER, PiDog will stand; input 2, PiDog will sit down; input 27, PiDog will issue “woohoo~ “. Press Ctrl+C to exit the program.
- Page 44 SunFounder PiDog Kit, Release 1.0 (continued from previous page) from pidog import Pidog import import curses import curses_utils # init pidog # ====================================== my_dog Pidog() sleep(0.5) # global variables # ====================================== actions # name, head_pitch_adjust(-1, use last_pitch), speed stand , 0, 50],...
- Page 45 SunFounder PiDog Kit, Release 1.0 (continued from previous page) # define pad size # ====================================== curses_utils.PAD_Y curses_utils.PAD_X # display fuctions # ====================================== display_head(subpad): title "Function Demonstration" tip1 "Input Function number to see how it goes." tip2 "Actions will repeat 10 times."...
- Page 46 SunFounder PiDog Kit, Release 1.0 (continued from previous page) subpad.addstr(i, 2, f"{i+1}. {actions[i][0]}", curses_utils.LIGHT_GRAY) range(sound_len): subpad.addstr(i, 30, f"{i+actions_len+1}. {sound_effects[i]}", curses_utils. LIGHT_GRAY) display_bottom(subpad): curses_utils.clear_line(subpad, 0, color=curses_utils.WHITE_GRAY) subpad.addstr(0, 0, "Enter function number: ", curses_utils.WHITE_GRAY) subpad.addstr(0, curses_utils.PAD_X-16, "Ctrl^C to quit", curses_utils.WHITE_GRAY) do_function(index): global last_index, last_head_pitch my_dog.body_stop()
- Page 47 SunFounder PiDog Kit, Release 1.0 (continued from previous page) # init pad curses.newpad(curses_utils.PAD_Y, curses_utils.PAD_X) # init subpad head_pad pad.subpad(4, curses_utils.PAD_X, 0, 0) selection_pad pad.subpad(actions_len, curses_utils.PAD_X, 4, 0) bottom_pad pad.subpad(1, curses_utils.PAD_X, actions_len+4, 0) # add content to a display_head(head_pad) display_actions(selection_pad) display_head(head_pad) curses_utils.pad_refresh(pad)
- Page 48 2.3.3 3. Patrol In this project, PiDog makes a vivid behavior: patrolling. PiDog will walk forward, if there is an obstacle in front of it, it will stop and bark. Run the Code cd ~/pidog/examples sudo python3 3_patrol.py After running this example, PiDog will wag its tail, scan left and right, and walk forward.
- Page 49 At the same time, the touch sensor will also work. If the touch sensor is stroked (not just touched), PiDog will shake its head, wag its tail, and show a comfortable look.
- Page 50 SunFounder PiDog Kit, Release 1.0 like pidog\examples. After modifying the code, you can run it directly to see the effect. #!/usr/bin/env python3 from pidog import Pidog from time import sleep from math import from preset_actions import bark_action my_dog Pidog() sleep(0.1) lean_forward(): my_dog.speak(...
- Page 51 {e}\033[m") finally: my_dog.close() 2.3.5 5. Rest PiDog will doze off on the ground, and when it hears sounds around it, it will stand up in confusion to see who woke it up. Run the Code cd ~/pidog/examples sudo python3 5_rest.py After the program runs, PiDog will get down on the ground, shake its head and tail as if dozing off.
- Page 52 SunFounder PiDog Kit, Release 1.0 (continued from previous page) my_dog.head_move([[amplitude,0,0]], immediately=True, speed=speed) my_dog.wait_all_done() sleep(interval) my_dog.head_move([[-amplitude,0,0]], immediately=True, speed=speed) my_dog.wait_all_done() sleep(interval) my_dog.head_move([[0,0,0]], immediately=True, speed=speed) my_dog.wait_all_done() is_sound(): my_dog.ears.isdetected(): direction my_dog.ears.read() direction return True else: return False else: return False rest(): my_dog.wait_all_done() my_dog.do_action( , speed=50) my_dog.wait_all_done()
- Page 53 {e}\033[m") finally: my_dog.close() 2.3.6 6. Be Picked Up Try lifting your PiDog from the ground, PiDog will feel like it can fly, and it will cheer in a superman pose. Run the Code cd ~/pidog/examples sudo python3 6_be_picked_up.py After the program runs, the 6-DOF IMU Module will always calculate the acceleration in the vertical direction. If PiDog is calculated to be in a state of weightlessness, PiDog assumes a superman pose and cheers.
- Page 54 SunFounder PiDog Kit, Release 1.0 (continued from previous page) fly(): my_dog.rgb_strip.set_mode( boom color= , bps=3) my_dog.legs.servo_move([45, -45, 90, -80, 90, 90, -90, -90], speed=60) my_dog.do_action( wag_tail , step_count=10, speed=100) my_dog.speak( woohoo , volume=80) my_dog.wait_legs_done() sleep(1) stand(): my_dog.rgb_strip.set_mode( breath color= green , bps=1) my_dog.do_action(...
- Page 55 {e}\033[m") finally: my_dog.close() 2.3.7 7. Face Track PiDog will sit quietly in place. You applaud it, it looks your way, and if it sees you, it says hello. Run the Code cd ~/pidog/examples sudo python3 7_face_track.py After running this code, PiDog will start the camera and enable the face detection function. You can visit http:// + PiDog s IP +/mjpg (like mine is http://192.168.18.138:9000/mjpg) in your browser to view the camera’s...
- Page 56 SunFounder PiDog Kit, Release 1.0 (continued from previous page) my_dog.do_action( , speed=50) my_dog.head_move([[yaw, 0, pitch]], pitch_comp=-40, immediately=True, speed=80) my_dog.wait_all_done() sleep(0.5) # Cleanup sound detection by servos moving my_dog.ears.isdetected(): direction my_dog.ears.read() while True: False: flag my_dog.rgb_strip.set_mode( breath pink , bps=1) # If heard somthing, turn to face it my_dog.ears.isdetected():...
- Page 57 Run the Code cd ~/pidog/examples sudo python3 8_pushup.py After the program runs, PiDog will perform a plank, then cycle through push-ups and barks. Code Note: You can Modify/Reset/Copy/Run/Stop the code below. But before that, you need to go to source code path like pidog\examples.
- Page 58 {e}\033[m") finally: my_dog.close() 2.3.9 9. Howling PiDog is not only a cute puppy, but also a mighty dog. Come hear it howl! Run the Code cd ~/pidog/examples sudo python3 9_howling.py After the program runs, PiDog will sit on the ground and howl.
- Page 59 Because PiDog is equipped with a 6-DOF IMU module, it has a great sense of balance. In this example, you can make PiDog walk smoothly on the table, even if you lift one side of the table, PiDog will walk smoothly on the gentle slope.
- Page 60 SunFounder PiDog Kit, Release 1.0 2.3.11 11. Play PiDog with Keyboard In this example, we will use the keyboard to control PiDog. You can press these keys in the terminal to make it act. Keys Function Keys Function Keys Function...
- Page 61 • Connect your tablet/phone to the WLAN where PiDog is located. • Open the Sunfounder Controller APP. Click the + icon to add a controller. • Preset controllers are available for some products, here we choose PiDog. Give it a name, or simply tap Confirm.
- Page 62 5. Run the Controller. • When the “Connected Successfully” prompt appears, tap the button in the upper right corner. • The picture taken by the camera will appear on the APP, and now you can control your PiDog with these widgets.
- Page 63 • N: Bark. • O: Wag tail. • P: Pant. • K: Control PiDog’s movement (forward, backward, left and right). • Q: Controls the orientation of PiDog’s head. • J: Switch to voice control mode. It supports the following voice commands: –...
- Page 64 There’s a more streamlined approach. You can set PiDog to automatically run 12_app_control.py every time it’s powered on. After this, you can directly connect to PiDog using the APP and control your robotic dog with ease. How to set this up? 1.
- Page 65 SunFounder PiDog Kit, Release 1.0 3. From then on, you can simply power on PiDog and control it directly using the APP. Warning: If you wish to run other scripts, first execute pidog_app disable to turn off the autostart feature.
- Page 66 SunFounder PiDog Kit, Release 1.0 2.3.13 13. Ball Track PiDog will sit quietly in place. You put a red ball in front of it, it will stand, and then chase the ball. Run the Code cd ~/pidog/examples sudo python3 13_ball_track.py After running this code, PiDog will start the camera.
- Page 67 Then you may want to master its basic functions, or write some fun examples. If you are familiar with Python programming, you can find examples of PiDog’s basic functions in the ~/pidog/ basic_examples directory. If you prefer, you can master them in a step-by-step fashion using the lessons provided below.
-
Page 68: Easy Coding
• tail_init_angle : In this array, there is only one value, which is dedicated to controlling the tail servo, which is 9. 3. Pidog allows you to redefine the serial number of the servos when instantiating the robot if your servo order is different. - Page 69 SunFounder PiDog Kit, Release 1.0 # Import Pidog class from pidog import Pidog # instantiate a Pidog with custom initialized pins & servo angles my_dog Pidog(leg_pins=[2, 3, 7, 8, 0, 1, 10, 11], head_pins=[4, 6, 5], tail_pin=[9], leg_init_angles [25, 25, -25, -25, 70, -45, -70, 45],...
- Page 70 # stop and half stand my_dog.legs_move([[45, 10, -45, -10, 45, 10, -45, -10]], immediately=True, speed=50) PiDog’s leg control also has the following functions that can be used together: Pidog.is_legs_done() This function is used to determine whether the angle group in the cache has been executed. If yes, return True;...
- Page 71 Pidog() range(99): my_dog.head_move([[30, 0, 0],[-30, 0, 0]], immediately=False, speed=30) # keep 10s time.sleep(10) my_dog.head_move([[0, 0, 0]], immediately=True, speed=80) 3. Whether sitting or half standing, PiDog keeps its head level when shaking its head. from pidog import Pidog import time...
- Page 72 2.4.4 4. Tail Move Following are the functions that control PiDog’s tail. This function is similar to 2. Leg Move. Pidog.tail_move(target_angles, immediately=True, speed=50) • target_angles : It is a two-dimensional array composed of an array of 1 servo angles (referred to as angle group) as elements.
- Page 73 2.4.5 5. Stop All Actions After the previous chapters, you can find that the servo control of PiDog is divided into three threads. This allows PiDog’s head and body to move at the same time, even with two lines of code.
- Page 74 # close all the servo threads 2.4.6 6. Do Preset Action Some commonly used actions have been pre-written in PiDog’s library. You can call the following function to make PiDog do these actions directly. Pidog.do_action(action_name, step_count=1, speed=50) • action_name : Action name, the following strings can be written.
- Page 75 SunFounder PiDog Kit, Release 1.0 – "turn_right" – "trot" – "stretch" – "pushup" – "doze_off" – "nod_lethargy" – "shake_head" – "tilting_head_left" – "tilting_head_right" – "tilting_head" – "head_bark" – "head_up_down" – "wag_tail" • step_count : How many times to perform this action.
- Page 76 2.4.7 7. PiDog Speak PiDog can make sound, it is actually playing a piece of audio. These audios are saved under pidog\sounds path, you can call the following function to play them. Pidog.speak(name) • name : Filename (without suffix), such as "angry". Pidog provides the following audio.
- Page 77 {distance} cm") time.sleep(0.5) 2.4.9 9. PiDog RGB Strip There is an RGB Strip on PiDog’s chest, which PiDog can use to express emotions. You can call the following function to control it. Pidog.rgb_strip.set_mode(style= breath color= white , bps=1, brightness=1): •...
- Page 78 2.4.10 10. IMU Read Through the 6-DOF IMU Module, PiDog can determine if it’s standing on a slope, or if it’s being picked up. The 6-DOF IMU Module is equipped with a 3-axis accelerometer and a 3-axis gyroscope, allowing acceleration and angular velocity to be measured in three directions.
- Page 79 Pidog.accData With the PiDog placed horizontally, the acceleration on the x-axis (ie ax) should be close to the acceleration of gravity (1g), with a value of -16384. The values of the y-axis and x-axis are close to 0.
- Page 80 {direction}") 2.4.12 12. Pat the PiDog’s Head The Touch Swich on the head of PiDog can detect how you touch it. You can call the following functions to use it. Pidog.dual_touch.read() • Touch the module from left to right (front to back for PiDog’s orientation), it will return "LS".
- Page 81 It contains some practical functions, such as taking pictures, video recording, pose detection, face detection, motion detection, image classification and so on. • SunFounder Controller SunFounder Controller is an application that allows users to customize the controller for controlling their robot or as an IoT platform. 2.4. 4. Easy Coding...
- Page 82 SunFounder PiDog Kit, Release 1.0 Chapter 2. Play with Python...
-
Page 83: Hardware
CHAPTER THREE HARDWARE When you are writing code, you may need to know how each module works or the role of each pin, then please see this chapter. In this chapter you will find a description of each module’s function, technical parameters and working principle. 3.1 Robot HAT is a multifunctional expansion board that allows Raspberry Pi to be quickly turned into a robot. - Page 84 SunFounder PiDog Kit, Release 1.0 Power Port • 7-12V PH2.0 3pin power input. • Powering the Raspberry Pi and Robot HAT at the same time. Power Switch • Turn on/off the power of the robot HAT. • When you connect power to the power port, the Raspberry Pi will boot up. However, you will need to switch the power switch to ON to enable Robot HAT.
-
Page 85: Camera Module
SunFounder PiDog Kit, Release 1.0 • 2-channel XH2.54 motor ports. • The left port is connected to GPIO 4 and the right port is connected to GPIO 5. I2C Pin and I2C Port • I2C Pin: P2.54 4-pin interface. • I2C Port: SH1.0 4-pin interface, which is compatible with QWIIC and STEMMA QT. - Page 86 SunFounder PiDog Kit, Release 1.0 This is a 5MP Raspberry Pi camera module with OV5647 sensor. It’s plug and play, connect the included ribbon cable to the CSI (Camera Serial Interface) port on your Raspberry Pi and you’re ready to go.
-
Page 87: Sound Direction Sensor
SunFounder PiDog Kit, Release 1.0 Warning: Do not install the camera with the power on, it may damage your camera. 3.3 Sound Direction Sensor This is a sound direction recognition module. It is equipped with 3 microphones, which can detect sound sources from all directions, and is equipped with a TR16F064B, which is used to process sound signals and calculate the sound source direction. -
Page 88: 6-Dof Imu
SunFounder PiDog Kit, Release 1.0 direction data processed by 064B. After completion, the main control will pull the BUSY pin high to detect the direction again. Specifications • Power supply: 3.3V • Communication: SPI • Connector: PH2.0 7P • Sound recognition angle range 360°... -
Page 89: Dual Touch Sensor
SunFounder PiDog Kit, Release 1.0 Pin Out • GND - Ground Input • VCC - Power Supply Input • SDA - IIC SDA • SCL - IIC SCL 3.5 Dual Touch Sensor Dual channel touch sensor, based on two ttp223 touch sensors. When a touch signal is detected, the corresponding pin level will be pulled low. -
Page 90: 11-Channel Light Board
SunFounder PiDog Kit, Release 1.0 3.6 11-channel Light Board This is an 11-channel RGB LED module, which is equipped with 11 RGB LEDs controlled by the SLED1735 chip. SLED1734 can drive up to 256 LEDs and 75 RGB LEDs. In the LED matrix controlled by SLED1734, each LED has on/off, blinking, breathing light and automatic synchronization and many other functions. -
Page 91: Ultrasonic Module
SunFounder PiDog Kit, Release 1.0 3.7 Ultrasonic Module • TRIG: Trigger Pulse Input • ECHO: Echo Pulse Output • GND: Ground • VCC: 5V Supply This is the HC-SR04 ultrasonic distance sensor, providing non-contact measurement from 2 cm to 400 cm with a range accuracy of up to 3 mm. -
Page 92: 18650 Battery
SunFounder PiDog Kit, Release 1.0 • Echo will output a high level if a signal is returned; the duration of the high level is the time from emission to return. • Distance = (high level time x velocity of sound (340M/S)) / 2 Formula: •... - Page 93 • GND: Negative battery terminal. This is a custom battery pack made by SunFounder consisting of two 18650 batteries with a capacity of 2000mAh. The connector is PH2.0-5P, which can be charged directly after being inserted into the Robot HAT.
- Page 94 SunFounder PiDog Kit, Release 1.0 Chapter 3. Hardware...
-
Page 95: Appendix
CHAPTER FOUR APPENDIX 4.1 Filezilla Software The File Transfer Protocol (FTP) is a standard communication protocol used for the transfer of computer files from a server to a client on a computer network. Filezilla is an open source software that not only supports FTP, but also FTP over TLS (FTPS) and SFTP. We can use Filezilla to upload local files (such as pictures and audio, etc.) to the Raspberry Pi, or download files from the Raspberry Pi to the local. - Page 96 SunFounder PiDog Kit, Release 1.0 Note: Quick Connect is a good way to test your login information. If you want to create a permanent entry, you can select File-> Copy Current Connection to Site Manager after a successful Quick Connect, enter the name and click OK.
-
Page 97: Get The Ip Address
SunFounder PiDog Kit, Release 1.0 4.2 Get the IP address There are many ways to know the IP address, and two of them are listed as follows. Checking via the router If you have permission to log in the router(such as a home network), you can check the addresses assigned to Raspberry Pi on the admin interface of router. - Page 98 SunFounder PiDog Kit, Release 1.0 2. Use the following command to install OpenSSH.Client. Add-WindowsCapability -Online -Name OpenSSH.Client~~~~0.0.1.0 3. After installation, the following output will be returned. Path True Online False RestartNeeded : 4. Verify the installation by using the following command.
-
Page 99: Putty
SunFounder PiDog Kit, Release 1.0 4.4 PuTTY If you are a Windows user, you can use some applications of SSH. Here, we recommend PuTTY. Step 1 Download PuTTY. Step 2 Open PuTTY and click Session on the left tree-alike structure. Enter the IP address of the RPi in the text box under Host Name (or IP address) and 22 under Port (by default it is 22). - Page 100 SunFounder PiDog Kit, Release 1.0 Step 3 Click Open. Note that when you first log in to the Raspberry Pi with the IP address, there prompts a security reminder. Just click Yes. Step 4 When the PuTTY window prompts "login as:", type in "pi" (the user name of the RPi), and password: "raspberry"...
- Page 101 SunFounder PiDog Kit, Release 1.0 Step 5 Here, we get the Raspberry Pi connected and it is time to conduct the next steps. 4.4. PuTTY...
- Page 102 SunFounder PiDog Kit, Release 1.0 Chapter 4. Appendix...
-
Page 103: Copyright Notice
FIVE COPYRIGHT NOTICE All contents including but not limited to texts, images, and code in this manual are owned by the SunFounder Company. You should only use it for personal study,investigation, enjoyment, or other non-commercial or nonprofit purposes, under therelated regulations and copyrights laws, without infringing the legal rights of the author and relevant right holders.
Need help?
Do you have a question about the PiDog and is the answer not in the manual?
Questions and answers