Table of Contents
Advertisement
Advertisement
Table of Contents

Related Manuals for SunFounder pisloth


Summary of Contents for SunFounder pisloth
- Page 1 SunFounder pisloth www.sunfounder.com Feb 13, 2023...
-
Page 3: Table Of Contents
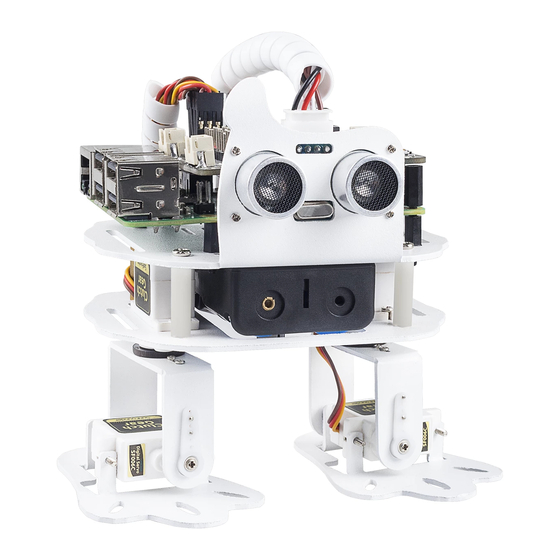
......... . . Emotional PiSloth . - Page 5 SunFounder pisloth Thanks for choosing our PiSloth. PiSloth is a Raspberry Pi Bionic robot with an aluminum alloy structure. It can talk, dance, and even express emotions, such as happiness and excitement. It has 22 different actions, such as: Stomp, Swing and MoonWalk, and you can customize the actions according to your needs.
- Page 6 PiSloth work in way you want. EzBlock Studio is a development platform developed by SunFounder designed for beginners to lower the barriers to getting started with Raspberry Pi. It has two programming languages: Graphical and Python, and available on almost all different types of devices.
-
Page 7: Component List And Assembly Instructions
CHAPTER COMPONENT LIST AND ASSEMBLY INSTRUCTIONS You need to check whether there are missing or damaged components according to the list first. If there are any problems, please contact us and we will solve them as soon as possible. Please follow the steps on the PDF to assemble. Note: 1. - Page 8 SunFounder pisloth Chapter 1. Component List and Assembly Instructions...
-
Page 9: About Robot Hat
CHAPTER ABOUT ROBOT HAT Robot HAT is a multifunctional expansion board that allows Raspberry Pi to be quickly turned into a robot. An MCU is on board to extend the PWM output and ADC input for the Raspberry Pi, as well as a motor driver chip, Bluetooth module, I2S audio module and mono speaker. - Page 10 SunFounder pisloth Accepts 7-12V PH2.0 2pin power input with 2 power indicators. The board also has a user available LED and a button for you to quickly test some effects. Note: You can see more details in the Robot HAT Documentation.
-
Page 11: Play With Ezblock
THREE PLAY WITH EZBLOCK For beginners and novices, EzBlock is a software development platform offered by SunFounder for Raspberry Pi. Ezbock offers two programming environments: a graphical environment and a Python environment. It is available for almost all types of devices, including Mac, PC, and Android. - Page 12 SunFounder pisloth 3. Follow the instructions on the assembly foldout, insert the battery holder cable and turn the power switch to the ON. Wait for 1-2 minutes, there will be a sound to indicate that the Raspberry Pi boots successfully.
- Page 13 Examples: View or run the related example directly. Note: After you connect the PiSloth, there will be a calibration step. This is because of possible deviations in the installation process or limitations of the servos themselves, making some servo angles slightly tilted, so you can...
-
Page 14: Move
Projects Here, we show you the projects of playing PiSloth on EzBlock Studio. If you are new to these, you can refer to the code images inside each project to program, and can learn the use of blocks according to TIPS. - Page 15 SunFounder pisloth This block is used to make PiSloth do a specific action several steps at a speed (%), for example, let PiSloth go forward 1 step at 50% speed. Different actions can be selected from the drop down options, there are 22 in total.
-
Page 16: Don't Touch Me
SunFounder pisloth 3.3 Don’t Touch Me If you don’t meet PiSloth’s needs, it will get angry and stay away from your touch. TIPS You can directly use this block to read the distance to the obstacle right ahead. Note: When assembling, Trig and Echo are connected to D2 and D3 respectively, you also need to change them simultaneously when programming. - Page 17 SunFounder pisloth To achieve conditional judgment of “if” type, you need to use an if do block. When you need to implement multiple conditional judgments, you will have to change if do into if else do. This can be achieved by clicking on the setting icon.
- Page 18 SunFounder pisloth EXAMPLE Note: • You can write the program according to the following picture, please refer to the tutorial: How to Create a New Project? • Or find the code with the same name on the Examples page of the EzBlock Studio and click Run or Edit directly.
-
Page 19: Obstacle Avoidance
• Or find the code with the same name on the Examples page of the EzBlock Studio and click Run or Edit directly. After the code runs, PiSloth will walk forward. If it detects that the distance of the obstacle ahead is less than 10cm, it will stop and sound a warning, then turn left for 7 steps and stop. - Page 20 SunFounder pisloth Chapter 3. Play with Ezblock...
-
Page 21: Emotional Pisloth
SunFounder pisloth 3.5 Emotional PiSloth PiSloth is very emotional, sometimes happy, sometimes shy, sometimes confused. TIPS You may want to simplify the program with Functions, especially when you perform the same operation multiple times. Putting these operations into a newly declared function can greatly facilitate your use. - Page 22 SunFounder pisloth Confuse Happy Chapter 3. Play with Ezblock...
- Page 23 SunFounder pisloth Fear 3.5. Emotional PiSloth...
- Page 24 SunFounder pisloth Fall Call all custom functions in the Forever block. Chapter 3. Play with Ezblock...
-
Page 25: Dance
SunFounder pisloth 3.6 Dance Now, PiSltoh will show you his newly learned dance. 3.6. Dance... - Page 26 PiSloth. TIPS In addition to having PiSloth play sound effects and speak, it can also play set background music, and the volume of the background music can be adjusted (0%-100%). Repeat block can help you execute the same code multiple times to reduce code size.
- Page 27 • Or find the code with the same name on the Examples page of the EzBlock Studio and click Run or Edit directly. The whole dance is divided into 2 parts, and PiSloth will finish these 2 parts with the music. If you don’t pause the code, it will repeat the dance.
- Page 28 SunFounder pisloth Chapter 3. Play with Ezblock...
- Page 29 SunFounder pisloth 3.6. Dance...
-
Page 30: Let's Fight! Warrior
SunFounder pisloth 3.7 Let’s Fight! Warrior! Here, PiSloth is a brave warrior, when it appears in front of the enemy, it will let out a roar and rush to the enemy. Note: You can download and print the PDF Cartoon Mask for your PiSloth. - Page 31 SunFounder pisloth TIPS You may want to simplify your program with Variable. For example, when you have multiple functions that need to read the obstacle distance, you don’t need to read the value for each function, just load the value into a variable and use it multiple times.
- Page 32 After the code is run, PiSloth will continuously detect the distance of the obstacle, when the distance is between 5 and 40, PiSloth will make a roaring sound and rush forward; when the distance of the obstacle is less than 5, PiSloth will stop.
- Page 33 SunFounder pisloth Flow Chart 3.7. Let’s Fight! Warrior!
- Page 34 SunFounder pisloth Chapter 3. Play with Ezblock...
-
Page 35: Remote Control
SunFounder pisloth 3.8 Remote Control You can also use the widgets on EzBlock Studio to make PiSloth move. • How to Use the Remote Control Function? TIPS To use the remote control function, you need to enter the Remote Control page from the left side of main page, and then drag one D-pad and 4 buttons to the central area. - Page 36 SunFounder pisloth in it. • Button () get value: This block is used to read the value of the buttons, if the button is pressed, the value is 1, otherwise it is 0. • Button () is (press/release): This block and Button () get value = (0/1) have the same effect and can be used directly to determine whether a button is pressed or not.
- Page 37 SunFounder pisloth 3.8. Remote Control...
-
Page 38: Custom Step
In this project, we will learn how to customize PiSloth’s step. All we have to do is to use the buttons in the remote control page to make PiSloth complete the step shown in the figure below, and then get the angles of the 4 Servos at that time. - Page 39 SunFounder pisloth Step 2: Create 4 variables to store the angles of the 4 Servos. Then initialize the angle to 0. 3.9. Custom Step...
- Page 40 SunFounder pisloth Step 3: Reads the values of the different buttons that are used to control the angles of the Servos. • button AB control the left-leg. • button CD control the left-foot. • button EF control the right-leg. • button GH control the right-foot.
- Page 41 SunFounder pisloth 3.9. Custom Step...
- Page 42 Step 5: Once the code is complete, click the download icon in the bottom right corner to download and run the code. Now we can click button CD and button GH (according to the actual code) to make PiSloth pose like this, you can also make it do other steps.
- Page 43 SunFounder pisloth The complete code is as follows: 3.9. Custom Step...
-
Page 44: Custom Action
3.10 Custom Action In the previous project, we were able to give PiSloth custom steps, so how do we combine these steps into actions? For example, have PiSloth make the step from the previous project and then return to the initial position. - Page 45 TIPS Create a variable up_down to store this action. You can use the create action block to make PiSloth do this action. These values represent the angles of the 4 Servos on the PiSloth. The range is (-90~90). 3.10. Custom Action...
- Page 46 Here you can increase or decrease the number of items by dragging it. Fill in the angle obtained in the previous project and name this action up_down (drag it from Variables category). Use the do block to make PiSloth do this action once at 50% speed. EXAMPLE Note: •...
- Page 47 SunFounder pisloth 3.10. Custom Action...
- Page 48 SunFounder pisloth Chapter 3. Play with Ezblock...
-
Page 49: Play With Python
CHAPTER FOUR PLAY WITH PYTHON If you want to program in python, then you will need to learn some basic Python programming skills and basic knowledge of Raspberry Pi, please configure the Raspberry Pi first according to Quick Guide on Python. - Page 50 SunFounder pisloth Power Adapter To connect to a power socket, the Raspberry Pi has a micro USB port (the same found on many mobile phones). You will need a power supply which provides at least 2.5 amps. Micro SD Card Your Raspberry Pi needs an Micro SD card to store all its files and the Raspberry Pi OS.
- Page 51 SunFounder pisloth Sound or Earphone The Raspberry Pi is equipped with an audio port about 3.5 mm that can be used when your screen has no built-in speakers or when there is no screen operation. 4.1.2 Installing the OS Required Components...
- Page 52 SunFounder pisloth Warning: Upgrading the Raspberry Pi OS to Debian Bullseye will cause some features to not work, so it is recommended to continue using the Debian Buster version. In the Raspberry Pi Imager, click CHOOSE OS -> Raspberry Pi OS(other).
- Page 53 SunFounder pisloth Step 5 Select the SD card you are using. Step 6 To open the advanced options page, click the setting button (appears after selecting operating system) or press Ctrl+Shift+X. Enable ssh and set the username and name. You can choose to always use this image customization options.
- Page 54 SunFounder pisloth Then scroll down to complete the wifi configuration and click SAVE. Note: wifi country should be set the two-letter ISO/IEC alpha2 code for the country in which you are using your Raspberry Pi, please refer to the following link: https://en.wikipedia.org/wiki/ISO_3166-1_alpha-2#Officially_...
- Page 55 SunFounder pisloth Step 7 Click the WRITE button. 4.1. Quick Guide on Python...
- Page 56 SunFounder pisloth Step 8 If your SD card currently has any files on it, you may wish to back up these files first to prevent you from permanently losing them. If there is no file to be backed up, click Yes.
- Page 57 SunFounder pisloth Step 9 After waiting for a period of time, the following window will appear to represent the completion of writing. 4.1. Quick Guide on Python...
- Page 58 SunFounder pisloth 4.1.3 Set up Your Raspberry Pi If You Have a Screen If you have a screen, it will be easy for you to operate on the Raspberry Pi. Required Components • Any Raspberry Pi • 1 * Power Adapter •...
- Page 59 SunFounder pisloth Note: If you use a Raspberry Pi 4, you need to connect the screen to the HDMI0 (nearest the power in port). 4. Use the power adapter to power the Raspberry Pi. After a few seconds, the Raspberry Pi OS desktop will be displayed.
- Page 60 SunFounder pisloth • Don’t Have Temporarily Monitor (or TV)? Have Temporarily Monitor (or TV)? 1. Connect a monitor (or TV), mouse and keyboard to the Raspberry Pi and power it on. Select the menu according to the numbers in the figure.
- Page 61 SunFounder pisloth 3. A VNC icon appears on the upper right of the screen and the VNC server starts. 4. Open the VNC server window by clicking on the VNC icon, then click on the Menu button in the top right corner and select Options.
- Page 62 SunFounder pisloth 5. You will be presented with the following screen where you can change the options. Set Encryption to Prefer off and Authentication to VNC password. 6. When you click the OK button, the password input screen is displayed. You can use the same password as the Raspberry pi password or a different password, so enter it and click OK.
- Page 63 SunFounder pisloth You are now ready to connect from your Mac. It’s okay to disconnect the monitor. From here, it will be the operation on the Mac side. 1. Now, select Connect to Server from the Finder’s menu, which you can open by right-clicking.
- Page 64 SunFounder pisloth 3. You will be asked for a password, so please enter it. 4. The desktop of the Raspberry pi will be displayed, and you will be able to operate it from the Mac as it is. Chapter 4. Play with Python...
- Page 65 SunFounder pisloth Don’t Have Temporarily Monitor (or TV)? • You can apply the SSH command to open the Raspberry Pi’s Bash shell. • Bash is the standard default shell for Linux. • The shell is a command line interpreter (CLI) when the user uses Unix/Linux.
- Page 66 SunFounder pisloth 2. The following message will be displayed only when you log in for the first time, so enter yes. The authenticity of host 'raspberrypi.local (2400:2410:2101:5800:635b:f0b6:2662:8cba)' can't be established. ED25519 key fingerprint is SHA256:oo7x3ZSgAo032wD1tE8eW0fFM/ kmewIvRwkBys6XRwg. This key is not known by any other names Are you sure you want to continue connecting (yes/no/[fingerprint])? 3.
- Page 67 SunFounder pisloth sudo raspi-config 6. The following screen will be displayed. Select 3 Interface Options with the arrow keys on the keyboard and press the Enter key. 7. Then select P3 VNC. 8. Use the arrow keys on the keyboard to select <Yes> -> <OK> -> <Finish> to complete the setup.
- Page 68 SunFounder pisloth 9. Now that the VNC server has started, let’s change the settings for connecting from a Mac. To specify parameters for all programs for all user accounts on the computer, create /etc/vnc/ config.d/common.custom. sudo nano /etc/vnc/config.d/common.custom After entering Authentication=VncAuthenter, press Ctrl+X -> Y -> Enter to save and exit.
- Page 69 SunFounder pisloth pi password or a different password. sudo vncpasswd -service 11. Once the setup is complete, restart the Raspberry Pi to apply the changes. sudo sudo reboot 12. Now, select Connect to Server from the Finder’s menu, which you can open by right-clicking.
- Page 70 SunFounder pisloth 14. You will be asked for a password, so please enter it. 15. The desktop of the Raspberry pi will be displayed, and you will be able to operate it from the Mac as it is. Chapter 4. Play with Python...
- Page 71 SunFounder pisloth Windows Users Login Raspberry Pi Remotely If you are using win10, you can use follow way to login Raspberry Pi remotely. 1. Type powershell in the search box of your Windows desktop, right click on the Windows PowerShell, and select Run as administrator from the menu that appears.
- Page 72 SunFounder pisloth Warning: If a prompt appears The term 'ssh' is not recognized as the name of a cmdlet..It means your system is too old and does not have ssh tools pre-installed, you need to manually Install OpenSSH via Powershell.
- Page 73 SunFounder pisloth 2. Choose 3 Interfacing Options by press the down arrow key on your keyboard, then press the Enter key. 3. Then P3 VNC. 4. Use the arrow keys on the keyboard to select <Yes> -> <OK> -> <Finish> to complete the setup.
- Page 74 SunFounder pisloth Login to VNC 1. You need to download and install the VNC Viewer on personal computer. 2. Open it once the installation is complete. Then, enter the host name or IP address and press Enter. 3. After entering your Raspberry Pi name and password, click OK.
- Page 75 SunFounder pisloth 4. Now you can see the desktop of the Raspberry Pi. 4.1. Quick Guide on Python...
- Page 76 SunFounder pisloth Linux /Unix Users #. Go to Applications->Utilities, find the Terminal, and open it. 1. Check if your Raspberry Pi is on the same network by type in ping <hostname>.local. ping raspberrypi.local As shown above, you can see the Raspberry Pi’s IP address after it has been connected to the network.
- Page 77 SunFounder pisloth ssh pi@raspberrypi.local Note: If a prompt appears The term 'ssh' is not recognized as the name of a cmdlet..It means your system is too old and does not have ssh tools pre-installed, you need to manually Install OpenSSH via Powershell.
- Page 78 SunFounder pisloth Then download the code and install pisloth library. /home/pi/ git clone -b v2.0 https://github.com/sunfounder/pisloth.git cd pisloth sudo python3 setup.py install This step will take a little time, so please be patient. Finally, you need to run the script i2samp.sh to install the components required by the i2s amplifier, otherwise the pislot will have no sound.
- Page 79 SunFounder pisloth Type y and press Enter to continue running the script. Type y and press Enter to run /dev/zero in the background. 4.1. Quick Guide on Python...
- Page 80 SunFounder pisloth Type y and press Enter to restart the machine. Note: If there is no sound after restarting, you may need to run the i2samp.sh script multiple times. 4.1.5 Servo Adjust To ensure that the servo has been properly set to 0°, first insert the rocker arm into the servo shaft and then gently rotate the rocker arm to a different angle.
- Page 81 SunFounder pisloth Wait for 1-2 minutes, there will be a sound to indicate that the Raspberry Pi boots successfully. Now, run servo_zeroing.py in the examples/ folder. cd /home/pi/piarm/examples sudo python3 servo_zeroing.py Note: If you get an error, try re-enabling the Raspberry Pi’s I2C port, see: i2c_config.
- Page 82 SunFounder pisloth At this point you will see the servo arm rotate to a specific position (0°). If the servo arm does not return to 0°, press the RST button to restart the Robot HAT. Now you can continue the installation as instructed on the assembly foldout.
-
Page 83: Move
/home/pi/pisloth/examples sudo python3 move.py After running the code, you will see PiSloth move left 7 steps, forward 5 steps, right 7 steps, and forward 5 steps. Code Note: You can Modify/Reset/Copy/Run/Stop the code below. But before that, you need to go to source code path like pisloth\examples. -
Page 84: Dance
__name__ "__main__": while True: main() How it works? First, import the Sloth class from the pisloth library you have installed, which contains all of PiSloth’s actions and the functions that implement them. from pisloth import Sloth Then instantiate the Sloth class. - Page 85 Run the Code cd /home/pi/pisloth/examples sudo python3 dancing.py The whole dance is divided into 2 parts, and PiSloth will finish these 2 parts with the music. If you don’t stop the code, it will repeat the dance. Code Note: You can Modify/Reset/Copy/Run/Stop the code below. But before that, you need to go to source code path like pisloth\examples.
- Page 86 You can make PiSloth play music by importing the following libraries. from robot_hat import TTS, Music Play the background music in the pisloth/examples/musics directory and set the volume to 20. You can also add music to the musics folder via Filezilla Software. Chapter 4. Play with Python...
-
Page 87: Obstacle Avoidance
After the code runs, PiSloth will walk forward. If it detects that the distance of the obstacle ahead is less than 10cm, it will stop and sound a warning, then turn left and stop. If there is no obstacle in the direction after turning left or the obstacle distance is greater than 10, it will continue to move forward. - Page 88 • When the distance is less than or equal to alert_distance (the threshold value set earlier, which is 10), play the sound effect sign.wav. PiSloth does hook, stand, left turn and stand in sequence. • When the distance is greater than alert_distance, PiSloth will move forward.
-
Page 89: Don't Touch Me
Note: You can add different sound effects or music to musics or sounds folder via Filezilla Software. 4.5 Don’t Touch Me If you don’t meet PiSloth’s needs, it will get angry and stay away from your touch. Run the Code cd /home/pi/pisloth/examples sudo python3 dont_touch_me.py Code Note: You can Modify/Reset/Copy/Run/Stop the code below. - Page 90 • When the distance is less than or equal to alert_distance (the threshold value set earlier, which is 20), play the sound effect talk3.wav and move backward. • When the distance is greater than alert_distance, PiSloth will Stand. distance sonar.read()
-
Page 91: Let's Fight! Warrior
SunFounder pisloth 4.6 Let’s Fight! Warrior! Here, PiSloth is a brave warrior, when it appears in front of the enemy, it will let out a roar and rush to the enemy. Note: You can download and print the PDF Cartoon Mask for your PiSloth. - Page 92 • Read the distance detected by ultrasonic module and filter out the values less than 0 (When the ultrasonic module is too far from the obstacle or cannot read the data correctly, distance<0 will appear). • When the distance is between 5 and 40, PiSloth will play warning.wav and attack.mp3 and move forward.
-
Page 93: Emotional Pisloth
Code Note: You can Modify/Reset/Copy/Run/Stop the code below. But before that, you need to go to source code path like pisloth\examples. After modifying the code, you can run it directly to see the effect. from pisloth import... - Page 94 SunFounder pisloth (continued from previous page) try: music.sound_effect_threading('./sounds/warning.wav') except Exception as print(e) sloth.do_action('hook', 1, 90) sloth.do_action('stand', 1, 90) try: music.sound_effect_threading('./sounds/warning.wav') except Exception as print(e) sloth.do_action('walk backward boldly', 1, 90) sloth.do_action('stand', 1, 90) sad(): try: music.sound_effect_threading('./sounds/depress.wav') except Exception as print(e) sloth.do_action('big...
- Page 95 In this project, actions + sound effects are combined into different emotional actions, and you can also modify them yourself. Note: This fail action will make the PiSloth fall, be careful not to let it fall off the table and break it. You can add different sound effects or music to musics or sounds folder via Filezilla Software.
-
Page 96: Remote Control
SunFounder pisloth 4.8 Remote Control In this project, we will learn how to use the keyboard to remotely control the PiSloth. You can control the PiSloth to move up, down, left, and right and speak through specific keys. Run the Code cd /home/pi/pisloth/examples sudo python3 keyboard_control.py... - Page 97 SunFounder pisloth (continued from previous page) sys.stdin.read(1) finally: termios.tcsetattr(fd, termios.TCSADRAIN, old_settings) return manual Press keys on keyboard to control PiSloth! w: Forward a: Turn left s: Backward d: Turn right 1: Sound effect: talk1 2: Sound effect: talk2 3: Sound effect: talk3 4: Sound effect: depress2 q: Say: "Oh hello there"...
- Page 98 Finally, according to the read keyboard characters, let PiSloth do the actions we set, call the tts.say() function to speak or play the sound effects prepared in advance. readchar().lower() # print(key) "w": sloth.do_action('forward', 1, 90) elif "a":...
-
Page 99: Custom Step
/home/pi/pisloth/examples sudo python3 custom_step.py Once the code has been run, press the following keys to adjust the angle of each servo of PiSloth. • q: Increase the angle of the left leg • w: Decrease the angle of the left leg •... - Page 100 Custom Action. Code Note: You can Modify/Reset/Copy/Run/Stop the code below. But before that, you need to go to source code path like pisloth\examples. After modifying the code, you can run it directly to see the effect. from pisloth import Sloth...
- Page 101 Press keys on keyboard to control PiSloth! q: Increase the servo angle of the left leg w: Decrease the servo angle of the left leg z: Increase the servo angle of the left foot...
-
Page 102: Custom Action
4.10 Custom Action In the previous project, we were able to give PiSloth custom steps, so how do we combine these steps into actions? For example, have PiSloth make the step from the previous project and then return to the initial position. - Page 103 SunFounder pisloth Note: You can download and print the PDF Cartoon Mask for your PiSloth. Step 1: Go to the /home/pi/pisloth/examples path. cd /home/pi/pisloth/examples Step 2: Open custom_action.py with the following command. nano custom_action.py Step 3: Modify the angle in sloth.add_action(), each group represents a step, and only 2 steps are set here.
- Page 104 SunFounder pisloth like pisloth\examples. After modifying the code, you can run it directly to see the effect. from pisloth import Sloth import time sloth Sloth([1,2,3,4]) sloth.add_action("my_action", [ 0,-45 ,0, 40], 0, 0, main(): sloth.do_action("my_action", 1, 80) time.sleep(1) __name__ "__main__": while...
-
Page 105: Appendix
CHAPTER FIVE APPENDIX 5.1 About the Battery Applicable Parameters • 3.7V • 18650 • Rechargeable • Li-ion Battery • Button Top • No Protective Board Note: • Robot HAT cannot charge the battery, so you need to buy a battery charger. •... -
Page 106: Filezilla Software
SunFounder pisloth No protective board? You are recommend to use 18650 batteries without a protective board. Otherwise, the robot may be cut power and stop running because of the overcurrent protection of the protective board. Battery capacity? In order to keep the robot working for a long time, use large-capacity batteries as much as possible. It is recommended to purchase batteries with a capacity of 3000mAh and above. - Page 107 SunFounder pisloth select File-> Copy Current Connection to Site Manager after a successful Quick Connect, enter the name and click OK. Next time you will be able to connect by selecting the previously saved site inside File -> Site Manager.
-
Page 108: Putty
SunFounder pisloth 5.3 PuTTY If you are a Windows user, you can use some applications of SSH. Here, we recommend PuTTY. Step 1 Download PuTTY. Step 2 Open PuTTY and click Session on the left tree-alike structure. Enter the IP address of the RPi in the text box under Host Name (or IP address) and 22 under Port (by default it is 22). -
Page 109: Install Openssh Via Powershell
SunFounder pisloth Note: When you input the password, the characters do not display on window accordingly, which is normal. What you need is to input the correct password. If inactive appears next to PuTTY, it means that the connection has been broken and needs to be reconnected. - Page 110 SunFounder pisloth Path Online True RestartNeeded : False 4. Verify the installation by using the following command. Get-WindowsCapability -Online Where-Object Name -like 'OpenSSH * ' 5. It now tells you that OpenSSH.Client has been successfully installed. Name OpenSSH.Client~~~~0.0.1.0 State : Installed Name OpenSSH.Server~~~~0.0.1.0...
-
Page 111: Thank You
CHAPTER THANK YOU Thanks to the evaluators who evaluated our products, the veterans who provided suggestions for the tutorial, and the users who have been following and supporting us. Your valuable suggestions to us are our motivation to provide better products! Particular Thanks •... - Page 112 SunFounder pisloth Chapter 6. Thank You...
-
Page 113: Copyright Notice
SEVEN COPYRIGHT NOTICE All contents including but not limited to texts, images, and code in this manual are owned by the SunFounder Company. You should only use it for personal study,investigation, enjoyment, or other non-commercial or nonprofit purposes, under therelated regulations and copyrights laws, without infringing the legal rights of the author and relevant right holders.
Need help?
Do you have a question about the pisloth and is the answer not in the manual?
Questions and answers