Table of Contents
Advertisement
Available languages
Available languages
Advertisement
Chapters
Table of Contents

Related Manuals for KERN ABS-N Series


Summary of Contents for KERN ABS-N Series
- Page 1 KERN & Sohn GmbH Ziegelei 1 Tel: +49-[0]7433- 9933-0 D-72336 Balingen Fax: +49-[0]7433-9933-149 E-Mail: info@kern-sohn.com Internet: www.kern-sohn.com Betriebsanleitung Operating instruction Mode d’emploi KERN ABS-N_ABJ-NM Version 1.5 08/2017 ABS-N_ABJ-NM-BA-def-1715...
- Page 2 Vous trouverez d’autres versions de langue online sous www.kern-sohn.com/manuals Further language versions you will find online under www.kern-sohn.com/manuals A használati utasítás egyéb nyelveken a www.kern-sohn.com/manuals címről tölthető le Trovate altre versioni di lingue online inwww.kern-sohn.com/manuals Ytterligere språkversjoner finner du online under www.kern-sohn.com/manuals Bijkomende taalversies vindt u online op www.kern-sohn.com/manuals...
-
Page 3: Table Of Contents
Justierung ....................20 Automatische Justierung durch PSC (Perfect Self Calibration), nur Modelle ABJ ..20 Menüeinstellung „I.CAL“ / „E.CAL“ ..................23 8.2.1 Justierung mit internem Gewicht (KERN ABJ) ................. 24 8.2.2 Justierung mit externem Gewicht (KERN ABS) ............... 25 Justierprotokoll ........................26 Waagenidentifikations–Nr. - Page 4 16.3 Kommunikationsparameter ....................82 16.3.1 Auswahl einer Standardeinstellung „MODE 1 - MODE 5“ ........... 83 16.3.2 Benutzerdefinierte Einstellungen „MODE U“ / Einstellung für KERN –YKB-01N ....84 16.4 Datenformate .......................... 88 16.5 Fernsteuerbefehle ........................92 Wartung, Instandhaltung, Entsorgung ............93 17.1...
-
Page 5: Technische Daten
1 Technische Daten KERN 80-4NM 120-4NM 220-4NM 320-4NM Ablesbarkeit (d) 0.1 mg 0.1 mg 0.1 mg 0.1 mg Wägebereich (Max) 82 g 120 g 220 g 320 g Mindestlast (Min) 10 mg 10 mg 10 mg 10 mg Eichwert (e) - Page 6 KERN ABS 80-4N ABS 120-4N Ablesbarkeit (d) 0.1 mg 0.1 mg Wägebereich (Max) 82 g 120 g Reproduzierbarkeit 0.2 mg 0.2 mg Linearität ± 0.3 mg ± 0.3 mg Empfohlenes Justierge- wicht nicht beigegeben 80 g (E2) 100 g (E2) (Klasse) Anwärmzeit...
- Page 7 KERN ABS 220-4N ABS 320-4N Ablesbarkeit (d) 0.1 mg 0.1 mg Wägebereich (Max) 220 g 320 g 0.2 mg Reproduzierbarkeit 0.2 mg Linearität ± 0.3 mg ± 0.3 mg Empfohlenes Justierge- wicht nicht beigegeben 200 g (E2) 300 g (E2)
-
Page 8: Konformitätserklärung
2 Konformitätserklärung Die aktuelle EG/EU-Konformitätserklärung finden Sie online unter: www.kern-sohn.com/ce Bei geeichten Waagen (= konformitätsbewerteten Waagen) ist die Konformitätserklärung im Lieferumfang enthalten. ABS-N_ABJ-NM-BA-d-17151... -
Page 9: Geräteübersicht
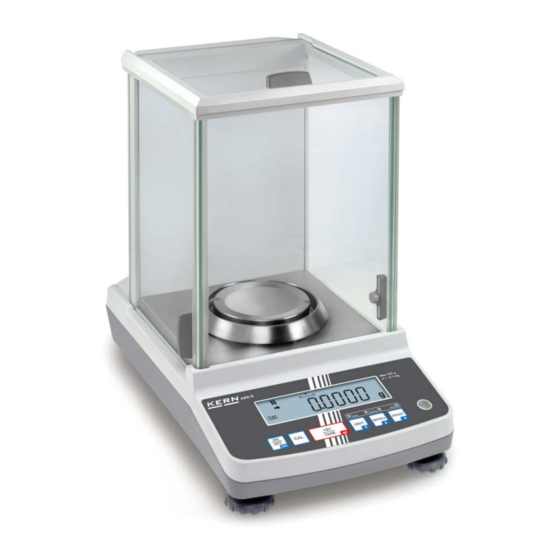
3 Geräteübersicht 1. Wägeplatte 2. Anzeige 3. Tastatur 4. Fußschraube 5. Libelle 6. Typenschild 7. Windschutz 8. Geräteschnittstelle 9. Anschluss Netzadapter ABS-N_ABJ-NM-BA-d-1715... -
Page 10: Tastaturübersicht
3.1 Tastaturübersicht Im Menü: Funktion Taste Bezeichnung Einmal drücken und Ca. 3 Sekunden Im Menü wieder freigeben gedrückt halten Menüpunkt zurück. Zurück in den Wä- Schaltet zwischen gemodus: ON/OFF Betriebs- ON/OFF wiederholt Standby-Modus um. oder 3 s lang drü- cken. Vorgang abbrechen. -
Page 11: Numerische Eingabe
3.1.1 Numerische Eingabe Taste Bezeichnung Funktion Blinkende Ziffer erhöhen Navigationstaste Blinkenden Dezimalpunkt nach links verschieben Blinkende Ziffer verringern Navigationstaste Blinkenden Dezimalpunkt nach rechts verschie- Ziffernanwahl nach rechts Navigationstaste Eingabe bestätigen Navigationstaste Eingabe abbrechen Bei numerischer Eingabe wird der Indikator [#] angezeigt. ABS-N_ABJ-NM-BA-d-1715... -
Page 12: Anzeigenübersicht
3.2 Anzeigenübersicht Symbole Numerische Anzeige/Menü Einheiten Anzeige Beschreibung s. Kap. Batteriesymbol Kap. 12.1 Zero tracking Funktion aktiv Kap. 8.2.1 Zeigt die Justierung an Kap. 8.1 Blinkt, bevor die automatische Justierung startet, nur Modelle ABJ Kap.13.1 Stabilität- und Reaktionseinstellungen über „Easy Setting-Anzeige“ Kap. -
Page 13: Grundlegende Hinweise (Allgemeines)
Die Waage darf nicht konstruktiv verändert werden. Dies kann zu falschen Wäger- gebnissen, sicherheitstechnischen Mängeln sowie der Zerstörung der Waage führen. Die Waage darf nur gemäß den beschriebenen Vorgaben eingesetzt werden. Abwei- chende Einsatzbereiche/Anwendungsgebiete sind von KERN schriftlich freizugeben. 4.3 Gewährleistung Gewährleistung erlischt bei •... -
Page 14: Prüfmittelüberwachung
5.1 Hinweise in der Betriebsanleitung beachten Lesen Sie diese Betriebsanleitung vor der Aufstellung und Inbetriebnahme sorgfältig durch, selbst dann, wenn Sie bereits über Erfahrungen mit KERN- Waagen verfügen. 5.2 Ausbildung des Personals Das Gerät darf nur von geschulten Mitarbeitern bedient und gepflegt werden. -
Page 15: Verpackung/Rücktransport
6.2 Verpackung/Rücktransport Alle Teile der Originalverpackung für einen eventuell not- wendigen Rücktransport aufbewahren. Für den Rücktransport ist nur die Originalverpackung zu verwenden. Vor dem Versand alle angeschlossenen Kabel und lo- sen/beweglichen Teile trennen. Evt. vorgesehene Transportsicherungen wieder anbringen. ... - Page 16 ABS-N_ABJ-NM-BA-d-17151...
-
Page 17: Auspacken, Aufstellung Und Inbetriebnahme
7 Auspacken, Aufstellung und Inbetriebnahme 7.1 Aufstellort, Einsatzort Die Waagen sind so konstruiert, dass unter den üblichen Einsatzbedingungen zuver- lässige Wägeergebnisse erzielt werden. Exakt und schnell arbeiten Sie, wenn Sie den richtigen Standort für Ihre Waage wäh- len. Beachten Sie deshalb am Aufstellort folgendes: •... -
Page 18: Lieferumfang / Serienmäßiges Zubehör
7.2.1 Lieferumfang / Serienmäßiges Zubehör Waage Wägeplatte Träger Wägeplatte Schirmring Netzadapter Betriebsanleitung Menü-Übersicht ABS-N_ABJ-NM-BA-d-17151... -
Page 19: Aufstellen
7.2.2 Aufstellen Schirmring, Träger der Wägeplatte und Wägeplatte der Reihenfolge nach an- bringen. Die Waage mit Fußschrauben nivellieren, bis sich die Luftblase in der Libelle im vorgeschriebenen Kreis befindet. Nivellierung regelmäßig überprüfen ABS-N_ABJ-NM-BA-d-1715... -
Page 20: Netzanschluss
7.3 Netzanschluss Die Stromversorgung erfolgt über das externe Netzgerät. Der aufgedruckte Span- nungswert muss mit der örtlichen Spannung übereinstimmen. Verwenden Sie nur KERN- Originalnetzgeräte. Die Verwendung anderer Fabrikate bedarf der Zustimmung von KERN. 7.3.1 Einschalten der Stromversorgung Waage über den Netzadapter mit Strom versorgen. Die Anzeige leuchtet auf und die Waage führt einen Selbsttest durch. -
Page 21: Justierung
8 Justierung Da der Wert der Erdbeschleunigung nicht an jedem Ort der Erde gleich ist, muss je- de Waage – gemäß dem zugrunde liegenden physikalischen Wägeprinzip – am Auf- stellort auf die dort herrschende Erdbeschleunigung abgestimmt werden ( nur wenn die Waage nicht bereits im Werk auf den Aufstellort justiert wurde). - Page 22 Fall 1: Die Last auf der Wägeplatte liegt nahe Null. Das Gewichtssymbol blinkt etwa zwei Minuten lang, gefolgt von „PSC.RUN“. Danach wird die interne Justierung automatisch gestartet. Um den korrekten PSC- Betrieb zu gewährleisten, müssen Vibrationen und Luftströme vermieden werden ...
- Page 23 Fall 2: Wägeplatte ist belastet Die Grammanzeige blinkt 2 Min. lang, gefolgt von „PLS.CAL“. Wägeplatte entlasten. Die Grammanzeige blinkt erneut 2 Min. lang. Danach wird die interne Justierung automatisch gestartet. Um den korrekten PSC-Betrieb zu ge- währleisten, müssen Vibrationen und Luftströme vermieden werden. Sobald die Grammanzeige nach Abschluss der Justierung mittels PSC wieder er- scheint, befindet sich die Waage wieder im Wägemodus.
-
Page 24: Menüeinstellung „I.cal" / „E.cal
8.2 Menüeinstellung „I.CAL“ / „E.CAL“ Zum Aufrufen der Justierfunktion im Wägemodus CAL 3 s lang drücken. Mit PRINT bestätigen, die aktuelle Einstellung wird an- gezeigt. Mit den Navigationstasten ( ) gewünschte Einstel- lung wählen I.CAL: Justierung mit internem Gewicht (s. Kap. 8.1) E.CAL: Justierung mit externem Gewicht (s. -
Page 25: Justierung Mit Internem Gewicht (Kern Abj)
8.2.1 Justierung mit internem Gewicht (KERN ABJ) Mit dem eingebauten Justiergewicht ist die Waagengenauigkeit jederzeit überprüfbar und neu einstellbar. • Voraussetzung: Menüeinstellung „I.CAL“. s. Kap. 8.2 • Bei Anschluss eines optionalen Druckers und aktivierter GLP-Funktion wird beim Start des Justierprotokolls „WAIT“ angezeigt. Nach erfolgtem Ausdruck wird die Justierung automatisch fortgesetzt. -
Page 26: Justierung Mit Externem Gewicht (Kern Abs)
Mindestgewicht „Justiergewicht“: ABS 80-4N / ABS 120-4N : 50 g ABS 220-4N ABS 320-4N:100 g Infos zu Prüfgewichten finden Sie im Internet unter: http://www.kern- sohn.com • Bei Anschluss eines optionalen Druckers und aktivierter GLP-Funktion wird beim Start des Justierprotokolls „WAIT“ angezeigt. Nach erfolgtem Ausdruck wird der Justiervorgang automatisch fortgesetzt. -
Page 27: Justierprotokoll
- - - - - - - - - - - - - - - - - CAL –EXTERNAL Justierart - - - - - - - - - - - - - - - - - KERN & Sohn GmbH Firma TYPE ABJ 220-4NM Modell SN WBIIAB000I Serien-Nr. -
Page 28: Waagenidentifikations-Nr
Einstellung ändern TARE drücken ON/OFF wiederholt oder 3 s lang drücken, die Waage kehrt zurück in den Wägemodus 8.4 Waagenidentifikations–Nr. Diese Einstellung bezieht sich auf die ID-Nummer der Waage, die im Justierprotokoll mit ausgegeben wird Menü aufrufen ... -
Page 29: Eichung
9 Eichung Allgemeines: Nach der EU-Richtlinie 90/384/EWG oder 2009/23EG müssen Waagen geeicht sein, wenn sie wie folgt verwendet werden (gesetzlich geregelter Bereich): a) Im geschäftlichen Verkehr, wenn der Preis einer Ware durch Wägung be- stimmt wird. b) Bei der Herstellung von Arzneimitteln in Apotheken sowie bei Analysen im medizinischen und pharmazeutischen Labor. - Page 30 Position Siegelmarken: Siegelmarke Typenschild Siegelmarke ABS-N_ABJ-NM-BA-d-17151...
-
Page 31: 10 Wägen
10 Wägen 10.1 Waage einschalten / Wägemodus aufrufen Status Waage Wägemodus aufrufen Anzeige ausgeschaltet ON/OFF drücken. Nach Anzeige beliebige Taste drücken Anzeige Anzeige Beliebige Taste drücken Alle Segmente leuchten Waage befindet sich im Menü ON/OFF wiederholt oder 3 s lang drücken Nach numerischer Eingabe 10.2 Waage ausschalten ... -
Page 32: Start-Anzeige Einstellen
10.3 Start-Anzeige einstellen Für die Start-Anzeige kann zwischen 3 Arten gewählt werden. Start-Anzeige Erklärung Menüeinstellung 1. Wägemodus Nach Anschluss an die Strom- versorgung startet die Waage im Wägemodus. 2. Anzeige Nach Anschluss an die Strom- versorgung zeigt die Waage an. Nach Drücken einer belieben Taste führt die Waage einen Segmenttest durch und startet automatisch im Wäge-... - Page 33 Menü aufrufen Im Wägemodus MENU-Taste 2 x drücken Menüpunkt anwählen Navigationstasten ( ) wiederholt drücken bis „TOOLS“ angezeigt wird. Mit PRINT bestätigen Navigationstasten ( ) wiederholt drücken bis „SYSTEM“ angezeigt wird. Mit PRINT bestätigen Navigationstasten ( ) wiederholt drücken bis „START“...
-
Page 34: Auto Power-Off Funktion (Automatische Abschaltfunktion)
10.4 Auto Power-Off Funktion (Automatische Abschaltfunktion) Bei aktivierter Funktion wird die Hinterleuchtung der Anzeige zur Batterieschonung nach einer definierten Zeit ohne Lastwechsel oder Bedienung automatisch abge- schaltet. 1. Menü aufrufen Im Wägemodus MENU-Taste 2 x drücken 2. Funktion anwählen ... -
Page 35: Einfaches Wägen
Bei Anschluss eines optionalen Druckers kann der Wägewert ausgegeben werden. Ausdruckbeispiel bei aktivierter GLP-Funktion (s. Kap. 8.3): - - - - - - - - - - - - - - - - - Firma KERN & Sohn GmbH TYPE ABJ 220-4NM Modell SN WBIIAB000I Serien-Nr. -
Page 36: Tarieren
10.6 Tarieren Das Eigengewicht beliebiger Wägebehälter lässt sich auf Knopfdruck wegtarieren, damit bei nachfolgenden Wägungen das Nettogewicht des Wägegutes angezeigt wird. Wägebehälter auf die Wägeplatte stellen und Windschutztüren schließen. Warten bis die Stabilitätsanzeige ( ) erscheint, dann TARE drücken. Das Gewicht des Gefäßes ist nun intern gespeichert. -
Page 37: Wägeeinheit Umschalten
10.7 Wägeeinheit umschalten Durch Drücken der UNIT-Taste kann die Anzeige in die zuvor im Menü aktivierten Einheiten umgeschaltet werden. Menü aufrufen Im Wägemodus UNIT-Taste 3 s lang drücken. Die aktuelle Einstellung wird durch die Stabilitätsanzeige ( ) gekennzeichnet. Mit Stabilitätsanzeige ( ) Einheit aktiviert Ohne Stabilitätsanzeige ( ) Einheit deaktiviert Einheiten aktivieren/deaktivieren... -
Page 38: Frei Programmierbare Wägeeinheit
10.7.1 Frei programmierbare Wägeeinheit Menü aufrufen Im Wägemodus UNIT-Taste 3 s lang drücken. Mit den Navigationstasten ( ) „UNIT.U“ wählen. Die aktuelle Einstellung wird durch die Stabilitätsanzeige ( ) gekennzeichnet. Mit Stabilitätsanzeige ( ) Einheit aktiviert Ohne Stabilitätsanzeige ( ) Einheit deaktiviert ggf. -
Page 39: Position Dezimalpunkt Für Frei Programmierbare Wägeeinheit
10.7.2 Position Dezimalpunkt für frei programmierbare Wägeeinheit Die Position des Dezimalpunktes kann nur bei numerischer Eingabe des Umrech- nungsfaktor verändert werden (s. Kap.10.7.2, Schritt 2). Bei blinkender erster Ziffer PRINT wiederholt drücken bis der Dezimalpunkt blinkt. Mit den Navigationstasten ( ) gewünschte Position wählen. -
Page 40: Ablesbarkeit Ändern (1D/10D)
10.8 Ablesbarkeit ändern (1D/10D) Menü aufrufen Im Wägemodus MENU-Taste 2 x drücken Menüpunkt anwählen Navigationstasten ( ) wiederholt drücken bis „TOOLS“ angezeigt wird. Mit PRINT bestätigen Navigationstasten ( ) wiederholt drücken bis „TARGET“ angezeigt wird. Mit PRINT bestätigen ... -
Page 41: Dezimalpunkt Als Punkt Oder Komma Anzeigen
10.9 Dezimalpunkt als Punkt oder Komma anzeigen Menü aufrufen Im Wägemodus MENU-Taste 2 x drücken Menüpunkt anwählen Navigationstasten ( ) wiederholt drücken bis „TOOLS“ angezeigt wird. Mit PRINT bestätigen Navigationstasten ( ) wiederholt drücken bis „SYSTEM“ angezeigt wird. ... -
Page 42: Menü
11 Menü Über das Menü kann das Verhalten der Waage an Ihre Anforderungen angepasst werden. Werksseitig ist das Menü so eingestellt, dass Sie in aller Regel keine Ände- rungen vorzunehmen brauchen. Wenn Sie besondere Einsatzbedingungen haben, stellen Sie Ihre Waage über das Menü individuell auf Ihre Wünsche ein. Menügliederung: Menü-Bezeichnung Menü-Aufruf... -
Page 43: Navigation Im Menü
11.2 Navigation im Menü • Menü aufrufen, s. Kap. 11 • Menüstruktur • Anwählen und Durchlaufen der Menüpunkte nach unten (). • Einstellung innerhalb einer Funktion auswählen • Anwählen und Durchlaufen der Menüpunkte nach oben (). • Einstellung innerhalb einer Funktion auswählen •... -
Page 44: Menü-Übersicht
11.3 Menü-Übersicht Siehe auch beigelegte Menu Map Menü-Übersicht ABS-N_ABJ-NM-BA-d-17151... -
Page 45: Menürückstellung
11.4 Menürückstellung Hierdurch werden alle Einstellungen auf Werkseinstellung zurückgesetzt. Dabei wird auch der bisher gespeicherte Referenzwert für die Stückzählung bzw. Prozentum- rechnung gelöscht. Die Werkseinstellungen sind in der Menü-Übersicht durch ein “ ” gekennzeichnet. Menü aufrufen Im Wägemodus MENU-Taste 2 x drücken Menüpunkt anwählen ... -
Page 46: Menüsperre
11.5 Menüsperre Um versehentliche Änderungen der Menüeinstellungen zu verhindern, können Ein- stellvorgänge gesperrt werden. Diese Menüsperre wird auf nachfolgend beschriebe- ne Art und Weise aktiviert: Entweder Stromversorgung der Waage einschalten und warten bis „OFF“ angezeigt wird oder oder Waage in Stand-by Modus setzen, s. Kap. 10.2 Menüpunkt anwählen 1. -
Page 47: Passwort Ändern
11.5.1 Passwort ändern Standardpasswort (Werkseinstellung): „9999“ Menü aufrufen Im Wägemodus MENU-Taste 2 x drücken Menüpunkt anwählen Navigationstasten ( ) wiederholt drücken bis „TOOLS“ angezeigt wird. Mit PRINT bestätigen Navigationstasten ( ) wiederholt drücken bis „SYSTEM“ angezeigt wird. ... -
Page 48: Menüeinstellungen Protokollieren
11.6 Menüeinstellungen protokollieren Bei Anschluss eines optionalen Druckers kann eine Liste der aktuellen Menüeinstel- lungen ausgedruckt werden. Datenausgang, s. Kap. 16 Menü aufrufen Im Wägemodus MENU-Taste 2 x drücken Menüpunkt anwählen Navigationstasten ( ) wiederholt drücken bis „TOOLS“ angezeigt wird. ... -
Page 49: Zero / Tare Menu (Nullstell- Und Tarierfunktionen)
12 Zero / tare Menu (Nullstell- und Tarierfunktionen) Wählbare Funktionen: 1. Zero tracking Funktion Mit dieser Funktion werden kleine Gewichtsschwan- kungen, die direkt nach dem Einschalten auftreten s. Kap. 12.1 automatisch korrigiert. Werden kleine Mengen vom Wägegut entnommen oder zugeführt, so können durch die in der Waage vorhande- ne „Stabilitätskompensation“... - Page 50 12.1 Zero tracking Funktion Werkseitig ist die Zero tracking Funktion „A.ZERO“ eingeschaltet. 1. Menüeinstellung überprüfen Zero tracking Symol Zero tracking Funktion eingeschaltet wird angezeigt ausgeschaltet wird nicht angezeigt 2. Funktion aufrufen Im Wägemodus TARE 3 s lang drücken und ggf. Navi- gationstasten (...
- Page 51 12.2 Auto Zero Funktion Die Auto Zero Funktion ist bei eingeschaltetem Rezepturmodus (s. Kap.14.3) nicht verfügbar. 1. Menü aufrufen Im Wägemodus TARE 3 s lang drücken. 2. Funktion anwählen Navigationstasten ( ). wiederholt drücken bis „A.ZERO“ angezeigt wird. Die aktuelle Einstellung wird durch die Stabilitätsanzeige ( ) gekennzeichnet.
- Page 52 12.3 Auto Tare Funktion 1. Menü aufrufen Im Wägemodus TARE 3 s lang drücken. 2. Funktion anwählen Navigationstasten ( ) wiederholt drücken bis „A.TARE““ angezeigt wird. Die aktuelle Einstellung wird durch die Stabilitätsanzeige ( ) gekennzeichnet. Mit Stabilitätsanzeige ( ) Funktion eingeschaltet Ohne Stabilitätsanzeige ( ) Funktion ausgeschaltet 3.
- Page 53 12.4 Zero / tare timing change Funktion Die Zero / tare timing change Funktion kann bei aktivierter „Auto zero“ und „Auto tare“-Funktion zugeschaltet werden. 1. Menü aufrufen Im Wägemodus TARE 3 s lang drücken. 2. Funktion anwählen Navigationstasten ( ). wiederholt drücken bis „TARE.F“...
-
Page 54: Stabilitäts- Und Reaktionseinstellungen
13 Stabilitäts- und Reaktionseinstellungen Es besteht die Möglichkeit, die Stabilität der Anzeige und den Reaktionsgrad der Waage auf die Anforderungen bestimmter Anwendungen oder die Umgebungsbe- dingungen abzustimmen. Messungen können überwiegend mit den Werkseinstellungen, also im Standard- Modus durchgeführt werden. Im Standardwägemodus haben Stabilität und Reaktion dieselbe Priorität. -
Page 55: Auswahl Wäge- / Dosiermodus
13.2 Auswahl Wäge- / Dosiermodus Wägemodus aufrufen: Dies ist die Werkseinstellung. Benutzen Sie diesen Modus, wenn weder Stabilität noch Reaktionszeit heraufgesetzt bzw. verkürzt werden müssen. Menü aufrufen Im Wägemodus MENU-Taste 2 x drücken Menüpunkt anwählen Navigationstasten ( ) wiederholt drücken bis „STAND“... -
Page 56: Stillstandsbreite
13.3 Stillstandsbreite Leuchtet die Stabilitätsanzeige ( ) auf, so ist das Wägeergebnis innerhalb des durch die Stillstandsbreite angegebenen Bereichs stabil. Bereich für die Stabilitätsermittlung einstellen: Menü aufrufen Im Wägemodus MENU-Taste 2 x drücken Menüpunkt anwählen Navigationstasten ( ) wiederholt drücken bis „TOOLS“... - Page 57 Reaktionszeit einstellen: Menü aufrufen Im Wägemodus MENU-Taste 2 x drücken Menüpunkt anwählen Navigationstasten ( ) wiederholt drücken bis „TOOLS“ angezeigt wird. Mit PRINT bestätigen Navigationstasten ( ) wiederholt drücken bis „PARAMW“ angezeigt wird. Mit PRINT bestätigen ...
-
Page 58: Applikationsfunktionen
14 Applikationsfunktionen • Die Applikationsfunktionen sind mit der Checkweighing- oder Target- Funktion kombinierbar (s. Kap. 14). • Die Waage startet in dem Modus, in dem sie ausgeschaltet wurde. • Zum Umschalten zwischen Applikation und Wägemodus MENU 3 s lang drücken. 14.1 Stückzählen Beim Stückzählen können Sie entweder Teile in einen Behälter einzählen oder Teile aus einem Behälter herauszählen. - Page 59 Referenz setzen Leeren Behälter auf die Waage stellen und durch Drü- cken von TARE tarieren. MENU 2 x drücken. Navigationstasten ( ) wiederholt drücken bis die ge- wünschte Referenzstückzahl angezeigt wird (mögliche Referenzstückzahlen 5, 10, 20, 50, 100). Mit MENU vorwärts blättern.
- Page 60 Entweder weitere Teile zählen oder Der Menüpunkt zum Ändern der gespeicherten Referenz wird aufgrufen, die aktuelle eingestellte Referenzstückzahl wird angezeigt. siehe „4. Stückgewicht ändern oder hinzufügen“ Das gespeicherte Stückgewicht wird in Gramm angezeigt, gekennzeichnet mit dem Symbol . Mit PRINT kann das Referenzgewicht (UW= Unit weight) bei Anschluß...
-
Page 61: Prozentbestimmung
14.2 Prozentbestimmung Das Prozentwägen ermöglicht die Gewichtsanzeige in Prozent, bezogen auf ein Re- ferenzgewicht. Die Waage bietet zwei Möglichkeiten: 1. Referenz = 100 % 2. Referenz = benutzerdefiniert Menü aufrufen Im Wägemodus MENU-Taste 2 x drücken Prozentwägemodus anwählen Navigationstasten ( ) wiederholt drücken bis „APL.FUNC“... -
Page 62: Referenzgewicht = 100
14.2.1 Referenzgewicht = 100 % Prozentwägemodus anwählen, s. Kap. 14.2 TARE drücken. Falls nötig, Navigationstasten ( ) wiederholt drücken bis „SAMPLE“ angezeigt wird. TARE drücken. Anzeige, wenn kein Referenzgewicht hinterlegt ist Anzeige, wenn ein Referenzgewicht hinterlegt ist Referenz setzen ... -
Page 63: Benutzerdefinierte Referenz
14.2.2 Benutzerdefinierte Referenz Prozentwägemodus anwählen, s. Kap. 14.2 TARE drücken. Falls nötig, Navigationstasten ( ) wiederholt drücken bis „OPTION“ angezeigt wird. TARE drücken. Anzeige, wenn keine Referenz hinterlegt ist Anzeige, wenn eine Referenz hinterlegt ist Referenz setzen ... -
Page 64: Prozentbestimmung
14.2.3 Prozentbestimmung oder Im Wägemodus MENU 3 s lang drücken, der aktuell ein- gestellte Prozentbestimmungsmodus wird angezeigt. Leeren Behälter auf die Waage stellen und durch Drü- cken von TARE tarieren. Wägegut auflegen. Das Gewicht der Probe wird in Prozent, bezogen auf das Referenzgewicht, angezeigt ... -
Page 65: Rezeptur Modus
14.3 Rezeptur Modus Mit der Rezeptur-Funktion lassen sich verschiedene Bestandteile einer Mischung zuwiegen. Zur Kontrolle kann das Gewicht aller Bestandteile (CMP001, (CMP002 usw.), sowie das Gesamtgewicht (TOTAL) ausgedruckt werden. Die Waage arbeitet mit einem getrennten Speicher für das Gewicht des Wägebehäl- ters und der Rezepturbestandteile. - Page 66 Drucker ausgegeben. Bei Anzeige des Symbols , ist die Waage für weite- re Messungen bereit. 6. Zurück in den Wägemodus ON/OFF 3 s lang drücken Ausdruckbeispiel „GLP ON“ (KERN YKB-01N): Firma Modell Serien-Nr. ID-Nr. Bearbeiter...
-
Page 67: Ausgabe „Komponenten-Nr." Aktivieren
(z. B. CMP001) Ohne ( ) Keine Ausgabe „Komponenten-Nr.“ Mit TARE ändern. Zurück in den Rezepturmodus ON/OFF wiederholt oder 3 s lang drücken Ausdruckbeispiele (KERN YKB-01N): Funktion ELM.NUM aktiviert Funktion ELM.NUM deakti- viert FORMULATION MODE FORMULATION MODE CMP001=... -
Page 68: Ausgabe „Total" Aktivieren
Ausgabe „TOTAL“ Ohne ( ) Keine Ausgabe „TOTAL“ Mit TARE ändern. Zurück in den Rezepturmodus ON/OFF wiederholt oder 3 s lang drücken Ausdruckbeispiele (KERN YKB-01N): Funktion TOTAL aktiviert Funktion TOTAL deaktiviert FORMULATION MODE FORMULATION MODE CMP001= 0,5361 g... -
Page 69: Checkweighing Und Target Mode (Kontroll- Und Zielwägen)
15 Checkweighing und Target Mode (Kontroll- und Zielwägen) • Der Checkweighing oder Target mode kann auf die Applikationsfunktio- nen (s. Kap.14) angewendet werden. • Die Waage startet in dem Modus, in dem sie ausgeschaltet wurde. 15.1 Checkweighing In vielen Fällen ist nicht der Sollwert des Wägegutes die entscheidende Größe, son- dern die Abweichung von diesem Sollwert. - Page 70 1. Menü aufrufen Im Wägemodus MENU-Taste 2 x drücken 2. Funktion anwählen Navigationstasten ( ) wiederholt drücken bis „TOOLS“ angezeigt wird. Mit PRINT bestätigen Navigationstasten ( ) wiederholt drücken bis „CHECK.W“ angezeigt wird. Die aktuelle Einstellung wird durch die Stabilitätsanzeige ( ) gekennzeichnet.
- Page 71 Mit TARE bestätigen. Navigationstasten ( ) wiederholt drücken bis „LO.LIM“ angezeigt wird. TARE drücken. Die aktuelle Einstellung wird ange- zeigt. Mit den Navigationstasten ( ) gewünschten Wert eingeben, s. Kap. 3.1.1 „Numerische Eingabe“. Mit TARE bestätigen. ...
- Page 72 4. Zurück in den Wägemodus ON/OFF wiederholt oder 3 s lang drücken 5. Toleranzkontrolle starten Falls nötig, leeren Behälter auf die Waage stellen und durch Drücken von TARE tarieren. Wägegut auflegen, warten bis der Indikator oder erscheint. Anhand des Indikators prüfen, ob das Wägegut unter, innerhalb oder über der vorgegebenen Toleranz liegt ...
-
Page 73: Target Mode
15.2 Target mode Dieser Modus dient z.B. zum Abwiegen konstanter Flüssigkeitsmengen ooder zur Beurteilung von Fehlmengen und Überschüssen. Der Zielwert ist der numerische Wert, welcher der Sollmenge der zum Wiegen ver- wendeten Einheit entspricht. Neben dem Zielwert erfolgt die Eingabe eines Tole- ranzwertes. - Page 74 1. Menü aufrufen Im Wägemodus MENU-Taste 2 x drücken 2. Funktion anwählen Navigationstasten ( ) wiederholt drücken bis „TOOLS“ angezeigt wird. Mit PRINT bestätigen Navigationstasten ( ) wiederholt drücken bis „TARGT“ angezeigt wird. Die aktuelle Einstellung wird durch die Stabilitätsanzeige ( ) gekennzeichnet.
- Page 75 Mit TARE bestätigen. 4. Zurück in den Wägemodus ON/OFF wiederholt oder 3 s lang drücken 5. Toleranzkontrolle starten Falls nötig, leeren Behälter auf die Waage stellen und durch Drücken von TARE tarieren. Wägegut auflegen, warten bis der Indikator oder erscheint.
-
Page 76: Datenausgang
Der fehlerfreie Betrieb ist nur mit dem entsprechenden KERN- Schnittstellenkabel (Option) sichergestellt. • Kommunikationsparameter (Baudrate, Bits und Parität) von Waage und Dru- cker müssen übereinstimmen. 16.1 Pinbelegung Durch Anschluss des optionalen KERN-Schnittstellenkabels ist die Waage mit einer RS232C-Schnittstelle ausgestattet. Waage (RS-232C) ABS-N_ABJ-NM-BA-d-17151... -
Page 77: Ausgabe-Funktionen
16.2 Ausgabe-Funktionen 16.2.1 Automatische Datenausgabe / Auto Print Funktion Die Datenausgabe erfolgt automatisch ohne Drücken von PRINT, sobald die ent- sprechende Ausgabebedingung erfüllt ist. Diese wird durch die Menüeinstellung defi- niert. Tab. 1: stabil / stabil / ne- Stabilisierung / Check- positiv gativ... - Page 78 Weitere Schritte sind von der gewünschten Einstellung abhängig: Stabilitäts- Funktion einstellen/aktualisieren abbrechen anzeige ( ) PRINT drücken und TARE drücken und weiter bei Schritt 3. weiter bei Schritt 5. Nein TARE drücken und weiter bei Schritt 5. weiter bei Schritt 3. 3.
-
Page 79: Kontinuierliche Datenausgabe / Continuous Output Funktion
16.2.2 Kontinuierliche Datenausgabe / Continuous Output Funktion (nur Modelle ABS-N) 1. Data Output-Menü aufrufen Im Wägemodus PRINT 3 s lang drücken. 2. Funktion anwählen Navigationstasten ( ) wiederholt drücken bis „APL.PRN“ angezeigt wird. Mit PRINT bestätigen Navigationstasten ( ). wiederholt drücken bis „SEQ.PRN“... - Page 80 4. Filter zuschalten Navigationstasten ( ) wiederholt drücken bis „NO.FIL“ angezeigt wird. Die aktuelle Einstellung wird durch die Stabilitätsanzeige ( ) gekennzeichnet. Mit ( ) Wägewert wird gefiltert Ohne ( ) Wägewert wird nicht gefiltert Mit TARE ändern 5.
-
Page 81: Output Timing Change Funktion
16.2.3 Output Timing Change Funktion Mit dieser Funktion ist wählbar, ob die Datenausgabe bei stabilem oder instabilem Wägewert nach Drücken von PRINT erfolgt. 1. Data Output-Menü aufrufen Im Wägemodus PRINT 3 s lang drücken. 2. Funktion anwählen Navigationstasten ( ) wiederholt drücken bis „APL.PRN“... -
Page 82: Glp Output Funktion / Waagenidentifikationsnummer
Mit der GLP Output Funktion werden Ausdrucke von Wägeergebnissen mit einer Kopf- und Fußzeile ergänzt. Inhalt der Kopf- und Fußzeile siehe nachfolgendes Aus- druckbeispiel. GLP Output Funktion aktivieren, s. Kap. 8.3 Waagenidenifikationsnummer eingeben, s. Kap. 8.4 Ausdruckbeispiel: KERN & Sohn GmbH Firma TYPE ABJ 220-4NM Modell SN WBIIAB000I Serien-Nr. -
Page 83: Kommunikationsparameter
Tabelle). Im Menüpunkt „MODE U“ können alle Parameter benutzerdefiniert eingestellt werden (s. Kap. 16.3.2). Einstellung Stan- Stan- Stan- Stan- Stan- Benutzer- für KERN – dardein- dardein- dardein- dardein- dardein- definierte YKB-01N stellung 1 stellung 2 stellung 3... -
Page 84: Auswahl Einer Standardeinstellung „Mode 1 - Mode 5
16.3.1 Auswahl einer Standardeinstellung „MODE 1 - MODE 5“ 1. Data Output-Menü aufrufen Im Wägemodus PRINT 3 s lang drücken. 2. Funktion anwählen Navigationstasten ( ) wiederholt drücken bis „COMM.SET“ angezeigt wird. Mit PRINT bestätigen Navigationstasten ( ). wiederholt drücken bis der ge- wünschte Modus „MODE 1 - MODE 5“... -
Page 85: Benutzerdefinierte Einstellungen „Mode U" / Einstellung Für Kern -Ykb-01N
16.3.2 Benutzerdefinierte Einstellungen „MODE U“ / Einstellung für KERN –YKB-01N Im Menüpunkt „MODE U“ kann jeder Kommunikationsparameter individuell einge- stellt werden. 1. Data Output-Menü aufrufen Im Wägemodus PRINT 3 s lang drücken. 2. Funktion anwählen Navigationstasten ( ) wiederholt drücken bis „COMM.SET“... - Page 86 3. Kommunikationsgeschwindigkeit (Baudrate) einstellen PRINT drücken Navigationstasten ( ) wiederholt drücken bis „BPS“ angezeigt wird. PRINT drücken. Die aktuelle Einstellung wird durch die Stabilitätsanzeige ( ) gekennzeichnet. Navigationstasten ( ). wiederholt drücken bis die ge- wünschte Einstellung (z. B. 9600 bps) angezeigt wird. ...
- Page 87 5. Stopp-Bit einstellen Mit ON/OFF zurück ins Menü Navigationstasten ( ) wiederholt drücken bis „STOP“ angezeigt wird. PRINT drücken. Die aktuelle Einstellung wird durch die Stabilitätsanzeige ( ) gekennzeichnet. Navigationstasten ( ). wiederholt drücken bis die ge- wünschte Einstellung (z.
- Page 88 7. Datenformat einstellen Mit ON/OFF zurück ins Menü Navigationstasten ( ) wiederholt drücken bis „D.FORM“ angezeigt wird. PRINT drücken. Die aktuelle Einstellung wird durch die Stabilitätsanzeige ( ) gekennzeichnet. Navigationstasten ( ). wiederholt drücken bis die ge- wünschte Einstellung (z.
-
Page 89: Datenformate
Nicht benötigte Positionen = Leerzeichen 20H Evt. Überlast (overload) wird in 2 Positionen mit O L dargestellt Wägeeinheit Trennzeichen C/R = 0DH, L/F = 0AH Bei CR+LF wird die Datenlänge erhöht Ausdruckbeispiele KERN YKB-01N 9.9949g Stabiler oder instabiler/positiver Wägewert -9.9949g Stabiler oder instabiler/negativer Wägewert ABS-N_ABJ-NM-BA-d-1715... - Page 90 Nicht benötigte Positionen = Leerzeichen 20H Evt. Überlast (overload) wird in 2 Positionen mit O L dargestellt Wägeeinheit Trennzeichen C/R = 0DH, L/F = 0AH Bei CR+LF wird die Datenlänge erhöht Ausdruckbeispiele KERN YKB-01N 9.9949 g Stabiler/positiver Wägewert 9.9949 g Instabiler/positiver Wägewert -9.9949 g Stabiler/negativer Wägewert...
- Page 91 Evt. Überlast (overload) wird in 2 Positionen mit O L dargestellt Wägeeinheit Trennzeichen C/R = 0DH, L/F = 0AH Bei CR+LF wird die Datenlänge erhöht Ausdruckbeispiele KERN YKB-01N +9.9949 g Stabiler oder instabiler/positiver Wägewert -9.9949 g Stabiler oder instabiler/negativer Wägewert...
- Page 92 Nicht benötigte Positionen = Leerzeichen 20H Evt. Überlast (overload) wird in 2 Positionen mit O L dargestellt Wägeeinheit Trennzeichen C/R = 0DH, L/F = 0AH Bei CR+LF wird die Datenlänge erhöht Ausdruckbeispiele KERN YKB-01N +9.9949 g Stabiler /positiver Wägewert +9.9949 g Instabiler/positiver Wägewert -9.9949 g Stabiler/negativer Wägewert...
-
Page 93: Fernsteuerbefehle
16.5 Fernsteuerbefehle Befehl Funktion Fortlaufende Datenausgabe Fortlaufende Datenausgabe stabiler Wägewerte Status der Stabilitätsanzeige wird bei der fortlaufende Ausga- be den Daten angehängt. U: instabil S: stabil Einmalige Ausgabe Automatische Ausgabe Einmalige Ausgabe. Status der Stabilitätsanzeige wird bei der Ausgabe den Daten angehängt. U: instabil (nur Modelle ABS-N) S: stabil Einmalige Ausgabe bei stabilem Wägewert... -
Page 94: Wartung, Instandhaltung, Entsorgung
17 Wartung, Instandhaltung, Entsorgung 17.1 Reinigen Vor der Reinigung das Gerät bitte von der Betriebsspannung trennen. Abb. 1: Waage reinigen 1. Anzeige Keine aggressiven Reinigungsmittel (Lösungsmittel o.Ä.) ver- wenden, sondern nur ein mit milder Seifenlauge angefeuchtetes Tuch. 2. Wägeplatte Wägeplatte entfernen, nass reinigen und vor dem Anbringen trocknen 3. - Page 95 1. Schirmring, Wägeplatte und Träger der Wägeplatte entfernen 2. Plastikgriff durch Drehen entfernen. Aufnahme der Wägeplatte nicht berühren. Die Waage könnte dadurch beschädigt werden. 3. Glastüre vorsichtig lt. Abb. entfernen. Abb. 2: Glastüren entfernen 4. Glastüre in umgekehrter Reihenfolge wieder anbringen. Zur Sicherung des Glastüre den Plastikgriff unbedingt wieder anbringen.
-
Page 96: Wartung, Instandhaltung
17.2 Wartung, Instandhaltung Das Gerät darf nur von geschulten und von KERN autorisierten Servicetechnikern geöffnet werden. Vor dem Öffnen vom Netz trennen. 17.3 Entsorgung Die Entsorgung von Verpackung und Gerät ist vom Betreiber nach gültigem nationa- lem oder regionalem Recht des Benutzerortes durchzuführen. -
Page 97: Fehlermeldungen
18.1 Fehlermeldungen Fehlermeldung Erläuterung Abhilfe Waage aus- und nochmals ein- schalten. Bleibt die Fehlermel- ERR H Hardware-Fehler dung erhalten, Händler benach- richtigen. Hohe Nullpunktverschiebung während der Justierung Mit ON/OFF zurück in den Wä- ERR C Gegenstände befinden sich gemodus. Justiervorgang neu auf der Wägeplatte starten. - Page 98 Automatic adjustment by PSC (Perfect Self Calibration), only models ABJ....20 Menu settings „I.CAL“ / „E.CAL“ ..................23 8.2.1 Adjustment with internal weight (KERN ABJ) ................24 8.2.2 Adjustment with external weight (KERN ABS) ................. 25 Adjustment log ........................26 Balance identification no.
- Page 99 Communication parameters ....................82 16.3.1 Selection of a standard setting „MODE 1 - MODE 5“ ............83 16.3.2 User-defined settings „MODE U“ / setting for KERN –YKB-01N ........84 16.4 Data Formats ........................... 88 16.5 Remote control instructions ....................92 Service, maintenance, disposal ..............
-
Page 100: Technical Specifications
1 Technical Specifications KERN 80-4NM 120-4NM 220-4NM 320-4NM Readability (d) 0.1 mg 0.1 mg 0.1 mg 0.1 mg Weighing range (max) 82 g 120 g 220 g 320 g Minimum load (Min) 10 mg 10 mg 10 mg 10 mg... - Page 101 KERN ABS 80-4N ABS 120-4N Readability (d) 0.1 mg 0.1 mg Weighing range (max) 82 g 120 g Reproducibility 0.2 mg 0.2 mg Linearity ± 0.3 mg ± 0.3 mg Recommended adjusting 80 g (E2) 100 g (E2) weight not supplied (class)
- Page 102 KERN ABS 220-4N ABS 320-4N Readability (d) 0.1 mg 0.1 mg Weighing range (max) 220 g 320 g Reproducibility 0.2 mg 0.2 mg Linearity ± 0.3 mg ± 0.3 mg Recommended adjusting 200 g (E2) 300 g (E2) weight not supplied (class) Stabilization time 3 sec.
-
Page 103: Declaration Of Conformity
2 Declaration of conformity To view the current EC/EU Declaration of Conformity go to: www.kern-sohn.com/ce The scope of delivery for verified weighing balances (= conformity-rated weighing balances) includes a Declaration of Conformity. ABS-N_ABJ-NM-BA-e-1715... -
Page 104: Appliance Overview
3 Appliance overview 1. Weighing plate 2. Display 3. Keyboard 4. Levelling screw 5. Bubble level 6. Name plate 7. Wind protection 8. Appliance interface 9. Mains adapter connection ABS-N_ABJ-NM-BA-e-1715... -
Page 105: Keyboard Overview
3.1 Keyboard overview In menu: Function Designation: Pressed once and Keep pressed for In menu released about 3 seconds Menu item back. Return to weighing Switches between mode: ON/OFF the operation and Press ON/OFF standby modes. repeatedly or for 3 s. Cancel procedure Invoke calibration Start adjustment... -
Page 106: Numeric Entry
3.1.1 Numeric entry Designation: Function Increase flashing digit Navigation key Shift flashing decimal dot to the left Decrease flashing digit Navigation key Shift flashing decimal dot to the right Navigation key Digit selection to the right Navigation key Confirm entry Cancel input With numerical input the indicator [#] appears. -
Page 107: Overview Of Displays
3.2 Overview of displays Symbols Numerical display/menu Units Display Description see chpt. Battery symbol Zero tracking function active Chpt.12.1 Chpt. 8.2.1 Displays adjustment Chpt. 8.1 Flashes prior to start of automatic adjustment, only models ABJ Chpt.13.1 Stability and reaction settings via „Easy Setting display“ Chpt. -
Page 108: Basic Information (General)
The structure of the balance may not be modified. This may lead to incorrect weighing results, safety-related faults and destruction of the balance. The balance may only be used according to the described conditions. Other areas of use must be released by KERN in writing. 4.3 Warranty Warranty claims shall be voided in case •... -
Page 109: Monitoring Of Test Resources
(www.kern-sohn.com with regard to the monitoring of balance test substances and the test weights required for this. In KERN’s accredited DKD calibration laboratory test weights and balances may be calibrated (return to the national standard) fast and at moderate cost. -
Page 110: Packaging / Return Transport
6.2 Packaging / return transport Keep all parts of the original packaging for a possibly required return. Only use original packaging for returning. Prior to dispatch disconnect all cables and remove loose/mobile parts. Reattach possibly supplied transport securing devices. ... - Page 111 ABS-N_ABJ-NM-BA-e-1715...
-
Page 112: Unpacking, Setup And Commissioning
7 Unpacking, Setup and Commissioning 7.1 Installation Site, Location of Use The balances are designed in a way that reliable weighing results are achieved in common conditions of use. You will work accurately and fast, if you select the right location for your balance. Therefore, observe the following for the installation site: •... -
Page 113: Scope Of Delivery / Serial Accessories
7.2.1 Scope of delivery / serial accessories Balance Weighing plate Carrier weighing plate Screening ring Mains adapter Operating instructions Menu overview ABS-N_ABJ-NM-BA-e-1715... -
Page 114: Placing
7.2.2 Placing Attach circular screen, carrier of weighing plate and weighing plate in order. Level balance with foot screws until the air bubble of the water balance is in the prescribed circle. Check levelling regularly ABS-N_ABJ-NM-BA-e-1715... -
Page 115: Mains Connection
Before connecting or disconnecting of additional devices (printer, PC) to the data interface, always disconnect the balance from the power supply. With your balance, only use accessories and peripheral devices by KERN, as they are ideally tuned to your balance. -
Page 116: Adjustment
8 Adjustment As the acceleration value due to gravity is not the same at every location on earth, each balance must be coordinated - in compliance with the underlying physical weighing principle - to the existing acceleration due to gravity at its place of location (only if the balance has not already been adjusted to the location in the factory). - Page 117 Case 1: The load on the weighing plate is near zero. The weight symbol flashes for approx. two minutes, followed by „PSC.RUN“. After that the internal adjustment is started automatically. In order to ensure proper PSC operation, prevent vibrations and air flow. ...
- Page 118 Case 2: Weighing plate loaded The gram display flashes for two minutes, followed by „PLS.CAL“. Unload weighing plate. The gram display flashes again for 2 minutes; after that the internal adjustment is started automatically. In order to ensure proper PSC operation, prevent vibrations and air flow.
-
Page 119: Menu Settings „I.cal" / „E.cal
8.2 Menu settings „I.CAL“ / „E.CAL“ To invoke the adjustment function in weighing mode, press CAL for 3 sec. Acknowledge using PRINT, the current setting is displayed. Select the desired adjustment using the navigation keys ( ) I.CAL: Adjustment with internal weight (see chpt. -
Page 120: Adjustment With Internal Weight (Kern Abj)
8.2.1 Adjustment with internal weight (KERN ABJ) With the internal adjustment weight, the weighing accuracy can be checked and re- adjusted at any time. • Condition: Menu setting „I.CAL“. • When an optional printer is connected and the GLP function activated, while starting the adjustment log „WAIT“... -
Page 121: Adjustment With External Weight (Kern Abs)
8.2.2 Adjustment with external weight (KERN ABS) • Condition: Menu setting „E.CAL“. • The weight to be used depends on the capacity of the scale. Carry out adjustment as near as possible to the balance’s maximum weight (recommended adjustment weight see chpt. 1). Weights of different nominal values or tolerance classes may be used for adjustment but are not optimal for technical measuring. -
Page 122: Adjustment Log
This function enables automatic log issue after each adjustment. These logs may be issued by using an optional printer. Printout example (KERN YKB-01N): - - - - - - - - - - - - - - - - - CAL –EXTERNAL... -
Page 123: Balance Identification No
How to change settings Press TARE Press ON/OFF repeatedly or for 3 sec., the balance will return into weighing mode 8.4 Balance identification no. This setting is for the balance ID number that is output along with the adjustment report. Call up menu ... -
Page 124: Verification
9 Verification General introduction: According to EU directive 90/384/EEC or 2009/23EG balances must be officially verified if they are used as follows (legally controlled area): a) For commercial transactions if the price of goods is determined by weighing. b) For the production of medicines in pharmacies as well as for analyses in the medical and pharmaceutical laboratory. - Page 125 Position of seals Seal Data plate Seal ABS-N_ABJ-NM-BA-e-1715...
-
Page 126: Weighing
10 Weighing 10.1 Switch-on balance / call-up weighing mode Status balance Call-up weighing mode Display switched off Press ON/OFF. After display press any key Display Press any key Display All segments light up Balance is in menu Press ON/OFF repeatedly or for 3 sec. After numeric input 10.2 Switch off the balance ... -
Page 127: Set The Start Display
10.3 Set the start display For the start display you can choose between three types. Start display Explanation Menu setting 1. Weighing mode After connection to the power supply the balance will start in weighing mode. 2. Display After connection to the power supply the balance displays After pressing a certain key the balance will carry out a segment... - Page 128 Call up menu In weighing mode press the MENU button twice Select menu item Press the navigation buttons ( ) repeatedly until „TOOLS“ is displayed. Confirm with PRINT Press the navigation buttons ( ) repeatedly until „SYSTEM“ is displayed. ...
-
Page 129: Auto Power-Off Function (Automatic Switch-Off Function)
10.4 Auto Power-Off function (automatic switch-off function) To save battery when function is enabled backlight of display will automatically switch off after a defined time during which there was no change of load or activity. 1. Call up menu In weighing mode press the MENU button twice 2. -
Page 130: Simple Weighing
When an optional printer is connected, the weighing value can be edited. Print-out example with enabled GLP function (see chpt. 8.3): - - - - - - - - - - - - - - - - - Company KERN & Sohn GmbH TYPE ABJ 220-4NM Model SN WBIIAB000I Serial no. -
Page 131: Taring
10.6 Taring The dead weight of any weighing container may be tared away by pressing a button, so that the following weighings show the net weight of the goods to be weighed. Put vessel of goods to be weighed on weighing plate and close the wind screen doors. -
Page 132: Switch-Over Weighing Unit
10.7 Switch-over weighing unit By pressing the UNIT key, the display can be switched over to the units enabled before in the menu. Call up menu In weighing mode press the UNIT key for 3 sec. The current setting is marked by the stability display ( ). With stability display ( ) Unit enabled Without stability display ( ) -
Page 133: Freely Programmable Weighing Unit
10.7.1 Freely programmable weighing unit Call up menu In weighing mode press the UNIT key for 3 sec. Use the navigation buttons ( ) to select „UNIT.U“. The current setting is marked by the stability display ( ). With stability display ( ) Unit enabled Without stability display ( ) Unit disabled... -
Page 134: Change Position Of Decimal Dot For Freely Programmable Weighing Unit
10.7.2 Change position of decimal dot for freely programmable weighing unit The position of the decimal dot can only be changed by a numeric input of the conversion factor (see chpt. 9.7.1, step 2). When the first cipher flashes, press PRINT repeatedly until the decimal dot flashes. -
Page 135: Change Readability (1D/10D)
10.8 Change readability (1D/10D) Call up menu In weighing mode press the MENU button twice Select menu item Press the navigation buttons ( ) repeatedly until „TOOLS“ is displayed. Confirm with PRINT Press the navigation buttons ( ) repeatedly until „TARGET“... -
Page 136: Display Decimal Dot As Point Or Comma
10.9 Display decimal dot as point or comma Call up menu In weighing mode press the MENU button twice Select menu item Press the navigation buttons ( ) repeatedly until „TOOLS“ is displayed. Confirm with PRINT Press the navigation buttons ( ) repeatedly until „SYSTEM“... -
Page 137: Menu
11 Menu To adapt the behaviour of the balance to your requirements, go to the menu. Usually the default setting of the menu is such that you do not need to make any changes. If you encounter special conditions of use, go to the menu in order to set your balance according to your individual requirements. -
Page 138: Navigation In The Menu
11.2 Navigation in the menu • How to invoke a menu, see chpt. 11 • Menu structure • Select and pass through menu items to bottom (). • Select setting within one function • Select and pass through menu items to top (). •... -
Page 139: Menu Overview
11.3 Menu overview See also the attached menu map ABS-N_ABJ-NM-BA-e-1715... -
Page 140: Resetting The Menu
11.4 Resetting the menu This will return all the settings to factory setting. The reference value stored in previous use of piece counting or percentage conversion will also be cleared. Factory settings are marked by a “ ” in the menu oversight. Call up menu ... -
Page 141: Menu Lock
11.5 Menu Lock The menu setting operations can be locked so that the settings cannot be inadvertently changed. This menu lock is set with the following procedure. Either Switch-on power supply of the balance and wait until „OFF“ is displayed ... -
Page 142: Change Password
11.5.1 Change password Standard password (factory setting): „9999“ Call up menu In weighing mode press the MENU button twice Select menu item Press the navigation buttons ( ) repeatedly until „TOOLS“ is displayed. Confirm with PRINT Press the navigation buttons ( ) repeatedly until „SYSTEM“... -
Page 143: Log Menu Settings
11.6 Log menu settings When an optional printer is connected, a list of the current menu settings can be printed out. Data output, see chpt. 16 Call up menu In weighing mode press the MENU button twice Select menu item ... -
Page 144: Zero / Tare Menu (Zeroing And Taring Functions)
12 Zero / tare menu (zeroing and taring functions) Selectable functions: 1. Zero tracking function This function is used to correct automatically small weight variations which appear directly after see chpt 12.1 switching-on. In the event that small quantities are removed or added to the material to be weighed, incorrect weighing results can be displayed due to the “stability compensation“... - Page 145 12.1 Zero tracking function The zero tracking function „A.ZERO“ is turned-on by factory. 1. Check menu setting Zero tracking symbol Zero tracking function switched on is displayed switched off is not displayed 2. Call function In weighing mode press TARE for 3 sec. and if necessary press repeatedly the navigation buttons (...
- Page 146 12.2 Auto zero function The auto zero function is not available when formula mode is enabled (see chapter 14.3). 1. Call up menu Press TARE for 3 sec. in weighing mode. 2. Select function Press the navigation buttons ( ) repeatedly until „A.ZERO“...
- Page 147 12.3 Auto Tare function 1. Call up menu Press TARE for 3 sec. in weighing mode. 2. Select function Press the navigation buttons ( ) repeatedly until „A.TARE“ is displayed. The current setting is marked by the stability display ( ). With stability display ( ) Function turned on Without stability display ( )
- Page 148 12.4 Zero / tare timing change function The zero / tare timing change function can be switched-on, when the „Auto zero“ and the „Auto tare“ function are enabled. 1. Call up menu Press TARE for 3 sec. in weighing mode. ...
-
Page 149: Settings For Stability And Response
13 Settings for Stability and Response Exists the possibility to tune the stability of the display and the degree of reaction of the balance to the requirements of certain applications or the environmental conditions. Most measurements can be carried out using default settings, that is, standard mode. In standard weighing mode, stability and reaction have the same priority. -
Page 150: Selection Weighing / Dosing Mode
13.2 Selection weighing / dosing mode Call-up weighing mode: This is the default setting. Use this mode, when neither stability nor reaction time must be increased or reduced. Call up menu In weighing mode press the MENU button twice Select menu item ... -
Page 151: Standstill Width
13.3 Standstill width If the stability display lights up ( ), the weighing result will be stable within the range indicated by the standstill width. Set range for stability determination: Call up menu In weighing mode press the MENU button twice Select menu item ... - Page 152 Set reaction time: Call up menu In weighing mode press the MENU button twice Select menu item Press the navigation buttons ( ) repeatedly until „TOOLS“ is displayed. Confirm with PRINT Press the navigation buttons ( ) repeatedly until „PARAMW“...
-
Page 153: Application Functions
14 Application Functions • The application functions can be combined with the check weighing or target function (see chpt. 14). • The balance starts in the mode, in which it has been switched off. • For switching over between application and weighing mode, press MENU for 3 sec. - Page 154 Set reference Place an empty container on the balance and tare it by pressing TARE. Press MENU twice. Press the navigation buttons ( ) repeatedly until the desired reference quantity is displayed (possible reference quantities 5, 10, 20, 50, 100). Use MENU to scroll forward.
- Page 155 Or count more pieces The menu item to change the stored reference is called up, the currently set reference quantity is displayed. see „4. Change or add piece weight“ The stored piece weight is displayed in grams, marked by the symbol .
-
Page 156: Percent Determination
14.2 Percent determination Percent weighing allows to display weight in percent, in relation to a reference weight. The balance offers two possibilities: 1. Reference = 100 % 2. Reference = defined by user Call up menu In weighing mode press the MENU button twice Select percent weighing mode ... -
Page 157: Reference Weight = 100
14.2.1 Reference weight = 100 % Select percent weighing mode, see chpt. 14.2 Press TARE. If necessary, press the navigation buttons ( ) repeatedly until „SAMPLE“ is displayed. Press TARE. Display, if no reference weight is stored Display, if a reference weight is stored Set reference ... -
Page 158: User-Defined Reference
14.2.2 User-defined reference Select percent weighing mode, see chpt. 13.2 Press TARE. If necessary, press the navigation buttons ( ) repeatedly until „OPTION“ is displayed. Press TARE. Display, if no reference is stored Display, if a reference is stored Set reference ... -
Page 159: Percent Determination
14.2.3 Percent determination In weighing mode press MENU for 3 sec., the currently set percentage determination mode is displayed. Place an empty container on the balance and tare it by pressing TARE. Place goods to be weighed on balance. The weight of the sample is displayed in percentage in terms of the reference weight. -
Page 160: Formula Mode
14.3 Formula mode The formula function allows to add on various components of a mixture. For check purpose, the weight of all components (CMP001, (CMP002 etc.), as well as the total weight (TOTAL) can be printed out. The balance works with a separated memory for the weight of the weighing container and of the formula components. - Page 161 When the symbol is displayed, the balance is ready for further measurements. 6. Return to weighing mode Press ON/OFF for 3 sec. Printout example „GLP ON“ (KERN YKB-01N): Company Model Serial no. ID no. prepared by...
-
Page 162: Enable Edition „Component No
(e.g. CMP001) without ( ) No edition „component no.“ Change using TARE. Back to formula mode Press ON/OFF repeatedly or for 3 sec. Printout examples (KERN YKB-01N): Function ELM.NUM enabled Function ELM.NUM disabled FORMULATION MODE FORMULATION MODE CMP001= 0.5361 g... -
Page 163: Enable Issue „Total
Issue „TOTAL“ without ( ) No issue „TOTAL“ Change using TARE. Back to formula mode Press ON/OFF repeatedly or for 3 sec. Printout examples (KERN YKB-01N): Function TOTAL enabled Function TOTAL disabled FORMULATION MODE FORMULATION MODE CMP001= 0.5361 g CMP001= 0.5361 g... -
Page 164: Check Weighing And Target Mode (Check And Target Weighing)
15 Check weighing and target mode (check and target weighing) • The check weighing or target mode can be applied for the application functions (see chpt. 14). • The balance starts in the mode, in which it has been switched off. 15.1 Check weighing In many cases not the nominal value of the weighed goods is the decisive parameter, but the deviation from this nominal value. - Page 165 0. Call up menu In weighing mode press the MENU button twice 1. Select function Press the navigation buttons ( ) repeatedly until „TOOLS“ is displayed. Confirm with PRINT Press the navigation buttons ( ) repeatedly until „CHECK.W“...
- Page 166 Confirm with TARE. Press the navigation buttons ( ) repeatedly until „LO.LIM“ is displayed. Press TARE. The current setting will be displayed. Use the navigation buttons ( ) to enter the desired value, see chpt. 3.1.1 „Numeric input“. ...
- Page 167 3. Return to weighing mode Press ON/OFF repeatedly or for 3 sec. 4. Start tolerance control If necessary, place an empty container on the balance and tare it by pressing TARE. Place weighed goods and wait until the indicator appears.
-
Page 168: Target Mode
15.2 Target mode This mode e.g. is used for weighing constant liquid quantities or for assessment of missing quantities or excess quantities. The target value is the numeric value which corresponds to the nominal quantity of the used unit. Beside the target value a tolerance value is entered. This is a numerical value which is plus/minus over or under the acceptable target value. - Page 169 1. Call up menu In weighing mode press the MENU button twice 2. Select function Press the navigation buttons ( ) repeatedly until „TOOLS“ is displayed. Confirm with PRINT Press the navigation buttons ( ) repeatedly until „TARGT“...
- Page 170 Confirm with TARE. 4. Return to weighing mode Press ON/OFF repeatedly or for 3 sec. 5. Start tolerance control If necessary, place an empty container on the balance and tare it by pressing TARE. Place weighed goods and wait until the indicator appears.
-
Page 171: Data Output
Faultless operation requires an adequate KERN interface cable (optional). • Communication parameters (baud rate, bits and parity) of balance and printer must match. 16.1 Pin connection Due to connection of an optional KERN interface cable the balance is equipped with a RS232C interface. Balance (RS-232C) ABS-N_ABJ-NM-BA-e-1715... -
Page 172: Issue Functions
16.2 Issue functions 16.2.1 Automatic data output / Auto Print function Data output ensues automatically without pressing PRINT, as soon as the respective output condition is fulfilled. This is defined by the menu setting. Tab. 1: stable / stable / Stabilisation / Check positive... - Page 173 Further steps depend on the desired setting: Stability Function set/update cancel display ( ) Press PRINT and Press TARE and continue with step 3. continue with step 5. Press TARE and continue with step 5. continue with step 3. 3.
-
Page 174: Continuous Output Function
16.2.2 Continuous Output function (only models ABS-N) 1. Invoke Data Output menu Press PRINT for 3 sec. in weighing mode. 2. Select function Press the navigation buttons ( ) repeatedly until „APL.PRN“ is displayed. Confirm with PRINT ... - Page 175 4. Connect filter Press the navigation buttons ( ) repeatedly until „NO.FIL“ is displayed. The current setting is marked by the stability display ( ). with ( ) Weighing value is filtered without ( ) Weighing value is not filtered ...
-
Page 176: Output Timing Change Function
16.2.3 Output Timing Change function This function allows to select if the data output shall ensue with stable or instable weighing value after pressing PRINT. 1. Invoke Data Output menu Press PRINT for 3 sec. in weighing mode. 2. Select function ... -
Page 177: Glp Output Function / Balance Identification Number
Contents of the headline and bottom row see following printout example. Enable GLP Output function, see chpt. 8.3 Enter balance identification number, see chpt. 8.4 Printout example: KERN & Sohn GmbH Company TYPE ABJ 220-4NM Model SN WBIIAB000I Serial no. -
Page 178: Communication Parameters
In the menu item „MODE U“ all parameters can be set defined by user (see chpt. 16.3.2). Setting for Standard Standard Standard Standard Standard User-defined KERN – setting 1 setting 2 setting 3 setting 4 setting 5 settings YKB-01N Menu... -
Page 179: Selection Of A Standard Setting „Mode 1 - Mode 5
16.3.1 Selection of a standard setting „MODE 1 - MODE 5“ 1. Invoke Data Output menu Press PRINT for 3 sec. in weighing mode. 2. Select function Press the navigation buttons ( ) repeatedly until „COMM.SET“ is displayed. ... -
Page 180: User-Defined Settings „Mode U" / Setting For Kern -Ykb-01N
16.3.2 User-defined settings „MODE U“ / setting for KERN –YKB-01N In the menu item „MODE U“ every communication parameter can be set individually. 1. Invoke Data Output menu Press PRINT for 3 sec. in weighing mode. 2. Select function ... - Page 181 3. Set the communication speed (Baud rate) Press PRINT Press the navigation buttons ( ) repeatedly until „START“ is displayed. Press PRINT. The current setting is marked by the stability display ( ). Press the navigation buttons ( ) repeatedly until the desired setting (e.g.
- Page 182 5. Stop bit settings Use ON/OFF to return to menu Press the navigation buttons ( ) repeatedly until „STOP“ is displayed. Press PRINT. The current setting is marked by the stability display ( ). Press the navigation buttons ( ) repeatedly until the desired setting (e.g.
- Page 183 7. Set data format Use ON/OFF to return to menu Press the navigation buttons ( ) repeatedly until „D.FORM“ is displayed. Press PRINT. The current setting is marked by the stability display ( ). Press the navigation buttons ( ) repeatedly until the desired setting (e.g.
-
Page 184: Data Formats
Where necessary, Overload is displayed in 2 positions with O L Weighing unit Separator C/R = 0DH, L/F = 0AH At CR+LF data length will be increased Printout examples KERN YKB-01N 9.9949g Stable or instable/positive weighing value -9.9949g Stable or instable/negative weighing value... - Page 185 Where necessary, Overload is displayed in 2 positions with O L Weighing unit Separator C/R = 0DH, L/F = 0AH At CR+LF data length will be increased Printout examples KERN YKB-01N 9.9949 g Stable/positive weighing value 9.9949 g Instable/positive weighing value -9.9949 g...
- Page 186 Where necessary, Overload is displayed in 2 positions with O L Weighing unit Separator C/R = 0DH, L/F = 0AH At CR+LF data length will be increased Printout examples KERN YKB-01N +9.9949 g Stable or instable/positive weighing value -9.9949 g Stable or instable/negative weighing value...
- Page 187 Where necessary, Overload is displayed in 2 positions with O L Weighing unit Separator C/R = 0DH, L/F = 0AH At CR+LF data length will be increased Printout examples KERN YKB-01N +9.9949 g Stable/positive weighing value +9.9949 g Instable/positive weighing value -9.9949 g...
-
Page 188: Remote Control Instructions
16.5 Remote control instructions Command Function Continuous data output Continuous data output of stable weighing values Status of stability display is attached to the data in the continuous output. U: instable S: stable Single output Automatic output Single output. Status of stability display is attached to the data in the output. -
Page 189: Service, Maintenance, Disposal
17 Service, maintenance, disposal 17.1 Cleaning Before cleaning, disconnect the appliance from the operating voltage. Fig. 1: Clean the balance 1. Display Please do not use aggressive cleaning agents (solvents or similar agents), but a cloth dampened with mild soap suds. 2. - Page 190 1. Remove, screening ring, weighing plate and carrier of weighing plate 2. Remove the plastic handle by turning. Do no touch the support of the weighing plate. This could cause damage to the balance. 3. Remove glass door carefully acc. to fig.
-
Page 191: Service, Maintenance
17.2 Service, maintenance The appliance may only be opened by trained service technicians who are authorized by KERN. Before opening, disconnect from power supply. 17.3 Disposal Disposal of packaging and appliance must be carried out by operator according to valid national or regional law of the location where the appliance is used. -
Page 192: Error Messages
18.1 Error messages Error message Explication Remedy Switch balance off and on ERR H Hardware error again. If the error message remains inform manufacturer. High zero point shift during adjustment Use ON/OFF to return into ERR C Objects present on weighing weighing mode. - Page 193 Ajustage ......................20 Ajustage automatique par PSC uniquement les modèles ABJ ........20 Réglages du menu „I.CAL“ / „E.CAL“ .................. 23 8.2.1 Ajustage avec poids interne (KERN ABJ) ................24 8.2.2 Ajustage avec poids externe (KERN ABS)................25 Protocole d’ajustage ......................26 N°...
- Page 194 Paramètres de communication ..................... 82 16.3.1 Sélection d’un réglage standard „MODE 1 - MODE 5“ ............83 16.3.2 Réglages définis par l’utilisateur „MODE U“ / réglage pour KERN –YKB-01N ....84 16.4 Formats de données ......................88 16.5 Commandes à distance ......................92 Maintenance, entretien, élimination ............
-
Page 195: Caractéristiques Techniques
1 Caractéristiques techniques KERN 80-4NM 120-4NM 220-4NM 320-4NM Lisibilité (d) 0.1 mg 0.1 mg 0.1 mg 0.1 mg Plage de pesée (max) 120 g 220 g 320 g 82 g 10 mg 10 mg 10 mg Charge minimale (Min) 10 mg... - Page 196 KERN ABS 80-4N ABS 120-4N Lisibilité (d) 0.1 mg 0.1 mg Plage de pesée (max) 82 g 120 g Reproductibilité 0.2 mg 0.2 mg Linéarité ± 0,3 mg ± 0,3 mg Poids d’ajustage recommandé 80 g (E2) 100 g (E2) n’est pas joint (catégorie)
- Page 197 KERN ABS 220-4N ABS 320-4N Lisibilité (d) 0.1 mg 0.1 mg Plage de pesée (max) 220 g 320 g Reproductibilité 0.2 mg 0.2 mg Linéarité ± 0.3 mg ± 0.3 mg Poids d’ajustage recommandé 200 g (E2) 300 g (E2) n’est pas joint (catégorie)
-
Page 198: Déclaration De Conformité
2 Déclaration de conformité Vous trouvez la déclaration de conformité CE- UE actuelle online sous: www.kern-sohn.com/ce Dans le cas de balances étalonnées (= de balances à la conformité évaluée) la déclaration de conformité est comprise dans les fourni- tures. ABS-N_ABJ-NM-BA-f-1715... -
Page 199: Aperçu De L'appareil
3 Aperçu de l’appareil 1. Plateau de pesée 2. Affichage 3. Clavier 4. Vis des pieds 5. Bulle d’air 6. Plaque-type 7. Pare-brise 8. Interface équipements 9. Raccord adaptateur secteur ABS-N_ABJ-NM -BA-f-1715... -
Page 200: Vue D'ensemble Du Clavier
3.1 Vue d’ensemble du clavier dans le menu: Fonction Désig- Touche Appeler une fois et Tenir appuyé env. nation Im Menü libérer de nouveau trois secondes Point de menu retour. mode de pesage : Bascule entre le Répéter l’appel de ON/OFF Mode opération ON/OFF ou appuyer... -
Page 201: Saisie Numérique
3.1.1 Saisie numérique Touche Désignation Fonction Augmenter les chiffres clignotants Touche de navigation Décaler le point décimal clignotant vers la gauche Diminuer les chiffres clignotants Touche de navigation Décaler le point décimal clignotant vers la droite Sélection des chiffres de gauche à droite Touche de navigation Valider l’entrée Touche de navigation... -
Page 202: Vue D'ensemble Des Affichages
3.2 Vue d’ensemble des affichages Symboles Affichage numérique /menu Unités Affichage Description voir chap. Symbole de batterie Fonction zero tracking activée chap. 12.1 chap. 8.2.1 Indique l’ajustage chap. 8.1 Clignote avant le départ de l’ajustage automatique, seulement les modèles ABJ chap.13.1 Réglage de la stabilité... -
Page 203: Indications Fondamentales (Généralités)
La balance ne doit être utilisée que selon les prescriptions indiquées. Les domaines d´utilisation/d´application dérogeant à ces dernières doivent faire l´objet d´une autori- sation écrite délivrée par KERN. 4.3 Garantie La garantie n´est plus valable en cas •... -
Page 204: Vérification Des Moyens De Contrôle
5.1 Observez les indications du mode d´emploi Lisez attentivement la totalité de ce mode d´emploi avant l´installation et la mise en service de la balance, et ce même si vous avez déjà utilisé des balances KERN. 5.2 Formation du personnel L´appareil ne doit être utilisé... -
Page 205: Emballage / Réexpédition
6.2 Emballage / réexpédition Conservez tous les éléments de l’emballage d’origine en vue d’un éventuel transport en retour. L´appareil ne peut être renvoyé que dans l´emballage d´origine. Avant expédition démontez tous les câbles branchés ainsi que toutes les pièces détachées et mobiles. ... - Page 206 ABS-N_ABJ-NM-BA-f-1715...
-
Page 207: Déballage, Installation Et Mise En Service
7 Déballage, installation et mise en service 7.1 Lieu d´installation, lieu d´utilisation La balance a été construite de manière à pouvoir obtenir des résultats de pesée fiables dans les conditions d´utilisation d´usage. Vous pouvez travailler rapidement et avec précision à condition d´installer votre ba- lance à... -
Page 208: Etendue De La Livraison / Accessoires De Série
7.2.1 Etendue de la livraison / accessoires de série Balance Plateau de pesée Vecteur du plateau de la balance Ecran statique Adaptateur réseau Mode d’emploi Aperçu des menus ABS-N_ABJ-NM-BA-f-1715... -
Page 209: Implantation
7.2.2 Implantation Monter dans l’ordre l’écran statique, le support du plateau de la balance et le plateau de la balance. Procéder à la mise à niveau de la balance à l´aide des vis des pieds, jusqu´à ce que la bulle d´air du niveau se trouve dans le cercle prescrit. ... -
Page 210: Branchement Secteur
Avant le raccordement ou le débranchement d´appareils supplémentaires (impri- mante, PC) à l´interface de données, la balance doit impérativement être coupée du secteur. N´utilisez avec votre balance que des accessoires et des périphériques li- vrés par KERN, ces derniers étant adaptés de manière optimale à votre balance. ABS-N_ABJ-NM-BA-f-1715... -
Page 211: Ajustage
8 Ajustage Etant donné que la valeur d´accélération de la pesanteur varie d´un lieu à l´autre sur la terre, il est nécessaire d´adapter chaque balance – conformément au principe phy- sique fondamental de pesée – à l´accélération de la pesanteur du lieu d´installation (uniquement si la balance n´a pas déjà... - Page 212 Cas 1: Le poids sur le plateau de pesée est proche du zéro. Le symbole du poids se met à clignoter pendant environ deux minutes, suivi de „PSC.RUN“. L’ajustage interne démarre ensuite automatiquement. Afin d’assurer une opération du PSC sans problème, évitez les vibrations et les vagues d’air. ...
- Page 213 Cas 2: Le plateau de pesée est chargé L’affichage des grammes clignote pendant 2 min. , suivi de „PLS.CAL“. Délestez le plateau de pesée. L’affichage des grammes clignote à nouveau pendant 2 min. L’ajustage interne démarre ensuite automatiquement. Afin d’assurer une opé- ration du PSC sans problème, évitez les vibrations et les vagues d’air.
-
Page 214: Réglages Du Menu „I.cal" / „E.cal
8.2 Réglages du menu „I.CAL“ / „E.CAL“ our l’appel de la fonction ajustage en mode de pesée appelez 3 s sur CAL. Valider sur PRINT, le réglage actuel est affiché. Sur les touches de navigation ( ) sélectionner le ré- glage voulu I.CAL: Ajustage avec poids interne (voir chap. -
Page 215: Ajustage Avec Poids Interne (Kern Abj)
8.2.1 Ajustage avec poids interne (KERN ABJ) Avec le poids d’ajustage incorporé la précision de la pesée est susceptible d’être contrôlée et réajustée à tout moment. • Condition préliminaire: Réglage du menu „I.CAL“. • En cas de branchement d’une imprimante en option et fonction GLP acti- vée apparaît „WAIT“... -
Page 216: Ajustage Avec Poids Externe (Kern Abs)
8.2.2 Ajustage avec poids externe (KERN ABS) • Condition préliminaire: Réglage du menu „E.CAL“. • Le poids d’ajustage à utiliser dépend de la capacité de la balance. Réali- sation de l’ajustage le plus près possible de la charge maximale de la balance (poids d’ajustage conseillé... -
Page 217: Protocole D'ajustage
Cette fonction assure l’édition automatique d’un protocole après chaque ajustage. Ces proto- coles peuvent être édités sur une imprimante en option. Exemple d’édition (KERN YKB-01N): - - - - - - - - - - - - - - - - - CAL –EXTERNAL... -
Page 218: N° D'identification De La Balance
Modifier le réglage Appuyer sur TARE Répéter l’appel de ON/OFF ou appuyer pendant 3 s, la balance retourne en mode de pesée 8.4 N° d’identification de la balance Ce paramétrage permet d’inclure un numéro d’identification de balance au rapport de calibrage. -
Page 219: Etalonnage
9 Etalonnage Généralités: D´après la directive UE 90/384/CEE ou 2009/23CE, les balances doivent faire l´objet d´un étalonnage officiel lorsqu´elles sont utilisées tel qu´indiqué ci-dessous (domaine régi par la loi): a) Dans le cadre de relations commerciales, lorsque le prix d´une marchandise est déterminé... - Page 220 Position du cachet: Cachet Plaque d'identification Cachet ABS-N_ABJ-NM-BA-f-1715...
-
Page 221: Pesage
10 Pesage 10.1 Mettre en marche la balance / appeler le mode de pesée Etat balance Appeler le mode de pesée Affichage à l’arrêt Appuyer sur ON/OFF. Après affichage appeler la touche voulue Affichage Appeler la touche voulue Affichage Tous les segments sont allumés La balance se trouve dans le Répéter l’appel de ON/OFF ou appuyer pendant menu... -
Page 222: Régler L'affichage De Démarrage
10.3 Régler l’affichage de démarrage 3 modes au choix peuvent être sélectionnés pour l’affichage du démarrage. Affichage du démarrage Explication Réglage du menu 1. Mode de pesage La balance démarre en mode de pesée après branchement à l’alimentation en courant. 2. - Page 223 Appel du menu En mode de pesée appuyer 2 x sur la touche MENU Appel du point de menu Appeler de façon répétée les touches de navigation ( ) jusqu’à ce qu’apparaisse „TOOLS“. Valider sur PRINT Appeler de façon répétée les touches de navigation (...
-
Page 224: Fonction Auto Power-Off (Fonction De Coupure Automatique)
10.4 Fonction Auto Power-Off (fonction de coupure automatique) Lorsque la fonction est activée l’éclairage d'arrière-plan de l’affichage est coupé après un laps de temps défini pour des raisons d’économie de la batterie en l’absence de changement de charge ou d’une quelconque manipulation. 1. -
Page 225: Pesage Simple
La valeur de pesée peut être éditée sur une imprimante raccordée en option. Exemple d’édition avec fonction GLP activée (voir au chap. 8.3): - - - - - - - - - - - - - - - - - Société KERN &Sohn GmbH TYPE ABJ 220-4NM Modèle SN WBIIAB000I N°... -
Page 226: Tarage
10.6 Tarage Le poids propre d’un quelconque récipient de pesage peut être saisi par la tare sur simple pression d’un bouton, afin que le pesage consécutif affiche le poids net de l’objet pesé. Poser le récipient à peser sur le plateau de la balance et fermer les portes du brise-vent. -
Page 227: Commutation De L'unité De Pesée
10.7 Commutation de l’unité de pesée Par appel de la touche UNIT, l’affichage peut de nouveau être commuté dans les unités préalablement activées dans le menu. Appel du menu Dans le mode de pesée appuyer sur la touche UNIT pendant 3 s. -
Page 228: Unité De Pesée Librement Programmable
10.7.1 Unité de pesée librement programmable Appel du menu Dans le mode de pesée appuyer sur la touche UNIT pendant 3 s. Sélectionner ( ) „UNIT.U“ sur les touches de navigation. Le réglage actuel est symbolisé par l’affichage de la sta- bilité... -
Page 229: Position Point Décimal Pour L'unité De Pesée Librement Programmable
10.7.2 Position point décimal pour l’unité de pesée librement programmable La position du point décimal ne peut être décalée qu’en saisie numérique du facteur de conversion (voir au chap. 9.7.1, phase 2). Lorsque le premier chiffre clignote, répéter la pression sur PRINT jusqu’à... -
Page 230: Modifier La Lisibilité (1D/10D)
10.8 Modifier la lisibilité (1D/10D) Appel du menu En mode de pesée appuyer 2 x sur la touche MENU Appel du point de menu Appeler de façon répétée les touches de navigation ( ) jusqu’à ce qu’apparaisse „TOOLS“. ... -
Page 231: Afficher Le Point Décimal Comme Point Ou Comme Virgule
10.9 Afficher le point décimal comme point ou comme virgule Appel du menu En mode de pesée appuyer 2 x sur la touche MENU Appel du point de menu Appeler de façon répétée les touches de navigation ( ) jusqu’à ce qu’apparaisse „TOOLS“. ... -
Page 232: Menu
11 Menu Le menu permet d’adapter les propriétés de la balance à vos besoins. A l’usine le menu est réglé de sorte à ce que vous n’ayez pas à apporter de modification en règle générale. Si vous avez des conditions de mise en œuvre particulières, vous réglez votre balance individuellement en fonction de vos souhaits sur le menu. -
Page 233: Navigation Dans Le Menu
11.2 Navigation dans le menu • Appel du menu, voir au chap. 11 • Structure des menus • Sélection et passage en revue des points de menu de haut en bas (). • Sélection du réglage à l’intérieur d’une fonction •... -
Page 234: Aperçu Des Menus
11.3 Aperçu des menus Voir également dossier du menu ABS-N_ABJ-NM-BA-f-1715... -
Page 235: Raz Du Menu
11.4 RAZ du menu Tous les réglages sont remis à zéro sur réglage d'usine. La valeur de référence stockée durant l’utilisation précédente de comptage de pièce ou de conversion en pourcentage sera également effacée. Les réglages d’usine portent un astérisque “ ”... -
Page 236: Verrouillage Du Menu
11.5 Verrouillage du menu Les opérations de paramétrage du menu peuvent être verrouillées afin d’éviter des changements de paramètres non souhaités. Le verrouillage de menu se configure de la manière suivante : Soit : Mettre en marche l’alimentation en courant de la balance et attendre l’affichage de „OFF“... -
Page 237: Modifier Le Mot De Passe
11.5.1 Modifier le mot de passe Mot de passe standard (réglage d’usine): „9999“ Appel du menu En mode de pesée appuyer 2 x sur la touche MENU Appel du point de menu Appeler de façon répétée les touches de navigation (... -
Page 238: Consigner Les Réglages Du Menu Dans Un Protocole
11.6 Consigner les réglages du menu dans un protocole Une liste des réglages actuels du menu peut être éditée en cas de raccordement d’une imprimante en option. Edition des données, voir au chap. 16 Appel du menu En mode de pesée appuyer 2 x sur la touche MENU Appel du point de menu ... -
Page 239: Menu Zéro / Tare (Fonctions De Mise À Zéro Et De Tarage)
12 Menu Zéro / tare (fonctions de mise à zéro et de tarage) Fonctions sélectionnables: 1. Fonction Zero tracking Cette fonction permet de corriger automatiquement les petites fluctuations de poids, qui interviennent voir chap. 12.1 directement après la mise en marche. Dans le cas où... - Page 240 12.1 Fonction Zero tracking Départ usine, c’est la fonction „A.ZERO“ de zérotage, qui est en marche. 1. Contrôler le réglage du menu Symbole Zero tracking Fonction Zero tracking marche est affiché arrêt n’est pas affiché 2. Appel de la fonction ...
- Page 241 12.2 Fonction Auto Zéro La fonction Auto Zero n’est pas disponible en mode recette en marche (voir au chap. 14.3). 1. Appel du menu En mode de pesée, appuyer pendant 3 s sur TARE. 2. Sélectionner la fonction ...
- Page 242 12.3 Fonction Auto Tare 1. Appel du menu En mode de pesée, appuyer pendant 3 s sur TARE. 2. Sélectionner la fonction Appeler de façon répétée les touches de navigation ( ) jusqu’à ce que „A.TARE“ soit affiché. Le réglage actuel est symbolisé...
-
Page 243: Fonction Zero / Tare Timing Change
12.4 Fonction Zero / tare timing change La fonction Zero / tare timing change peut être mise en circuit additionnelle- ment lorsque la fonction „Auto zero“ et „Auto tare“ est activée. 1. Appel du menu En mode de pesée, appuyer pendant 3 s sur TARE. ... -
Page 244: Paramétrage De La Stabilité Et De La Réponse
13 Paramétrage de la stabilité et de la réponse Il y a possibilité d’adapter la stabilité de l’affichage et le degré de réaction de la ba- lance aux exigences de certaines applications ou aux conditions de l’environnement. Les mesures peuvent dans la majeure partie des cas être réalisées au moyen des réglages d’usine, à... -
Page 245: Menu)
13.2 Sélection mode de pesée / mode de dosage Appel du mode de pesée: Il s’agit là du réglage d’usine. Utilisez ce mode à moins qu’il soit nécessaire d’augmenter la réponse ou la stabilité. Appel du menu En mode de pesée appuyer 2 x sur la touche MENU Appel du point de menu ... -
Page 246: Etendue D'arrêt
13.3 Etendue d’arrêt Lorsque l’affichage de la stabilité ( ) s’allume, le résultat de la pesée reste stable à l’intérieur de la gamme indiquée par l’étendue d’arrêt. Régler la gamme de détermination de la stabilité: Appel du menu En mode de pesée appuyer 2 x sur la touche MENU Appel du point de menu ... - Page 247 Régler le temps de réaction: Appel du menu En mode de pesée appuyer 2 x sur la touche MENU Appel du point de menu Appeler de façon répétée les touches de navigation ( ) jusqu’à ce qu’apparaisse „TOOLS“. ...
-
Page 248: Fonctions D'application
14 Fonctions d’application • Les fonctions d’application peuvent être combinées avec la fonction Checkweighing ou la fonction Target (voir au chap. 14). • La balance reprend dans le mode, dans lequel elle a été mise hors cir- cuit. • Pour commuter entre application et mode de pesée, appuyer sur MENU pendant 3 s. - Page 249 Fixer la référence Déposer le récipient vide sur la balance et appeler le ta- rage sur TARE. Appuyer 2 x sur MENU. Appeler de façon répétée les touches de navigation ( ) jusqu’à ce que le nombre de pièces de référence voulu soit atteint (nombres de pièces de références au choix 5, 10, 20, 50, 100).
- Page 250 Soit compter d’autres pièces Le point du menu permettant de modifier la référence mémorisée est appelé, la quantité de référence actuelle réglée est affichée. Voir sous „4. Modifier ou ajouter poids à la pièce“ Le poids à la pièce mémorisé est affiché en grammes en associa- tion avec le symbole .
-
Page 251: Détermination Du Pourcentage
14.2 Détermination du pourcentage Le mode pesée à pourcentage permet l’affichage du poids en pourcent, rapporté à un poids de référence. La balance offre deux possibilités: 1. Référence = 100 % 2. Référence = définie par l’utilisateur Appel du menu ... - Page 252 14.2.1 Poids de référence = 100 % Sélectionner le mode de pesage en pourcentage, voir au chap. 14.2 Appuyer sur TARE. Le cas échéant, Appeler de façon répétée les touches de navigation ( ) jusqu’à ce que „SAMPLE“. soit affiché ...
- Page 253 14.2.2 Référence définie par l‘utilisateur Sélectionner le mode de pesage en pourcentage, voir au chap. 13.2 Appuyer sur TARE. Le cas échéant, appeler de façon répétée les touches de navigation ( ) jusqu’à ce que soit affiché „OPTION“. ...
-
Page 254: Détermination Du Pourcentage
14.2.3 Détermination du pourcentage En mode de pesée, appuyer sur MENU pendant 3 s, le mode de détermination du pourcentage est affiché. Déposer le récipient vide sur la balance et appeler le ta- rage sur TARE. Mettre en place le produit pesé. Le poids de l’échantillon est indiqué... -
Page 255: Mode Recette
14.3 Mode recette Cette fonction de recette permet d’ajouter différents composants à un mélange en les pesant. A titre de contrôle, le poids total de tous les composants (CMP001, (CMP002 etc.), ainsi que le poids total (TOTAL) peuvent être édités. La balance fonctionne avec une mémoire séparée pour le poids du récipient de pe- sage et des composants de la recette. - Page 256 Lorsqu’est affiché le symbole , la balance est prête pour d’autres mesures. 6. Retour en mode de pesage Appuyer pendant 3 s sur ON/OFF Exemple d’édition „GLP ON“ (KERN YKB-01N): Société Modèle N° de série N° d’ident. Traîté par...
-
Page 257: Activer L'édition „N° Des Composants
( ) Pas d’édition du „n° des composants“ Modifier sur TARE. Retour au mode des recettes Répéter l’appel de ON/OFF ou appuyer pendant 3 s Exemples d’éditions (KERN YKB-01N): Fonction ELM.NUM activée Fonction ELM.NUM désacti- vée FORMULATION MODE... -
Page 258: Activer L'édition De „Total
( ) Pas d’édition „TOTAL“ Modifier sur TARE. Retour au mode des recettes Répéter l’appel de ON/OFF ou appuyer pendant 3 s Exemples d’éditions (KERN YKB-01N): Fonction TOTAL activée Fonction TOTAL désactivée FORMULATION MODE FORMULATION MODE CMP001=... -
Page 259: Mode Checkweighing Et Target (Pesées De Contrôle Et Pesées Ciblées)
15 Mode Checkweighing et Target (pesées de contrôle et pesées ciblées) • Le mode Checkweighing ou Target peut être appliqué aux fonctions d’application (voir au chap. 14). • La balance reprend dans le mode, dans lequel elle a été mise hors cir- cuit. - Page 260 1. Appel du menu En mode de pesée appuyer 2 x sur la touche MENU 2. Sélectionner la fonction Appeler de façon répétée les touches de navigation ( ) jusqu’à ce qu’apparaisse „TOOLS“. Valider sur PRINT Appeler de façon répétée les touches de navigation (...
- Page 261 Valider sur TARE. Appeler de façon répétée les touches de navigation ( ) jusqu’à ce que „LO.LIM“ soit affiché. Appuyer sur TARE. Le réglage actuel est affiché. Sur les touches de navigation ( ) saisir la valeur désirée, voir au chap.
- Page 262 4. Retour en mode de pesage Répéter l’appel de ON/OFF ou appuyer pendant 3 s 5. Démarrer le contrôle de la tolérance Le cas échéant, déposer le récipient vide sur la balance et appeler le tarage sur TARE. Mettre le produit à peser, attendre que l’indicateur apparaisse.
-
Page 263: Target Mode
15.2 Target mode Ce mode sert p. ex. à peser des quantités de liquides constantes ou à évaluer les quantités manquantes ou les excédents en surnombre. La valeur ciblée est la valeur numérique, qui correspond à l’unité de la valeur de consigne utilisée pour la pesée. - Page 264 1. Appel du menu En mode de pesée appuyer 2 x sur la touche MENU 2. Sélectionner la fonction Appeler de façon répétée les touches de navigation ( ) jusqu’à ce qu’apparaisse „TOOLS“. Valider sur PRINT Appeler de façon répétée les touches de navigation (...
- Page 265 Valider sur TARE. 4. Retour en mode de pesage Répéter l’appel de ON/OFF ou appuyer pendant 3 s 5. Démarrer le contrôle de la tolérance Le cas échéant, déposer le récipient vide sur la balance et appeler le tarage sur TARE.
-
Page 266: Sortie Des Données
• Les paramètres de communication (vitesse de transmission en bauds, bits et parité) doivent coïncider entre la balance et l’imprimante. 16.1 Attribution des pins Par le branchement d’un câble d’interface KERN en option, la balance est équipée d’une interface RS232C. Balance (RS-232C) -
Page 267: Fonctions D'édition
16.2 Fonctions d’édition 16.2.1 Edition automatique des données / fonction Auto Print L’édition des données se fait automatiquement sans appel de PRINT, dès que la condition d’édition correspondante est remplie. Celle-ci est définie par un réglage du menu. Tab. 1: Stable / Stable / Stabilisation /... - Page 268 Les autres démarches dépendent du réglage voulu: Affichage de stabilité Fonction Réglage / actualisation Coupure Appuyer sur TARE Appuyer sur PRINT et Marche et la suite à la la suite à la phase 3. phase 5. Appuyer sur TARE et Continuer par la Arrêt la suite à...
-
Page 269: Fonction D'édition Continue Des Données / Continuous Output
16.2.2 Fonction d’édition continue des données / Continuous Output (uniquement les modèles ABS-N) 1. Appel du menu Data Output En mode de pesée appuyer pendant 3 s sur PRINT. 2. Sélectionner la fonction Appeler de façon répétée les touches de navigation ( ) jusqu’à... - Page 270 4. Mettre en œuvre un filtre Appeler de façon répétée les touches de navigation ( ) jusqu’à ce que „NO.FIL“ soit affiché. Le réglage ac- tuel est symbolisé par l’affichage de la stabilité ( ). avec ( ) La valeur de la pesée est filtrée sans ( ) Valeur de pesée n’est pas filtrée ...
-
Page 271: Fonction Output Timing Change
16.2.3 Fonction Output Timing Change Avec cette fonction il est possible de choisir, si l’édition des données doit intervenir avec les valeurs de pesée stables / instables après pression sur PRINT. 1. Appel du menu Data Output En mode de pesée appuyer pendant 3 s sur PRINT. 2. -
Page 272: Fonction Glp Output / Numéro D'identification De La Balance
Teneur de l’entête et du pied de page voir l’exemple d’édition suivant. Activer la fonction GLP Output, voir au chap. 8.3 Saisir le numéro d’identification de la balance, voir au chap. 8.4 Exemple d’édition: KERN & Sohn GmbH Société TYPE ABJ 220-4NM Modèle SN WBIIAB000I N°... -
Page 273: Paramètres De Communication
(voir au chap. 16.3.2). Para- Para- Para- Para- Para- Réglage Réglages mètres mètres mètres mètres mètres pour KERN définis par standard 1 standard 2 standard 3 standard 4 standard 5 l’utilisateur –YKB-01N Sélection MODE 1 MODE 2 MODE 3... -
Page 274: Sélection D'un Réglage Standard „Mode 1 - Mode 5
16.3.1 Sélection d’un réglage standard „MODE 1 - MODE 5“ 1. Appel du menu Data Output En mode de pesée appuyer pendant 3 s sur PRINT. 2. Sélectionner la fonction Appeler de façon répétée les touches de navigation ( ) jusqu’à... -
Page 275: Réglages Définis Par L'utilisateur „Mode U" / Réglage Pour Kern -Ykb-01N
16.3.2 Réglages définis par l’utilisateur „MODE U“ / réglage pour KERN –YKB-01N Sous le point du menu „MODE U“ chaque paramètre de communication est suscep- tible d’être réglé individuellement. 1. Appel du menu Data Output En mode de pesée appuyer pendant 3 s sur PRINT. - Page 276 3. Régler la vitesse de communication (taux de bauds) Appeler PRINT Appeler de façon répétée les touches de navigation ( ) jusqu’à ce que „BPS“ soit affiché. Appeler PRINT . Le réglage actuel est symbolisé par l’affichage de la stabilité ( ). ...
- Page 277 5. Réglage de l’octet d’arrêt Retour au menu sur ON/OFF Appeler de façon répétée les touches de navigation ( ) jusqu’à ce que „STOP“ soit affiché. Appeler PRINT . Le réglage actuel est symbolisé par l’affichage de la stabilité ( ). ...
- Page 278 7. Réglage du format des données Retour au menu sur ON/OFF Appeler de façon répétée les touches de navigation ( ) jusqu’à ce que „D.FORM“ soit affiché. Appeler PRINT . Le réglage actuel est symbolisé par l’affichage de la stabilité ( ). ...
-
Page 279: Formats De Données
2 positions avec O L Unité de pesée Caractères blancs C/R = 0DH, L/F = 0AH dans le cas de CR+LF la longueur des données est rallongée Exemples d’édition KERN YKB-01N 9.9949g Valeur de pesée stable ou instable/ valeur de pesée positive -9.9949g Valeur de pesée stable ou instable/négative... - Page 280 2 positions avec O L Unité de pesée Caractères blancs C/R = 0DH, L/F = 0AH dans le cas de CR+LF la longueur des données est rallongée Exemples d’édition KERN YKB-01N 9.9949 g Valeur de pesée stable/positive 9.9949 g Valeur de pesée instable/positive -9.9949 g...
- Page 281 Unité de pesée Caractères blancs C/R = 0DH, L/F = 0AH dans le cas de CR+LF la longueur des données est rallongée Exemples d’édition KERN YKB-01N +9.9949 g Valeur de pesée stable ou instable/ valeur de pesée positive -9.9949 g Valeur de pesée stable ou instable/négative...
- Page 282 2 positions avec O L Unité de pesée Caractères blancs C/R = 0DH, L/F = 0AH dans le cas de CR+LF la longueur des données est rallongée Exemples d’édition KERN YKB-01N +9.9949 g Valeur de pesée stable/positive +9.9949 g Valeur de pesée instable/positive -9,9949 g Valeur de pesée stable/négative...
-
Page 283: Commandes À Distance
16.5 Commandes à distance Ordre Fonction Edition continue des données Edition permanente de données valeurs de pesées stables Le statut de l’affichage de la stabilité est annexé lors de l’édition continue des données. U: instable S stable Edition unique Edition automatique Edition unique. -
Page 284: Maintenance, Entretien, Élimination
17 Maintenance, entretien, élimination 17.1 Nettoyage Avant le nettoyage, coupez l´appareil de la tension de service. Fig. 1 : Nettoyer la balance 1. Afficheur N´utiliser pas de produits de nettoyage agressifs (dissolvants ou produits similaires) mais uniquement un chiffon humidifié de les- sive douce de savon. - Page 285 1. Enlever l’écran statique, le plateau de la balance et le vecteur du plateau de la balance 2. Retirer la poignée en plastique en la tournant. Ne toucher pas au support du plateau de pesée. Sinon, la ba- lance pourrait être endommagée. 3.
-
Page 286: Maintenance, Entretien
17.2 Maintenance, entretien L´appareil ne doit être ouvert que par des dépanneurs formés à cette fin et ayant re- çu l´autorisation de KERN. Avant d´ouvrir l´appareil, couper ce dernier du secteur. 17.3 Mise au rebut L´élimination de l´emballage et de l´appareil doit être effectuée par l´utilisateur selon le droit national ou régional en vigueur au lieu d´utilisation. -
Page 287: Messages D'erreur
18.1 Messages d’erreur Message explication Remède d’erreur Mettre la balance à l’arrêt et la remettre en marche. Si le mes- ERR H Erreur du matériel informatique sage d´erreur ne disparaît pas, informer le fabricant. Grand décalage du point-zéro en cours d’ajustage Sur ON/OFF retour au mode de ERR C Des objets se trouvent sur le...
Need help?
Do you have a question about the ABS-N Series and is the answer not in the manual?
Questions and answers