
Subscribe to Our Youtube Channel
Related Manuals for Yealink CP960


Summary of Contents for Yealink CP960
- Page 1 HD IP Conference Phone CP960 English | Deutsch | Español | Français Quick Start Guide (V83.5) Applies to firmware version 73.80.0.35 or later. www.yealink.com...
- Page 3 Table of Contents English ............1 Deutsch ............13 Español ............25 Français ............37...
-
Page 5: Package Contents
Refer to Wireless Network Connection mentioned below in Configuring Your Phone for more information. Note: The IP phone should be used with Yealink original PoE adapter (54V/0.56A) only. The use of the third-party PoE adapter may cause the damage to the phone. - Page 6 2. Connect the optional PC. Micro USB Port 3. Connect the optional external speaker. 4. Connect the optional USB flash drive. Startup After the IP phone is connected to the network and supplied with power, it automatically begins the initialization process. After startup, the phone is ready for use.
-
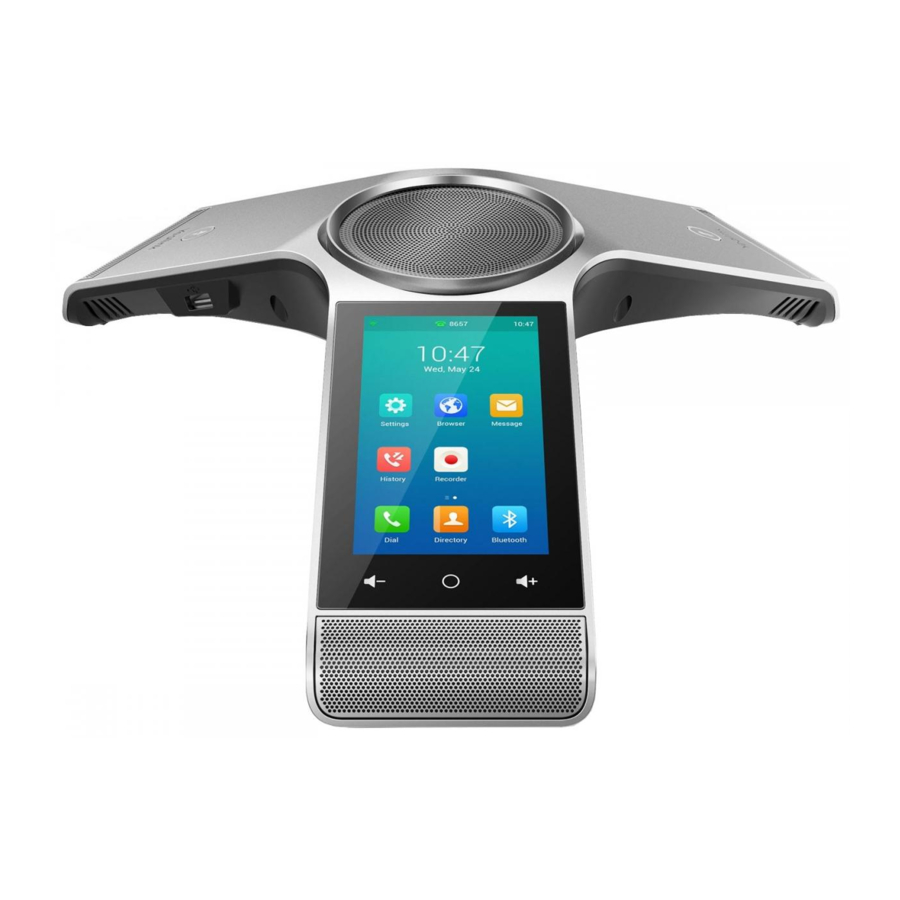
Page 7: Hardware Component Instructions
Hardware Component Instructions Microphone Microphone Mute Indicator LED Mute Indicator LED Speaker Touch Screen Volume(-) Touch Key Volume(+) Touch Key Microphone Home Touch Key Security Slot 3.5mm Audio-out Port Network Port USB Port Micro USB Port USB Port... -
Page 8: Using The Touch Screen
Using the Touch Screen DSS Key Screen Home Screen Status Bar Tap to configure a DSS key Digital Clock DSS key list Applications Screen Indicator Shortcut Keys Swipe left or right to switch between two idle screens. Control Center and Notification Center Swipe down from the top of the screen to enter the control center and the notification center. -
Page 9: Configuring Your Phone
Configuring Your Phone Configuring via web user interface Accessing the web user interface: 1. Tap Settings->General to obtain the IP address of the phone. 2. Open a web browser on your computer, enter the IP address into the address bar (e.g., "http://192.168.0.10" or “192.168.0.10”), and then press Enter. -
Page 10: Basic Call Features
Basic Call Features Placing a Call You can place a call by manually entering a phone number, or to a contact from Directory or History. From the Home screen, do one of the following: • Tap Dial, enter the phone number, and then tap Send. •... -
Page 11: Customizing Your Phone
To forward an incoming call to a contact: 1. Tap from the Incoming Call screen. 2. Enter the number you want to forward to. You can also select a contact from Directory or History. The call is forwarded to the contact directly. 3. - Page 12 Call History 1. Tap History from the Home screen. 2. Tap All Local Calls, and then select the desired call history list. 3. Drag up and down to scroll. 4. Tap after the desired entry, and then you can do the following: •...
-
Page 13: Safety Instructions
• Without prior written consent, no organization or individual is permitted to make any change to the structure or the safety design of the device. Yealink is under no circumstance liable to consequences or legal issues caused by such changes. - Page 14 ENVIRONMENTAL RECYCLING Never dispose of the device with domestic waste Ask your Town Council about how to dispose of it in an environmentally friendly way. The cardboard box, plastic packaging and player components may be recycled in accordance with prevailing recycling regulations in your country. Always adhere to prevailing regulations Those who fail to do so may be fined or prosecuted in accordance with the law.
-
Page 15: Declaration Of Conformity
YEALINK (XIAMEN) NETWORK TECHNOLOGY CO.,LTD WWW.YEALINK.COM Declaration of Conformity YEALINK (XIAMEN) NETWORK TECHNOLOGY CO.,LTD Address: 309, 3th Floor, No.16, Yun Ding North Road, Huli District, Xiamen City, Fujian, P.R. China DATE: 30/Jane/2017 declare that the product Type: HD IP Conference Phone... - Page 16 As one of the best providers in more than 140 countries and regions including the US, the UK and Australia, Yealink ranks No.1 in the global market share of SIP phones shipments.
-
Page 17: Installation Des Telefons
Ausführungen zu Funknetzwerkverbindungen unter Konfigurieren Ihres Telefons nach. Hinweis: Das IP-Telefon darf nur mit dem originalen PoE-Netzteil von Yealink (54 V / 0,56 A) betrieben werden. Die Verwendung von PoE-Netzteilen von Drittanbietern kann zur Beschädigung des Telefons führen. Das Kabel sollte ersetzt werden, wenn die Kabelummantelung beschädigt ist. - Page 18 2. Anschluss eines optionalen PCs. MicroUSB-Port 3. Anschluss eines optionalen Lautsprechers. 4. Anschluss eines optionalen USB-Datenträgers. Startvorgang Nach der Verbindung mit dem Netzwerk und der Stromversorgung startet das IP-Telefon automatisch den Initialisierungsprozeß. Nach dem Startvorgang ist das Telefon betriebsbereit. Sie können das Telefon via Weboberfläche oder Benutzeroberfläche des Telefons konfigurieren.
- Page 19 Anweisungen zu Hardwarekomponenten Mikrofonkapsel Mikrofonkapsel Anzeige-LED Stummschaltung Anzeige-LED Stummschaltung Lautsprecher Touchscreen Berührungssensitive Lautstärketaste (-) Berührungssensitive Lautstärketaste (+) Mikrofonkapsel Berührungssensitive Taste Startbildschirm Sicherheitssteckplatz 3,5 mm Audioausgangs-Port Netzwerk-Port USB-Anschluss MicroUSB-Port USB-Anschluss...
-
Page 20: Verwendung Des Touchscreens
Verwendung des Touchscreens Direktruftasten-Bildschirm Startbildschirm Statusbalken Tippen Sie eine Direktruftaste an, um Digitale Uhr sie zu konfigurieren Direktruftasten-Liste Anwendungen Bildschirm- anzeiger Schnellwahl- tasten Streichen Sie nach links oder rechts, um zwischen zwei Untätigkeitsbildschirmen umzuschalten. Systemsteuerung und Mitteilungszentrale Streichen Sie vom oberen Bildschirmrand nach unten, um die Systemsteuerung und die Mitteilungszentrale zu öffnen. Datum und Uhrzeit Das Icon für kabellose Mikrofone und die Anzahl verbundener kabelloser Mikrofone. - Page 21 Konfiguration Ihres Telefons Konfiguration über die Weboberfläche Zugriff auf die Weboberfläche: 1. Tippen Sie auf Einstellungen->Allgemein, um die IP-Adresse Ihres Telefons zu ermitteln. 2. Öffnen Sie an Ihrem Computer den Webbrowser, geben Sie die IP-Adresse in die Adresszeile ein (z.B. „http://192.168.0.10“ oder „192.168.0.10“) und drücken Sie dann Bestätigen. 3.
- Page 22 Grundlegende Anruffunktionen Anruf tätigen Sie können einen Anruf tätigen, indem Sie eine Telefonnummer manuell eingeben oder einen Kontakt aus dem Telefonbuch oder der Verlauf. Führen Sie dazu im Homeverzeichnis eine der nachstehenden Aktionen aus: • Tippen Sie auf Senden, geben Sie die Telefonnummer ein und tippen Sie anschließend auf Anrufen. •...
- Page 23 Um einen eingehenden Anruf zu einem Kontakt umzuleiten: 1. Tippen Sie auf dem Eingehendes-Gespräch-Bildschirm 2. Geben Sie die Nummer ein, an die Anrufe umgeleitet werden sollen. Sie können ebenfalls einen Kontakt aus dem Telefonbuch oder der Verlauf auswählen. Der Anruf wird direkt zu dem Kontakt umgeleitet.
- Page 24 Anrufliste 1. Tippen Sie im Homeverzeichnis auf Verlauf. 2. Tippen Sie auf Lokale Rufliste und wählen Sie anschließend die gewünschte Anrufliste aus. 3. Ziehen Sie nach oben und unten um zu blättern. 4. Wenn Sie den gewünschten Eintrag ausgewählt haben und anschließend angetippt haben, haben Sie folgende Möglichkeiten: •...
- Page 25 Wartungscenter für eine Reparatur. Ohne vorherige schriftliche Zustimmung dürfen weder Unternehmen noch Einzelperson Änderungen an der Struktur oder dem Sicherheitskonzept des Geräts vornehmen. Yealink übernimmt unter keinen Umständen die Haftung für Folgen oder Rechtsansprüche, die auf solche Änderungen zurückzuführen sind.
- Page 26 Reinigungsvorschriften Bevor Sie das Gerät reinigen, schalten Sie es aus und trennen Sie es von der Stromversorgung. Verwenden Sie ein trockenes, weiches und antistatisches Tuch zum Reinigen des Geräts. Halten Sie das Netzkabel sauber und trocken. Über einen schmutzigen oder nassen Netzstecker kann es zu einem elektrischen Schlag oder anderen Gefahren kommen.
- Page 27 YEALINK (XIAMEN) NETWORK TECHNOLOGY CO.,LTD WWW.YEALINK.COM Konformitätserklärung Wir, YEALINK (XIAMEN) NETWORK TECHNOLOGY CO.,LTD Adresse: 309, 3rd Floor, No.16, Yun Ding North Road, Huli District, Xiamen City, Fujian, P.R. China DATUM: 30. Juni 2017 erklären hiermit, dass das Produkt Typ: HD-IP-Konferenztelefon Modell: CP960 die grundlegenden Anforderungen und andere relevante Bestimmungen der folgenden EG-Richtlinie erfüllt.
- Page 28 Yealink ist ein weltweit führender Hersteller von Enterprise Communication and Collaboration Solutions, der weltweit operierenden Unternehmen Video-Konferenz-Services bietet. Fokussiert auf Forschung und Entwicklung zeichnet sich Yealink durch Innovationen und Kreativität aus. Mit den herausragenden technischen Patenten in den Bereichen Cloud Computing, Audio, Video und Bildverarbeitungstechnologie hat Yealink eine umfassende Collaboration Solution für Audio- und Video-Konferenzen geschaffen, indem es seine Cloud Services mit einer Serie von Endpunkt-Produkten ergänzt hat.
-
Page 29: Contenido Del Embalaje
El CPW90 le permite ampliar el alcance del audio del teléfono IP. Para obtener más información, consulte la guía rápida de inicio correspondiente al CPW90 de Yealink. Se recomienda usar los accesorios suministrados o aprobados por Yealink. El uso de accesorios de terceros no aprobados puede afectar al funcionamiento. -
Page 30: Puesta En Funcionamiento
2. Conecte el ordenador opcional. Puerto micro USB 3. Conecte un altavoz externo opcional. 4. Conecte la memoria USB opcional. Ñ Puesta en funcionamiento El proceso de inicialización empezará automáticamente cuando el teléfono IP esté conectado a la red y reciba alimentación. El teléfono estará... - Page 31 Instrucciones para los componentes de hardware Micrófono Micrófono LED indicador de audio LED indicador de audio desactivado desactivado Altavoz Pantalla táctil Tecla táctil de volumen (-) Tecla táctil de volumen (+) Micrófono Tecla táctil de inicio Ranura de seguridad Puerto de salida de audio de 3,5 mm Ñ...
-
Page 32: Uso De La Pantalla Táctil
Uso de la pantalla táctil Pantalla de teclas de selección Pantalla de inicio directa de estación (DSS) Barra de estado Pulse para configurar una Reloj digital tecla DSS Lista de teclas Aplicaciones Indicador de pantalla Teclas de método abreviado Deslice de izquierda a derecha para alternar entre las dos pantallas en suspensión. Centro de control y centro de notificaciones Deslice el dedo de arriba a abajo en la pantalla para entrar en el centro de control y el centro de notificaciones. -
Page 33: Configuración Del Teléfono
Configuración del teléfono Configuración a través de la interfaz web Acceso a la interfaz web: 1. Seleccione Ajustes->General para obtener la dirección IP del teléfono. 2. Abra el navegador de la Web en su ordenador, introduzca la dirección IP en la barra de direcciones (por ejemplo, "http://192.168.0.10"... - Page 34 Funcionalidades básicas de llamadas Hacer una llamada Es posible hacer una llamada introduciendo manualmente un número de teléfono, o llamar a un contacto desde el Directorio o el Historial. En la pantalla de inicio, realice una de las siguientes acciones: •...
- Page 35 Para desviar una llamada entrante a un contacto: 1. Pulse en la pantalla de llamadas entrantes. 2. Introduzca el número al que quiera desviar la llamada. También es posible seleccionar un contacto del Directorio o del Historial. La llamada se transfiere directamente al contacto.
- Page 36 Historial de llamadas 1. Pulse Historial en la pantalla de inicio para acceder al historial. 2. Pulse Llamadas locales y seleccione la lista deseada de historial de llamadas. 3. Arrastre hacia arriba y hacia abajo para desplazarse 4. Pulse después de la entrada deseada para luego poder hacer lo siguiente: •...
-
Page 37: Instrucciones De Seguridad
No se permite hacer modificaciones en la estructura ni el diseño de seguridad del dispositivo sin previo consentimiento por escrito. Yealink no será responsable bajo ninguna circunstancia de las consecuencias o problemas legales derivados de dichas modificaciones. - Page 38 RECICLAJE AMBIENTAL Nunca deseche el equipo con los residuos domésticos Pregunte en su ayuntamiento cómo desecharlo de forma respetuosa con el medio ambiente. Se debe reciclar caja de cartón, el embalaje de plástico y los componentes en conformidad con la normativa de reciclaje vigente en su país.
-
Page 39: Declaración De Conformidad
YEALINK (XIAMEN) NETWORK TECHNOLOGY CO.,LTD WWW.YEALINK.COM Declaración de conformidad Declarante: YEALINK (XIAMEN) NETWORK TECHNOLOGY CO.,LTD Dirección: 309, 3th Floor, No.16, Yun Ding North Road, Huli District, Xiamen City, Fujian, P.R. China FECHA: 30 de enero de 2017 Declara que el producto Tipo: Teléfono IP HD para conferencias... - Page 40 Como uno de los mejores proveedores en más de 140 países y regiones, incluidos los EE. UU., El Reino Unido y Australia, Yealink ocupa el número 1 en la cuota del mercado global de los envíos de teléfonos SIP.
-
Page 41: Contenu De La Boîte
Ç Remarque : Le téléphone IP doit uniquement être utilisé avec l’adaptateur PoE original de Yealink (54 V/0,56 A). L'utilisation d'un adaptateur PoE tiers est susceptible d'endommager le téléphone. Le câble doit être remplacé dès que sa gaine est déchirée. - Page 42 3. Connectez le PC facultatif. Port micro-USB 4. Connectez le haut-parleur externe facultatif. 5. Connectez la clé USB facultative. Démarrage Une fois que le téléphone IP est connecté au réseau et est alimenté en courant, la procédure d’initialisation démarre automatiquement. Après le démarrage, le téléphone est prêt à...
- Page 43 Instructions concernant les composants matériels Microphone Microphone Voyant microphone coupé Voyant microphone coupé Haut-parleur Écran tactile Touche tactile Volume(-) Touche tactile Volume(+) Microphone Touche tactile Accueil Emplacement de sécurité Sortie audio 3,5 mm Port réseau Port USB Port micro-USB Port USB Ç...
-
Page 44: Utilisation De L'écran Tactile
Utilisation de l’écran tactile Écran touches DSS Écran d'accueil Barre d’état Appuyez pour configurer une Horloge touche DSS numérique Liste des touches DSS Applications Indicateur d’écran Touches de raccourci Balayez vers la gauche ou vers la droite pour basculer entre deux écrans de veille. Centre de contrôle et centre de notification Balayez l’écran de haut en bas pour entrer dans le centre de contrôle et le centre de notification. - Page 45 Configuration de votre téléphone Configuration via l’interface utilisateur web Accès à l’interface utilisateur web : 1. Appuyez sur Paramètres->Général pour obtenir l’adresse IP du téléphone. 2. Ouvrez le navigateur web sur votre ordinateur, saisissez l'adresse IP dans la barre d'adresse (par exemple «...
- Page 46 Fonctions d’appel de base Passer un appel Vous pouvez passer un appel en saisissant manuellement un numéro de téléphone, ou en sélectionnant un contact depuis l’écran Répertoire ou Historique. Depuis l’écran d'accueil, effectuez l'une des actions suivantes : • Appuyez sur Env., saisissez le numéro de téléphone puis appuyez sur Env.. •...
-
Page 47: Personnaliser Votre Téléphone
Pour renvoyer un appel entrant vers un contact : 1. Appuyez sur depuis l'écran appel entrant. 2. Saisissez le numéro vers lequel vous souhaitez renvoyer les appels. Vous pouvez également sélectionner un contact depuis l'écran Répertoire ou Historique. L'appel est directement renvoyé... - Page 48 Historique des appels 1. Appuyez sur Historique depuis l’écran d’accueil. 2. Appuyez sur Appels locaux, puis sélectionnez l'historique des appels souhaité. 3. Balayez l’écran vers le haut ou vers le bas pour le faire défiler. 4. Appuyez sur après avoir sélectionné l’entrée souhaité, puis vous pourrez effectuer les actions suivantes : •...
-
Page 49: Consignes De Sécurité
Sans consentement écrit préalable, aucune organisation ou individu n’est autorisé à apporter des changements à la structure ou au dispositif de sécurité de l’appareil. Yealink n’est en aucun cas responsable des conséquences ou des problèmes juridiques causés par ces changements. - Page 50 RECYCLAGE ENVIRONNEMENTAL Ne jetez pas cet appareil avec les déchets ménagers Contactez vos collectivités locales pour savoir comment l’éliminer de façon écologique. La boîte en carton, l’emballage en plastique et les composants de l’appareil peuvent être recyclés conformémentà la réglementation en vigueur dans votre pays. Respectez toujours la réglementation en vigueur Les personnes qui l’enfreignent sont passibles de poursuites judiciaires.
-
Page 51: Déclaration De Conformité
YEALINK (XIAMEN) NETWORK TECHNOLOGY CO.,LTD WWW.YEALINK.COM Déclaration de conformité Nous, YEALINK (XIAMEN) NETWORK TECHNOLOGY CO.,LTD Adresse : 309, 3th Floor, No.16, Yun Ding North Road, Huli District, Xiamen City, Fujian, P.R. Chine DATE : 30 juin 2017 déclarons que le produit Type : Téléphone de conférence IP HD... - Page 52 à la pointe de la technologie. En tant que leader dans plus de 140 pays incluant les Etat-Unis, le Royaume-Uni et l’Australie, Yealink se hisse au premier rang sur le marché...
Need help?
Do you have a question about the CP960 and is the answer not in the manual?
Questions and answers